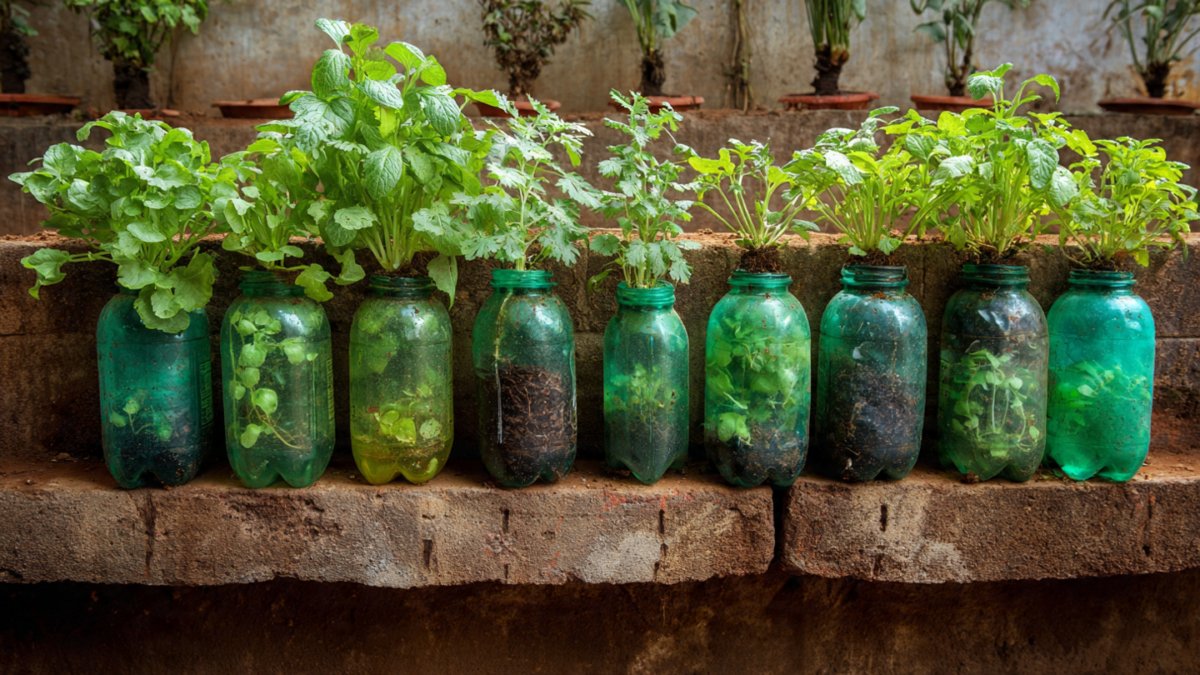
Growing your own vegetables at home has become increasingly popular, and for good reason. Freshly harvested produce is more nutritious, tastes better, and helps you reduce grocery expenses. But not everyone has a backyard or garden space, which can make traditional vegetable gardening challenging. The solution? Using recycled plastic bottles to grow vegetables at home. This sustainable and space-saving method turns ordinary waste into a productive mini-garden, making it perfect for apartments, balconies, and even small patios.
Recycling plastic bottles into vegetable planters not only reduces environmental waste but also allows anyone to grow food easily and affordably. In this guide, we’ll walk you through everything you need to know to start your own home vegetable garden using plastic bottles.
Why Use Plastic Bottles for Vegetable Gardening
Plastic bottles are among the most commonly discarded items worldwide. Instead of letting them end up in landfills, repurposing them for gardening is an eco-friendly way to give them a second life. Using bottles for growing vegetables has several benefits:
- Space-saving: Bottles can be hung vertically, stacked, or arranged in rows, making them ideal for small areas.
- Cost-effective: They are free if you recycle what you already have at home.
- Portable: Bottle gardens are lightweight and can be moved easily to optimize sunlight.
- Customizable: Bottles can be cut, painted, or arranged in any pattern you like.
This method allows anyone, even with minimal space or resources, to cultivate a variety of vegetables and enjoy fresh, home-grown produce.
Materials Needed
To start your plastic bottle vegetable garden, you will need some basic materials that are easy to find:
- Plastic bottles (1 to 2 liters work best)
- Sharp scissors or a craft knife
- A nail or screwdriver to make drainage holes
- Potting soil
- Compost or organic fertilizer
- Rope, twine, or wire for hanging (optional for vertical setups)
- Seeds or seedlings of vegetables you want to grow
Optional materials include paint, labels, and decorations to personalize your garden.

Choosing the Right Vegetables
Not all vegetables are suitable for bottle gardening. Choose varieties that grow well in small spaces and have shallow root systems. Some ideal options include:
- Leafy greens: Spinach, lettuce, arugula, and kale grow quickly and thrive in containers.
- Herbs: Basil, coriander, mint, parsley, and chives are perfect for small spaces.
- Small vegetables: Cherry tomatoes, chilies, radishes, spring onions, and bell peppers can thrive in bottles.
- Companion plants: Mix herbs with vegetables to improve growth and repel pests naturally.
Avoid planting root-heavy vegetables like potatoes or large squash, as they require more soil depth than bottles can provide.
Preparing the Plastic Bottles
- Clean the bottles: Wash them thoroughly to remove any residue or chemicals. Remove labels for a neat look.
- Cutting the bottles: Decide whether you want to place the bottles horizontally or vertically. For horizontal placement, cut a rectangular opening along the side for planting. For vertical setups, cut the top off or create a side opening.
- Drainage holes: Use a heated nail or screwdriver to make small holes in the bottom of each bottle. This is essential to prevent waterlogging and root rot.
- Optional holes for hanging: If you plan a vertical garden, make two small holes at the top for threading rope or wire.
These steps prepare the bottles for planting and ensure your vegetables grow in healthy conditions.
Making the Soil Mix
Vegetables need nutrient-rich, well-draining soil to thrive in limited container space. A good soil mix includes:
- 2 parts potting soil
- 1 part compost
- 1 part sand or coco peat for aeration and moisture retention
Mix the components thoroughly before filling the bottles. Adding a small amount of organic fertilizer helps boost growth, but avoid chemical fertilizers that may damage delicate plants.
Planting the Vegetables
Once the bottles are prepared and filled with soil, you can begin planting:

- Seeds: Plant seeds according to the depth specified on the packet, usually shallowly, and cover lightly with soil. Water gently after planting.
- Seedlings: Make a small hole in the soil, place the seedling carefully, and gently press soil around the roots.
Space the plants properly in each bottle to prevent overcrowding, which can stunt growth. One medium-sized plant or two small herbs per bottle works well.
Setting Up Vertical or Horizontal Gardens
Vertical setup: Vertical gardens save space and create an eye-catching display. Hang bottles using rope, twine, or wire. Ensure each bottle is stable and evenly spaced. Secure the ropes to wall hooks, balcony rails, or a wooden frame.
Horizontal setup: Horizontal placement works well on window sills or shelves. Arrange bottles side by side, ensuring they get adequate sunlight. You can even stack them in tiers for a small vertical effect.
In both setups, ensure that bottles are easily accessible for watering, pruning, and harvesting.
Watering and Fertilizing
Container-grown vegetables dry out faster than garden beds, so regular watering is essential. Check soil daily and water when the top inch feels dry. Water slowly to ensure the roots absorb moisture evenly.
Fertilize every two to three weeks using organic liquid fertilizers or compost tea. This replenishes nutrients in the limited soil and encourages healthy growth. Avoid over-fertilizing, especially with nitrogen-heavy fertilizers, as this can lead to excessive leaf growth at the expense of vegetables.

Managing Pests and Diseases
Plastic bottle gardens are less prone to pests, but you may still encounter:
- Aphids
- Spider mites
- Caterpillars
Inspect plants weekly and remove affected leaves. For natural pest control, spray neem oil or mild soapy water. Avoid chemical pesticides, especially if your vegetables are meant for consumption.
Proper airflow is also important. Ensure bottles are not too close together and avoid overwatering, which can lead to fungal diseases.
Harvesting Your Vegetables
Knowing when to harvest is key to enjoying the best flavor and nutrition:
- Leafy greens and herbs: Begin harvesting once leaves are mature enough, usually 30–45 days after planting. Regular harvesting encourages new growth.
- Cherry tomatoes and peppers: Harvest when fruits are fully colored and firm.
- Radishes and spring onions: These mature quickly, typically within 25–35 days.
Harvest carefully to avoid damaging the plant, allowing it to continue producing vegetables.
Benefits of Recycling Plastic Bottles for Gardening
Recycling plastic bottles for vegetable gardening offers numerous benefits:

- Environmental impact: Reduces plastic waste in landfills and oceans.
- Sustainability: Promotes self-sufficiency by growing your own food.
- Cost savings: Minimizes the need to buy herbs and vegetables from stores.
- Health benefits: Fresh vegetables are more nutritious and free from harmful chemicals.
- Educational: Teaches children and adults about recycling, sustainability, and gardening.
This simple DIY project turns ordinary waste into something valuable and productive.
Tips for Success
- Use bottles of the same size to maintain uniformity in your garden.
- Rotate the bottles periodically to ensure even sunlight exposure.
- Consider companion planting to maximize space and protect plants naturally.
- Personalize your bottles with paint or labels for an attractive display.
- Regularly prune and remove dead leaves to maintain plant health.
With consistent care and attention, your bottle garden can produce fresh vegetables for months.
Conclusion
Recycling plastic bottles to grow vegetables at home is an innovative and sustainable solution for modern living. It combines environmental responsibility, creativity, and practicality, making it ideal for small spaces. By repurposing plastic bottles, preparing nutrient-rich soil, selecting the right vegetables, and maintaining proper care, anyone can create a thriving home garden.
This approach not only reduces waste but also promotes healthier eating habits, saves money, and adds greenery to your surroundings. Whether you’re an experienced gardener or a beginner, a plastic bottle vegetable garden is a rewarding and eco-friendly project that brings the satisfaction of growing your own food directly to your home.
By starting small, you can gradually expand your garden, experiment with different plants, and enjoy the long-term benefits of a sustainable lifestyle. Recycling bottles for gardening proves that even simple actions can have a big impact on the environment and your personal well-being.

Leave A Comment