On an extraordinary astronomical event, skywatchers around the world are preparing to witness the longest total solar eclipse of the century, a phenomenon that will temporarily turn day into night across multiple regions. This rare celestial spectacle is captivating both professional astronomers and amateur enthusiasts alike, offering a once-in-a-lifetime opportunity to experience the awe-inspiring alignment of the Sun, Moon, and Earth.
What Is a Total Solar Eclipse?
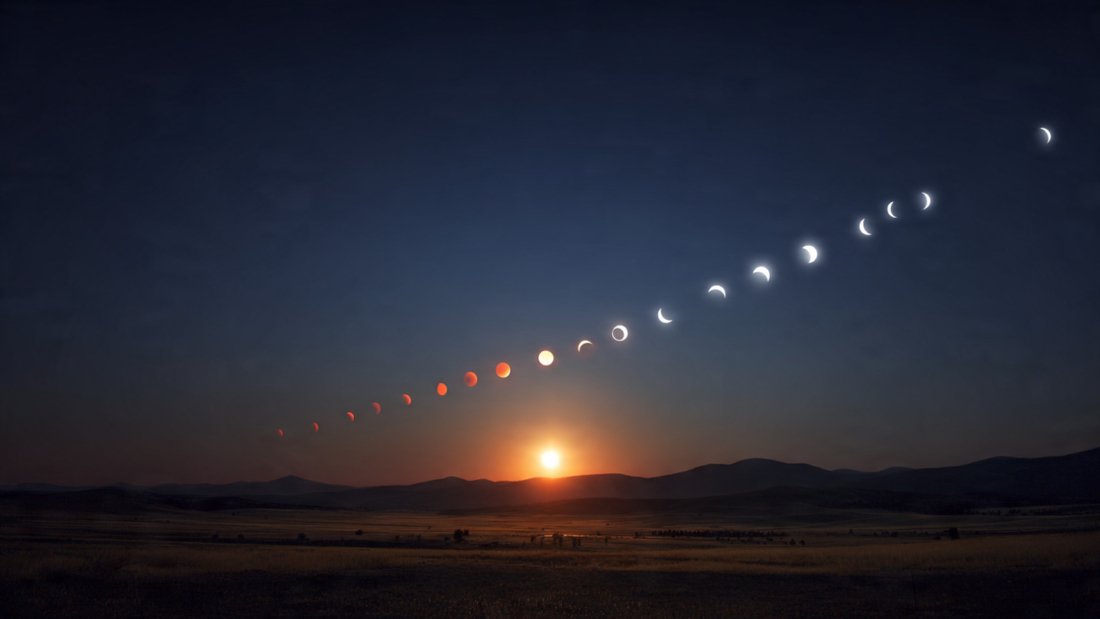
A total solar eclipse occurs when the Moon passes directly between the Earth and the Sun, completely obscuring the Sun’s bright disk for viewers located along the path of totality. Unlike a partial eclipse, where only a portion of the Sun is hidden, a total eclipse creates a dramatic transformation, plunging daytime into near darkness for a short period.
The Sun’s corona, normally invisible to the naked eye due to the overwhelming brightness of the Sun’s surface, becomes visible during totality. This halo of plasma and magnetic activity surrounding the Sun provides a breathtaking view that has fascinated humans for centuries. Eclipse chasers, scientists, and photographers often travel great distances to capture this rare and fleeting event.
Why This Eclipse Is Special
While total solar eclipses occur somewhere on Earth roughly every 18 months, this particular eclipse is extraordinary for several reasons:
- Duration: It is projected to last up to seven minutes and thirty-three seconds at certain locations along the path of totality. This makes it the longest total solar eclipse of the 21st century, far exceeding the typical totality duration of two to four minutes.
- Wide Path of Totality: The eclipse will be visible across several regions spanning multiple continents, providing millions of people with the chance to experience totality firsthand. Areas directly under the path of totality will experience the dramatic darkening, while adjacent regions will observe a partial eclipse.
- Scientific Opportunities: Astronomers and solar scientists are especially eager to study the Sun’s corona during this event. Long-duration eclipses offer rare opportunities to observe solar prominences, flares, and coronal mass ejections without interference from the Sun’s intense light.
The Path of Totality
The path of totality is a narrow corridor on Earth’s surface where the Moon completely blocks the Sun. For this eclipse, the path is unusually long, stretching thousands of miles across multiple countries and regions. Cities and towns located along this path will witness the full darkening of the Sun, while areas outside the path will experience a partial eclipse.
Meteorologists and local authorities are advising residents and travelers in the path of totality to prepare for both astronomical viewing and potential disruptions. The drop in sunlight can temporarily affect local temperatures, wildlife behavior, and human activity. Birds may go silent, animals may return to sleep, and the temperature can drop by several degrees, creating a surreal twilight effect.
Timing and Local Viewing Conditions
Exact timings for totality vary depending on the viewer’s location. The total eclipse will occur in multiple waves across different regions, with each location experiencing a unique schedule for the start, peak, and end of the event. Skywatchers are encouraged to consult local astronomical societies or official eclipse maps to determine the precise timing for their area.
Because the eclipse coincides with daytime hours in most regions, weather conditions will play a crucial role in visibility. Clear skies are essential for observing totality, while clouds, rain, or fog can obscure the Sun and prevent a full viewing experience. Many enthusiasts are planning trips to areas with historically favorable weather conditions to maximize the chances of witnessing the complete eclipse.
Safety Measures for Viewing
A total solar eclipse is a spectacular phenomenon, but it can also be dangerous if viewed improperly. Looking directly at the Sun without proper eye protection can cause permanent retinal damage. Experts recommend the following precautions:
- Solar Viewing Glasses: Only ISO-certified eclipse glasses should be used to view the Sun before and after totality. Ordinary sunglasses, no matter how dark, are not safe.
- Pinhole Projectors: Indirect viewing methods, such as projecting the Sun’s image through a pinhole onto a flat surface, allow for safe observation without eye risk.
- Telescopes and Binoculars: These instruments should be equipped with special solar filters to prevent eye injury and equipment damage.
During the brief period of totality, it is safe to view the eclipse without glasses, as the Sun is completely obscured. However, this phase only lasts a few minutes, after which protective measures must be reinstated as sunlight returns.
Cultural and Historical Significance
Total solar eclipses have fascinated humanity for millennia. Ancient civilizations often regarded eclipses as omens or divine events, influencing mythology, religion, and scientific inquiry. Today, eclipses continue to inspire awe and wonder, connecting people across cultures in shared experiences of the cosmos.
Many communities in the path of totality are planning public viewing events, educational programs, and cultural celebrations. Astronomical societies and observatories are organizing viewing parties, lectures, and workshops to engage the public in the science behind eclipses.
Scientific Importance of Long Totality
Extended periods of totality, such as this eclipse, offer unique research opportunities:
- Solar Corona Observation: Scientists can study the Sun’s outer atmosphere, which is otherwise obscured by intense sunlight. This research helps improve understanding of solar winds, space weather, and magnetic activity.
- Astrophysical Experiments: Eclipses provide natural conditions for experiments, such as testing the bending of light predicted by Einstein’s theory of general relativity. Observing stars near the Sun’s edge becomes possible when the Sun is fully blocked.
- Environmental Monitoring: The sudden reduction in sunlight allows meteorologists and ecologists to study temperature drops, wind patterns, and wildlife responses during rapid changes in illumination.
Travel and Tourism Impacts
The longest total solar eclipse of the century is expected to attract thousands of travelers to regions under the path of totality. Hotels, campsites, and local attractions are reporting high demand, as enthusiasts flock to optimal viewing spots. Travel planning is essential, as accommodations near prime locations are limited and may be booked months in advance.
In addition to tourism revenue, local authorities are preparing for increased traffic, crowd management, and safety measures. Public transportation, emergency services, and temporary viewing areas are being coordinated to ensure smooth and safe experiences for both residents and visitors.
What to Expect During Totality
For those lucky enough to be under the path of totality, the experience is otherworldly:
- Rapid Darkening: Daylight will gradually fade, culminating in near-total darkness.
- Temperature Drop: Temperatures may decrease rapidly, creating a twilight-like atmosphere.
- Animal Behavior: Birds may roost, nocturnal animals may become active, and insects may react to the sudden change in light.
- Sky Changes: Stars, planets, and the Moon may become visible in the daytime sky. The Sun’s corona and prominences appear as ethereal structures surrounding the darkened Moon.
Observers often describe totality as a surreal, almost spiritual moment, where the everyday world is briefly transformed by cosmic forces.
Final Preparations and Recommendations
To fully enjoy this rare event, observers should:
- Check local eclipse timings and weather forecasts.
- Gather proper viewing equipment, including eclipse glasses or filters.
- Plan transportation and accommodations well in advance.
- Be aware of local safety guidelines and community viewing events.
- Prepare for a few minutes of profound darkness and the awe-inspiring view of the Sun’s corona.
Whether experienced in a remote field, an urban rooftop, or a specially designated viewing site, the eclipse promises a memorable celestial spectacle.
Conclusion
The upcoming longest total solar eclipse of the century represents an extraordinary intersection of science, culture, and natural wonder. Across several regions, day will turn slowly to night, offering observers a fleeting but unforgettable glimpse of the Sun’s hidden beauty. From scientists studying the solar corona to families watching in awe, the eclipse highlights both the power of nature and humanity’s enduring fascination with the cosmos.
By preparing properly, taking safety precautions, and understanding what to expect, observers can fully appreciate the eclipse’s dramatic transformation of the sky. As this remarkable celestial event unfolds, it will surely be remembered as one of the most spectacular astronomical experiences of the century, leaving a lasting impression on everyone fortunate enough to witness it.