Growing your own vegetables may seem difficult if you have limited space, no backyard, or little gardening experience. However, with creativity and simple household items, anyone can start a productive garden. One of the easiest and most affordable ways is by using plastic bottles as planters. These everyday items can be transformed into mini gardens that support healthy plant growth from seed to harvest.
Turning plastic bottles into a thriving vegetable garden is not only budget-friendly but also environmentally responsible. It reduces waste, promotes sustainable living, and brings fresh food closer to your kitchen. This guide explains how beginners can use plastic bottles to grow vegetables successfully, even in small apartments or urban homes.
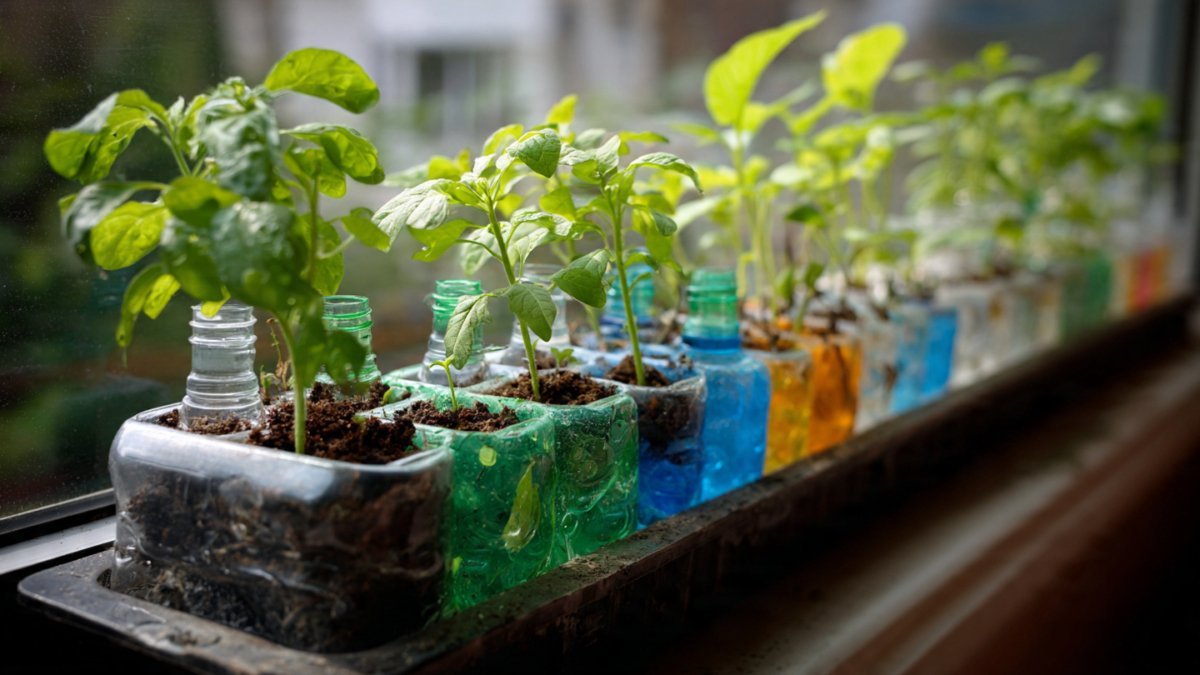
Why Use Plastic Bottles for Gardening?
Plastic bottles are lightweight, waterproof, and easily available. Instead of throwing them away, reusing them as planters gives them a second life and reduces environmental pollution.
One major advantage is affordability. Traditional pots and gardening containers can be expensive. Plastic bottles cost nothing and can be collected easily.
They are also flexible in design. Bottles come in various shapes and sizes, allowing you to grow different vegetables according to their root depth.
Using recycled bottles encourages eco-conscious habits. It teaches beginners that gardening and environmental care can go hand in hand.
Another benefit is portability. Bottle planters are easy to move, allowing you to adjust sunlight exposure when needed.
Understanding the Basics of Bottle Gardening
Before starting, it is important to understand how bottle gardening works. In this method, plastic bottles act as containers that hold soil, seeds, and water.
Because bottles are smaller than traditional pots, they require more attention to watering and nutrients. However, they also allow better control over plant conditions.
Bottle gardens work well for balconies, windowsills, rooftops, and even indoor spaces near sunlight.
With proper drainage, soil, and care, these simple containers can support healthy vegetable growth.
Materials You Will Need
Getting started does not require expensive tools. Most materials are easily found at home.
You will need:
- Empty plastic bottles (1 to 2 liter size works well)
- Scissors or sharp knife
- Marker pen
- Nail or heated metal rod
- Potting soil or garden mix
- Small stones or gravel
- Vegetable seeds
- Water spray bottle
- Rope or wire for hanging (optional)
Optional items include paint, stickers, or rope for decoration.

Preparing Plastic Bottles
Start by cleaning the bottles thoroughly. Remove labels and wash away any residue. Let them dry completely.
Decide how you want to use the bottle. You can cut it horizontally, vertically, or make a side opening depending on your design.
Mark the cutting lines using a marker and cut carefully. Smooth sharp edges if needed.
Make several small drainage holes at the bottom using a heated nail or screwdriver. These holes prevent water from collecting and damaging roots.
Place a thin layer of gravel inside the bottle before adding soil. This improves drainage and airflow.
Choosing the Right Vegetable Seeds
Not all vegetables grow well in small containers, so choosing suitable seeds is important for beginners.
Best vegetables for bottle gardening include:
- Lettuce
- Spinach
- Fenugreek
- Coriander
- Basil
- Mint
- Radish
- Green onions
- Cherry tomatoes
- Chili peppers
Leafy greens and herbs are ideal for beginners because they grow quickly and need less space.
Root vegetables like carrots can grow in deeper bottles, but short varieties are recommended.
Always use fresh, good-quality seeds for better results.
Preparing the Soil Mix
Healthy soil is the foundation of a successful garden. Garden soil alone is often too heavy for containers.
A good soil mix can be made by combining:
- Two parts potting soil
- One part compost or vermicompost
- One part sand or coco peat
This mixture ensures good drainage, nutrients, and root aeration.
Fill the bottle with soil, leaving about two centimeters at the top for watering.

Moisten the soil lightly before planting seeds.
Planting Seeds Properly
Planting seeds correctly improves germination and growth.
Make small holes in the soil using your finger. The depth depends on seed size. Generally, seeds should be planted at a depth twice their size.
Place one to three seeds in each hole, depending on bottle size. Cover lightly with soil and press gently.
Water using a spray bottle to avoid disturbing the seeds.
Label your bottles if you are growing different vegetables.
Keep the soil moist but not soaked during germination.
Providing the Right Light
Sunlight is essential for vegetable growth. Most plants need at least five to six hours of light daily.
Place your bottle garden near:
- A sunny window
- Balcony railing
- Rooftop
- Terrace edge
If natural light is limited, use LED grow lights for indoor gardening.
Rotate bottles occasionally so all sides receive equal light.
Without enough sunlight, plants become weak and thin.
Watering and Moisture Management
Because plastic bottles hold limited soil, they dry out faster than ground gardens.
Check soil moisture daily by touching the surface. Water when it feels dry.

Use a spray bottle for young plants and a gentle stream for mature ones.
Avoid overwatering, as this leads to root rot and fungal problems.
Ensure excess water drains out freely through holes.
Early morning or evening is the best time to water.
Feeding Your Plants
Vegetables in containers depend entirely on soil nutrients, so regular feeding is necessary.
Use organic fertilizers such as:
- Compost tea
- Vermicompost
- Banana peel water
- Mustard cake solution
Apply liquid fertilizer every two to three weeks.
Avoid excessive feeding, as it can damage roots and attract pests.
Healthy feeding promotes strong growth and better harvests.
Supporting and Training Plants
Some vegetables, especially tomatoes and peppers, need support as they grow.
Use small sticks, bamboo skewers, or wire frames for support.
Tie stems gently with soft thread to prevent damage.
Trailing plants can be trained along walls or railings.
Supporting plants improves airflow and reduces disease risk.

Preventing Pests and Diseases
Even small bottle gardens can attract pests.
Common pests include aphids, whiteflies, and spider mites.
Use natural remedies such as:
- Neem oil spray
- Soap water spray
- Garlic-chili solution
Inspect plants regularly and remove infected leaves.
Good airflow and sunlight reduce disease problems.
Avoid using chemical pesticides, especially for edible crops.
Harvesting Your Vegetables
Harvesting at the right time improves taste and encourages more growth.
Leafy greens can be harvested by cutting outer leaves while leaving the center intact.
Herbs should be trimmed regularly to promote bushy growth.
Tomatoes and chilies should be picked when fully colored.
Use clean scissors or hands for harvesting.
Frequent harvesting keeps plants productive.
Creative Ways to Arrange Bottle Gardens
Arrangement plays a big role in maximizing space and beauty.
You can create:

- Hanging bottle gardens
- Wall-mounted vertical gardens
- Shelf gardens
- Window box rows
- Stacked bottle towers
Vertical setups are perfect for small apartments.
Creative layouts improve sunlight exposure and visual appeal.
Common Beginner Mistakes to Avoid
Many beginners make simple mistakes that affect success.
Do not skip drainage holes.
Avoid overcrowding plants.
Do not overwater.
Avoid poor-quality soil.
Do not ignore sunlight needs.
Learning from mistakes is part of gardening.
Benefits of Bottle Gardening
Plastic bottle gardening offers many advantages.
It saves money.
It reduces plastic waste.
It provides fresh, chemical-free vegetables.
It improves mental well-being.
It encourages sustainable living.
It also builds confidence and patience in beginners.
Conclusion
Turning plastic bottles into a thriving vegetable garden truly feels like beginner’s magic. With simple tools, basic knowledge, and consistent care, anyone can grow fresh vegetables from seeds at home.
This eco-friendly method reduces waste, saves money, and makes gardening accessible to everyone, regardless of space limitations. From preparing bottles to harvesting crops, each step brings learning and satisfaction.
By starting small and staying patient, you can transform discarded bottles into productive green spaces. One seed, one bottle, and one effort at a time, you can create a healthy, sustainable garden that nourishes both your body and the environment.
Leave A Comment