How to Cultivate Streptocarpus for Endless Blooms Throughout the Year

How to Cultivate Streptocarpus for Endless Blooms Throughout the Year

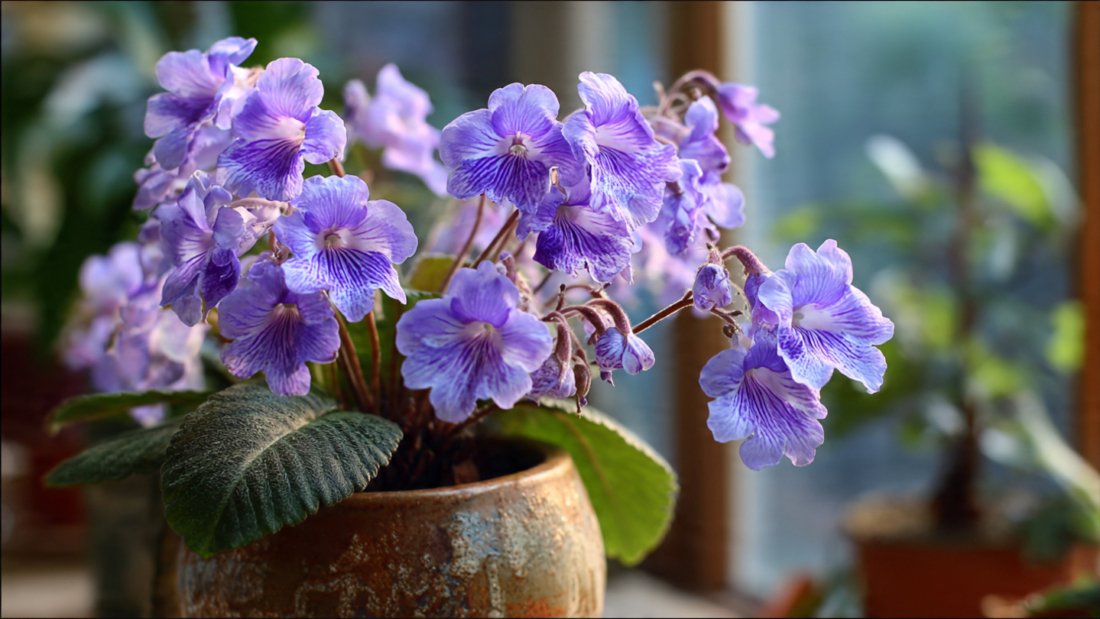
Streptocarpus, often called “Cape Primrose,” is a stunning houseplant known for its elegant, trumpet-shaped flowers and vibrant foliage. These beautiful plants are prized for their ability to bloom continuously, filling homes with color and charm all year round. Cultivating streptocarpus may seem intimidating at first, but with the right techniques, you can enjoy endless blooms regardless of the season. In this guide, we’ll explore how to grow, care for, and maintain streptocarpus so they flourish beautifully throughout the year.

Understanding Streptocarpus

Streptocarpus is native to South Africa and Madagascar, thriving in shaded areas under forest canopies. Unlike many flowering houseplants, streptocarpus can bloom repeatedly from a single rosette, provided they receive proper care. Their flowers come in shades of purple, pink, red, white, and blue, often with beautiful patterns and veining.

These plants are compact and ideal for indoor spaces, growing well in pots, hanging baskets, or terrariums. One of their remarkable traits is their long flowering period. With the right conditions, streptocarpus can bloom for months at a time, making them a favorite among gardeners who love constant floral color.

Choosing the Right Variety

Streptocarpus varieties are divided into two main types:

  1. Leafy Varieties: These have larger foliage and smaller flowers, providing lush greenery with delicate blooms. Leafy streptocarpus is perfect for indoor decoration.
  2. Hybrid Flowering Varieties: These are bred for large, showy flowers and come in an array of colors. Hybrids bloom more prolifically and are the best choice if your goal is endless blooms.

When selecting a variety, consider your space, lighting conditions, and aesthetic preferences. Hybrid varieties tend to bloom longer and more consistently, while leafy types are easier to maintain and great for beginners.

The Ideal Growing Conditions

Streptocarpus thrive in specific conditions that mimic their natural habitat. Providing these conditions will encourage continuous blooming.

Light

Streptocarpus prefers bright, indirect light. Direct sunlight can scorch the leaves, while too little light results in poor flowering. A north or east-facing window is ideal for indoor plants. If natural light is insufficient, fluorescent or LED grow lights can supplement and promote growth and flowering.

Temperature

These plants thrive in moderate temperatures, ideally between 60°F and 75°F (15°C–24°C). They are sensitive to extreme cold and should be protected from drafts or sudden temperature drops. Avoid placing them near heating vents, as dry, hot air can damage the leaves.

Humidity

Streptocarpus prefers moderate humidity. Indoor air can be dry, especially in winter, so placing a tray of water near the plant or using a small humidifier can help maintain the moisture level. Avoid misting the leaves directly, as water on the foliage can encourage fungal diseases.

Soil

Well-draining soil is essential. Streptocarpus roots are prone to rot if kept in soggy soil. Use a light, airy potting mix, such as a combination of peat moss, perlite, and vermiculite. Specialized African violet mixes work exceptionally well for streptocarpus, providing the perfect balance of moisture retention and drainage.

Planting and Repotting Streptocarpus

  1. Pot Selection: Choose shallow pots, as streptocarpus prefers to be slightly root-bound. A pot with drainage holes is crucial to prevent waterlogging.
  2. Planting: Fill the pot with fresh potting mix, place the rosette or leaf cutting in the center, and gently firm the soil around the roots. Water lightly after planting.
  3. Repotting: Repotting every 12–18 months helps refresh the soil and encourage healthy growth. Remove any dead leaves, and carefully lift the plant without damaging the roots. Always repot during active growth periods, typically in spring.

Propagation Techniques

Streptocarpus can be propagated easily, allowing you to expand your collection or share plants with friends:

Leaf Cuttings

  1. Select a healthy, mature leaf.
  2. Cut the leaf into sections, each 2–4 inches long.
  3. Insert the cuttings vertically into moist potting mix, burying the base about an inch deep.
  4. Cover with a clear plastic bag or dome to maintain humidity.
  5. Roots and new plantlets will develop in 4–6 weeks.

Division

Mature plants with multiple rosettes can be divided. Carefully separate the rosettes, ensuring each has healthy roots, and plant them in individual pots. This method quickly produces multiple plants that can bloom within months.

Watering and Fertilization

Proper watering and feeding are critical to maintaining year-round blooms:

  1. Watering: Keep the soil evenly moist but not soggy. Water the plant when the top inch of soil feels dry. Avoid wetting the crown or leaves, as this can lead to crown rot.
  2. Fertilization: Feed streptocarpus with a balanced, water-soluble fertilizer every 2–3 weeks during the growing and flowering season. Use a diluted solution to prevent over-fertilization, which can damage roots and leaves.
  3. Dormancy Care: While streptocarpus rarely enters a true dormancy, growth may slow in winter. Reduce watering and fertilization during this time to prevent stress.

Pruning and Deadheading

Deadheading spent flowers is essential to encourage continuous blooming. Remove faded blooms by pinching them off at the base of the flower stalk. This redirects the plant’s energy into producing new flowers rather than seed production.

Light pruning of older leaves can also improve air circulation and overall plant health. Remove yellow or damaged leaves regularly to keep your plant looking vibrant and healthy.

Controlling Pests and Diseases

Streptocarpus are generally hardy, but they can occasionally fall prey to pests and diseases:

  • Aphids and Mealybugs: Check under leaves and around the crown. Treat infestations with insecticidal soap or neem oil.
  • Spider Mites: These tiny pests thrive in dry conditions. Increase humidity and treat affected leaves with gentle sprays.
  • Fungal Diseases: Overwatering or poor ventilation can cause fungal infections. Ensure proper drainage and air circulation.

Regular inspection and preventive care will keep your streptocarpus healthy and blooming year-round.

Encouraging Endless Blooms

To maximize flowering, follow these tips:

  1. Consistent Light: Provide 12–14 hours of bright, indirect light daily.
  2. Regular Feeding: Fertilize consistently during active growth.
  3. Deadheading: Remove spent flowers promptly.
  4. Humidity and Temperature Control: Maintain moderate humidity and avoid temperature extremes.
  5. Healthy Soil: Refresh soil periodically and ensure proper drainage.

By meeting these conditions, you can enjoy continuous blooms throughout the year, transforming your indoor space into a vibrant, floral display.

Display Ideas for Streptocarpus

Streptocarpus plants are not only easy to care for but also versatile in display:

  • Windowsills: A bright windowsill is perfect for indirect sunlight.
  • Hanging Baskets: Trailing varieties look stunning in hanging containers, allowing flowers to cascade naturally.
  • Terrariums: Small, enclosed terrariums can maintain humidity and create a mini tropical environment.
  • Indoor Gardens: Combine multiple pots of streptocarpus for a colorful indoor garden that blooms year-round.

Conclusion

Streptocarpus is a rewarding houseplant that offers endless blooms with proper care. By understanding its needs—light, temperature, humidity, soil, and nutrition—you can cultivate a thriving plant that flowers almost continuously. Whether you propagate from leaf cuttings or invest in hybrid varieties, streptocarpus brings beauty, color, and joy into your home. Regular care, deadheading, and vigilance against pests ensure that your plant remains healthy and productive. For beginners and experienced gardeners alike, growing streptocarpus is a fulfilling journey that pays off with months of vibrant, long-lasting blooms. With patience and attention, your streptocarpus can transform your indoor space into a year-round floral paradise.

Vertical Garden Guide: How to Prepare the Best Soil for Growing Vegetables Successfully

Vertical Garden Guide: How to Prepare the Best Soil for Growing Vegetables Successfully

Vertical gardening has become a revolutionary way to grow fresh vegetables, especially for urban dwellers or anyone with limited space. By using walls, fences, or specially designed structures, vertical gardens maximize growing area and bring greenery into small spaces. However, one of the most crucial elements for a thriving vertical garden is the soil. Unlike traditional garden beds, vertical gardens require soil that is lightweight, nutrient-rich, well-draining, and capable of retaining moisture long enough to nourish plants. Getting the soil right can make the difference between a flourishing vertical vegetable garden and a frustrating, low-yielding one.

This guide explores how to prepare the best soil for vertical gardening, detailing everything from the choice of base materials to fertilizers and soil maintenance techniques. Whether you are growing leafy greens, tomatoes, peppers, or root vegetables, these tips will help ensure your vertical garden thrives.


Understanding the Unique Needs of Vertical Garden Soil

Vertical gardens face different challenges compared to traditional horizontal beds:

  1. Limited root space: Containers and vertical structures often have shallower soil, so it must hold nutrients effectively.
  2. Drainage and aeration: Water must drain properly to prevent root rot while still retaining moisture.
  3. Lightweight composition: Excessively heavy soil can stress vertical structures.
  4. Nutrient retention: Frequent watering in vertical setups can leach nutrients, so soil must hold fertility without compacting.

Understanding these challenges is the first step in preparing soil that supports healthy vegetable growth.


Choosing the Right Base Materials

Vertical garden soil begins with a strong, lightweight base. Traditional garden soil is often too dense and heavy for vertical setups. Instead, consider a mix of the following materials:

  • Coco peat (coco coir): Made from coconut husks, it’s lightweight, retains moisture well, and provides aeration for roots.
  • Compost: Nutrient-rich organic matter that nourishes plants. Well-rotted compost improves soil structure without adding excessive weight.
  • Perlite or vermiculite: Lightweight minerals that enhance drainage and aeration. Perlite also prevents soil compaction, allowing roots to grow freely.
  • Garden soil or loam (optional): A small amount can provide structure and trace minerals, but too much can make the soil heavy.

A recommended base ratio for vertical vegetable gardens is:

  • 40% coco peat or coir
  • 30% compost
  • 20% perlite or vermiculite
  • 10% garden soil or loam

This balance creates a medium that is light, well-draining, and rich in nutrients.


Preparing Soil for Different Vegetables

Not all vegetables have the same soil requirements. Understanding your plant’s needs can optimize growth in vertical gardens:

Leafy Greens (Lettuce, Spinach, Kale)

  • Prefer loose, well-draining soil with high organic matter.
  • Maintain consistent moisture without waterlogging.
  • Add extra compost or worm castings for rapid leaf growth.

Fruiting Vegetables (Tomatoes, Peppers, Eggplants)

  • Require nutrient-rich soil with good water retention.
  • Include slow-release fertilizers or granular compost for sustained nourishment.
  • Slightly deeper pockets (6–8 inches) are ideal to accommodate stronger root systems.

Root Vegetables (Radish, Carrots, Beets)

  • Need loose, sandy soil to allow roots to expand downward.
  • Avoid heavy compost that can compact roots.
  • Perlite or coarse sand improves drainage and prevents deformed roots.

Herbs (Basil, Mint, Parsley)

  • Thrive in lightweight, well-draining soil.
  • High organic content is essential for aromatic flavor.
  • Coco peat and vermiculite combination works best for container-style vertical planters.

Mixing Your Vertical Garden Soil

Once you’ve chosen your materials, it’s time to mix the soil properly:

  1. Start with a clean workspace: Use a large container or tarp to combine ingredients.
  2. Layering vs. mixing: For most vertical gardens, fully mix coco peat, compost, and perlite evenly. Avoid layering, as this can cause water to flow unevenly.
  3. Moisture balance: Lightly moisten the mixture. Soil should feel like a wrung-out sponge—damp but not soggy.
  4. Optional nutrients: Incorporate slow-release organic fertilizers or neem cake to maintain long-term fertility.

Proper mixing ensures that roots have consistent access to nutrients and moisture throughout the vertical planter.


Enhancing Soil Fertility

Even the best soil benefits from additional nutrients. Here are ways to enhance soil fertility for vertical vegetables:

  • Worm castings: Natural, nutrient-dense, and improves microbial activity.
  • Organic fertilizers: Bone meal, blood meal, or fish emulsion supports growth.
  • Compost tea: Liquid compost applied periodically boosts nutrients without adding weight.
  • Micronutrient powders: Add trace minerals like magnesium, iron, and zinc if deficiencies appear.

Regular soil enrichment is especially important in vertical gardens because frequent watering can leach nutrients faster than in-ground beds.


Water Retention Strategies

One of the main challenges in vertical gardening is keeping soil evenly moist. Too much water causes root rot, while too little stresses plants. Effective strategies include:

  1. Use moisture-retentive soil: Coco peat, vermiculite, and compost hold water without becoming soggy.
  2. Layering with mulch: Small layers of organic mulch, like shredded leaves or straw, reduce evaporation.
  3. Install drip irrigation or self-watering systems: Automated watering ensures consistent moisture for vertical setups.
  4. Check moisture regularly: Stick a finger or small probe into the soil to gauge dampness.

Proper moisture retention allows vegetables to thrive even in sunny or dry conditions.


Container and Structure Considerations

The type of vertical planter you use affects soil preparation:

  • Pocket planters: Fill each pocket with pre-mixed soil. Avoid overpacking to ensure aeration.
  • Stacked pots or tower planters: Use lightweight soil to prevent tipping. Layer soil to maintain balance.
  • Wall-mounted trays: Ensure drainage holes are present to prevent waterlogging and root rot.

Choosing the right container paired with properly prepared soil ensures long-term productivity.


Maintaining Soil Health

Vertical garden soil requires regular attention to maintain fertility and structure:

  • Add compost after each harvest: Replenishes nutrients lost during growth.
  • Check for compaction: Gently loosen soil if it becomes dense.
  • Rotate crops: Prevents nutrient depletion and reduces disease buildup.
  • Inspect for pests: Healthy soil supports beneficial microbes that naturally fight pests.

Maintaining soil health guarantees continuous vegetable production and reduces the need for chemical fertilizers.


Common Mistakes to Avoid

Even experienced gardeners make errors with vertical garden soil. Here’s how to avoid them:

  1. Using heavy garden soil: Can stress vertical structures and prevent proper root growth.
  2. Neglecting drainage: Standing water leads to root rot and fungal diseases.
  3. Over-fertilization: Excess nutrients can burn roots, especially in confined spaces.
  4. Ignoring moisture: Vertical soil dries faster than traditional beds; monitor water levels daily.
  5. Not replenishing nutrients: Continuous harvest depletes nutrients faster than in-ground gardens.

Awareness of these mistakes will save time and effort while keeping your vertical garden productive.


Harvesting Tips for Vertical Vegetables

Healthy soil leads to abundant, high-quality harvests:

  • Leafy greens: Pick outer leaves regularly to encourage new growth.
  • Fruiting vegetables: Harvest when fully ripe to promote continuous production.
  • Root crops: Ensure soil is loose for easy digging without damaging vegetables.

Consistent harvesting also prevents overcrowding, which improves airflow and reduces disease.


Final Thoughts

Preparing the best soil is the cornerstone of vertical vegetable gardening success. By choosing lightweight, nutrient-rich materials, ensuring proper drainage and aeration, and maintaining fertility through compost and organic fertilizers, you can create an environment where vegetables thrive. Vertical gardening allows you to transform small spaces into lush, productive food sources, bringing fresh, homegrown vegetables within easy reach.

Whether you are a beginner looking to try balcony gardening or an experienced gardener seeking to maximize yield in tight spaces, soil preparation is the step that will determine your success. With the right mix of ingredients, attention to moisture, and regular maintenance, your vertical garden can flourish year-round, producing abundant leafy greens, crisp roots, and flavorful fruits.

By following this guide, you can confidently prepare soil that supports robust plant growth, efficient water use, and high yields—all while taking advantage of limited space. Vertical gardening isn’t just a trend; it’s a practical, sustainable way to grow your own vegetables, save money, and enjoy the satisfaction of nurturing plants from seed to harvest.

How to Plant a Mango Tree for FREE – The Mango Seed Trick for Fast Growing

How to Plant a Mango Tree for FREE – The Mango Seed Trick for Fast Growing

Mangoes are often called the “king of fruits,” celebrated for their sweet, juicy flesh, tropical aroma, and nutritional benefits. Imagine enjoying fresh mangoes from your own garden without spending a dime on saplings or seedlings. It might sound too good to be true, but growing a mango tree from a simple seed is entirely possible—and with the right method, your tree can grow fast, producing leaves, flowers, and eventually fruit in a surprisingly short time. This article reveals the step-by-step mango seed trick that allows you to plant a mango tree for free and nurture it successfully.


Why Grow Mango Trees from Seeds?

Mango trees grown from seeds have several advantages:

  1. Cost-free start – You can grow a mango tree from seeds saved from the fruit you buy at the store. No need to purchase expensive saplings.
  2. Easy availability – Mango seeds are easy to find, and nearly all mangoes contain viable seeds.
  3. Fast-growing trick – With proper preparation, mango seeds sprout faster and develop into strong seedlings.
  4. Satisfaction – Watching a tree grow from a seed into a mature fruit-bearing plant is immensely rewarding.

While grafted mango trees sometimes produce fruit faster, growing from seed allows you to experiment, save money, and enjoy the thrill of home gardening.


Selecting a Mango for Seeds

The first step in planting a mango tree for free is choosing the right fruit:

  • Pick a fully ripe mango for the juiciest, most viable seed.
  • Ensure the fruit is disease-free; avoid any with signs of rot or fungal infections.
  • Popular mango varieties like Alphonso, Haden, Kent, or Tommy Atkins work well, but nearly any mango with a healthy seed will germinate.

Once you’ve selected the mango, carefully extract the seed.


Extracting the Mango Seed

The mango seed is encased in a hard pit. To extract it:

  1. Cut the mango flesh away carefully, taking care not to damage the seed inside.
  2. Rinse the pit under running water to remove all remaining fruit pulp. This prevents mold and fungal growth.
  3. Dry the pit lightly for a few hours, but do not let it dry out completely.

Once cleaned, the seed is ready for the germination trick that ensures fast growth.


The Mango Seed Trick for Fast Growing

Mango seeds can be slow to germinate if planted directly, but the following trick accelerates growth significantly:

  1. Crack the outer shell carefully – Mango seeds have a thick, woody shell. Using a nutcracker or gentle tapping with a hammer, crack the shell just enough to reveal the inner seed without damaging it.
  2. Soak the seed in warm water – Submerge the seed in warm water for 24 hours. This softens the seed and activates germination.
  3. Wrap in a moist paper towel – Place the seed in a damp paper towel or cloth and put it inside a plastic bag. Keep the bag in a warm, dark place.
  4. Check daily – Keep the towel moist and check for sprouting. Roots and shoots should appear in 1–2 weeks with this method.

This simple trick drastically increases the chances of fast germination and healthy seedlings.


Preparing the Planting Medium

Once the seed sprouts, it’s time to prepare a pot or planting area:

  • Choose a large, deep container for indoor planting, at least 12 inches deep, as mango trees develop long taproots.
  • Use well-draining soil, a mix of garden soil, sand, and compost works well. Avoid heavy clay soil, which can trap water and stunt growth.
  • Ensure the pot has drainage holes to prevent root rot.

For outdoor planting, select a spot with full sun exposure, fertile soil, and protection from strong winds.


Planting the Mango Seed

Follow these steps to plant your sprouted mango seed:

  1. Fill your pot or planting hole with the prepared soil mix.
  2. Plant the seed with the root pointing downward and the shoot pointing upward.
  3. Cover lightly with soil, leaving the shoot above ground.
  4. Water gently but thoroughly to settle the soil around the seed.

With proper planting, your mango seedling will establish quickly and begin growing into a strong tree.


Watering and Care

Mango seedlings require regular but moderate watering:

  • Water when the top inch of soil feels dry. Overwatering can cause root rot, especially in pots.
  • Reduce watering slightly once the plant establishes a strong root system.
  • Use room-temperature water to prevent shocking the seedling.

Additionally, mango plants appreciate a light misting to maintain humidity around the leaves, especially in dry indoor or balcony conditions.


Sunlight Requirements

Mango trees thrive in full sunlight. For indoor seedlings:

  • Place the pot in a south-facing window with at least 6–8 hours of direct sunlight.
  • If natural light is insufficient, use LED or fluorescent grow lights to ensure proper growth.
  • Rotate the pot every few days to encourage even growth and prevent leaning.

Proper sunlight is essential for photosynthesis, strong stems, and future fruit production.


Fertilizing for Fast Growth

Healthy seedlings need nutrients to grow quickly. Minimal-effort fertilization includes:

  • Organic compost – Mix into the soil at planting to provide slow-release nutrients.
  • Liquid fertilizer – Feed the young plant every 2–3 weeks with diluted balanced fertilizer.
  • Optional foliar spray – Spraying leaves with diluted seaweed extract can enhance growth and overall plant vigor.

Balanced fertilization ensures fast growth, lush leaves, and strong root development.


Transplanting Outdoors

Once your seedling reaches 12–18 inches in height and develops a strong root system, it can be transplanted outdoors (if desired):

  • Choose a sunny, well-draining location.
  • Dig a hole slightly larger than the root ball.
  • Carefully transplant the seedling, water thoroughly, and mulch around the base to retain soil moisture.
  • Stake young trees if needed to support growth in windy areas.

Outdoor planting allows mango trees to grow tall and potentially bear fruit faster, but potted growth works well for small spaces or urban gardens.


Pruning and Maintenance

Proper pruning ensures healthy, bushy growth and better fruit production:

  • Pinch the top shoots when the tree is young to encourage lateral branching.
  • Remove weak, dead, or overcrowded branches to improve airflow.
  • Regular pruning helps maintain a manageable size, especially for container-grown mango trees.

Minimal pruning combined with proper watering and sunlight will keep your tree healthy and vigorous.


Harvesting Mangoes

Mango trees grown from seed may take 3–6 years to bear fruit, depending on variety and care. Tips for successful harvest:

  • Look for slightly soft, fragrant fruit at the end of the season.
  • Harvest by gently twisting or cutting the mango from the stem.
  • Regular watering and occasional fertilization during flowering and fruiting stages enhance fruit quality.

While patience is required, the reward of homegrown mangoes is well worth the wait.


Troubleshooting Common Problems

Even with the free seed trick, challenges can arise:

  • Yellow leaves – Often caused by overwatering, nutrient deficiency, or insufficient sunlight.
  • Slow growth – Check soil quality, light exposure, and watering frequency.
  • Pests – Aphids or mealybugs can appear on young leaves. Neem oil or insecticidal soap is effective.
  • Root rot – Ensure proper drainage and avoid waterlogged soil.

Regular observation and adjustments are key to overcoming these issues.


Bonus Tips for Faster Growth

  1. Warm environment – Mango seeds sprout and grow faster in warm, humid conditions.
  2. Avoid overfertilization – Too much nitrogen can promote leaves but delay flowering.
  3. Mulching – Helps retain soil moisture and regulates temperature around the roots.
  4. Companion planting – Growing basil or marigolds nearby can reduce pests naturally.

These small techniques enhance growth and help you enjoy a thriving mango tree.


Final Thoughts

Planting a mango tree for free is easier than most people think. With a simple mango seed trick—soaking, sprouting in a moist paper towel, and careful planting—you can start a fast-growing tree without buying seedlings. By providing proper soil, sunlight, watering, and occasional fertilization, your mango seed will grow into a strong, healthy tree.

Whether planted in a pot for balcony gardening or in a sunny backyard, your tree can become a long-term source of fresh, nutritious mangoes. Watching a mango tree grow from seed to fruit-bearing plant is both educational and deeply satisfying, proving that nature’s bounty is within your reach, even for free.

Start today, follow these steps, and enjoy the journey of growing your very own mango tree—one seed at a time. In a few years, you’ll have your own sweet harvest, ready to enjoy fresh or in homemade recipes, all thanks to the simple mango seed trick.

Grow Watermelons at Home Using This Unique Method – Yields That Will Surprise You!

Grow Watermelons at Home Using This Unique Method – Yields That Will Surprise You!

Watermelon is one of the most refreshing and beloved summer fruits, packed with hydration, vitamins, and natural sweetness. While many people assume watermelons require vast garden spaces to thrive, there’s a unique method that allows you to grow them at home—even in small yards, patios, or balcony gardens—and still achieve high yields. This guide will walk you step by step through this method, from seed selection to harvest, so you can enjoy your own homegrown watermelons that will surprise both you and your neighbors.


Why Grow Watermelons at Home?

Growing watermelons at home has several advantages:

  1. Freshness and Flavor – Store-bought watermelons are often picked before full ripeness. Homegrown fruits have maximum flavor and sweetness.
  2. Control Over Chemicals – You can grow your watermelons organically, avoiding pesticides and harmful chemicals.
  3. Satisfying Hobby – Gardening is therapeutic, teaches patience, and gives a sense of accomplishment.
  4. Space Efficiency – With unique growing methods, even small spaces can produce multiple fruits.
  5. High Yield Potential – Proper techniques can dramatically increase the number of watermelons per plant.

Choosing the Right Variety

Selecting the right watermelon variety is the first step to a successful harvest:

  • Sugar Baby: Small, round watermelons ideal for container or small-space gardening.
  • Crimson Sweet: Medium to large fruits, known for sweetness and disease resistance.
  • Mini or Personal Watermelons: Perfect for balcony or patio growing; usually 5–10 pounds per fruit.

For home gardeners aiming for high yields, smaller and medium-sized varieties are ideal. They mature faster and require less space while producing multiple fruits per plant.


The Unique Method: Container and Trellis Watermelon Growing

Traditional watermelon cultivation requires sprawling vines that cover large areas. The unique method involves combining containers and vertical trellising, which offers several benefits:

  1. Space Efficiency – Vertical growth saves ground space and allows multiple plants in a small area.
  2. Improved Air Circulation – Reduces fungal disease risks like powdery mildew.
  3. Ease of Harvest – Fruits are easier to access, and you can hang them using slings.
  4. High Yield Potential – Proper support ensures the plant invests energy into fruiting rather than sprawling.

Step 1: Selecting the Container

Watermelons need deep, well-draining containers. Here’s what to look for:

  • Size: Minimum 15–20 gallons (57–76 liters) per plant. Bigger containers support larger root systems.
  • Material: Plastic or fabric grow bags work best because they retain moisture and are lightweight.
  • Drainage: Drill multiple holes at the bottom. Proper drainage prevents root rot.
  • Mobility: If space or sunlight is limited, lightweight containers allow you to move the plant to the sunniest spot.

Step 2: Preparing the Soil Mix

Watermelons thrive in nutrient-rich, well-drained soil. The ideal mix for container growing includes:

  • 2 parts potting soil or garden soil
  • 1 part compost or well-rotted manure
  • 1 part perlite or coco coir (for aeration and drainage)

Add a handful of slow-release fertilizer or organic amendments like bone meal to support flowering and fruiting. Before planting, water the soil to settle it and create a moist environment for seeds or seedlings.


Step 3: Planting Watermelon Seeds or Seedlings

Watermelon seeds should be planted in warm soil, ideally around 70–85°F (21–29°C). Steps:

  1. Plant 2–3 seeds per container, 1 inch deep.
  2. Keep the soil consistently moist but not waterlogged.
  3. Once seedlings sprout and develop 2–3 true leaves, thin to the strongest plant per container.

If using seedlings, transplant carefully to avoid root disturbance.


Step 4: Vertical Trellising and Support

The key to this unique method is training vines to grow vertically:

  1. Place a sturdy trellis behind each container. Bamboo stakes, wooden frames, or wire mesh work well.
  2. As vines grow, gently tie them to the trellis using soft string or garden tape.
  3. Fruits can become heavy, so use slings made of old cloth or mesh to support each watermelon as it grows.

Vertical growth prevents sprawling, improves sun exposure, and reduces disease risk.


Step 5: Watering and Fertilization

Watermelons need consistent moisture for optimal growth:

  • Water deeply 2–3 times per week, more frequently during hot weather.
  • Avoid wetting leaves; focus on the root zone.
  • Fertilize every 2–3 weeks with a balanced liquid fertilizer high in potassium and phosphorus to encourage flowering and fruiting.
  • Stop fertilization once fruits start to mature to avoid excess leaf growth at the expense of sweetness.

Mulching the soil surface with straw or leaves helps retain moisture, regulate temperature, and suppress weeds.


Step 6: Pollination

Watermelon flowers are separate male and female flowers, so pollination is essential:

  • Male flowers appear first and are usually in clusters.
  • Female flowers have a small swelling at the base (future fruit).
  • If natural pollinators are scarce, use hand pollination: gently transfer pollen from male flowers to female flowers using a small brush or cotton swab.

Proper pollination dramatically increases fruit set and overall yield.


Step 7: Managing Pests and Diseases

Even with container growing, watermelons are prone to pests and diseases:

  • Aphids: Spray neem oil or insecticidal soap.
  • Powdery Mildew: Ensure good air circulation, avoid wetting leaves, and remove affected leaves.
  • Fruit Flies or Beetles: Monitor regularly and use organic repellents or traps.

Regular inspection and early intervention keep plants healthy and maximize yield.


Step 8: Harvesting Watermelons

Knowing when to harvest is key to getting sweet, juicy fruits:

  • Check the tendril nearest the fruit; when it turns brown and dries, the watermelon is likely ripe.
  • The underside of the fruit should develop a creamy yellow spot where it rests on the ground or sling.
  • The skin should sound hollow when tapped.
  • Harvest using a sharp knife, leaving a small portion of stem attached.

Frequent harvesting encourages more flowering and fruiting throughout the season.


Maximizing Yield Using This Method

Even with limited space, container and vertical trellis watermelon growing can produce impressive results. Tips to maximize yield:

  1. Multiple Containers: Grow 2–3 plants in separate containers to stagger harvests.
  2. Prune Strategically: Remove weak or overcrowded vines to direct energy to main fruit-bearing vines.
  3. Optimize Sunlight: Watermelons need 6–8 hours of full sunlight daily. Rotate containers if necessary.
  4. Nutrient Boost: Use a liquid fertilizer high in potassium during flowering and fruiting stages.
  5. Pollinate Efficiently: Hand pollination ensures more fruits set, especially in urban areas with fewer insects.

With these practices, it’s possible to harvest 5–8 watermelons per container, sometimes even more with ideal care and conditions.


Tips for Urban Gardeners

This unique method is perfect for city dwellers with limited outdoor space:

  • Balcony Gardens: Containers and trellises work perfectly on balconies. Use sturdy railings for support.
  • Patio or Small Yard: Vertical growth saves ground space and reduces weeding.
  • Container Rotation: Move containers to follow sunlight or protect from extreme weather.
  • Companion Plants: Plant herbs like basil or marigold nearby to deter pests naturally.

Even with small spaces, you can enjoy an abundant harvest using these smart gardening techniques.


Conclusion

Growing watermelons at home doesn’t require sprawling fields or extensive land. By using the unique container and vertical trellis method, you can achieve high yields, save space, and enjoy fresh, sweet watermelons straight from your garden.

This approach allows for better air circulation, easier harvesting, and higher fruit quality. With careful seed selection, proper soil preparation, consistent watering, pollination, and pest management, even a novice gardener can produce a surprisingly large harvest.

Whether you have a small backyard, balcony, or patio, this method transforms watermelon growing into a practical, space-efficient, and highly rewarding experience. With patience and care, you’ll be savoring the taste of homegrown watermelons that are sweeter, juicier, and more satisfying than anything store-bought—proving that small-space gardening can yield big results.

How to Achieve Fast Blue Pea Seed Germination at Home Successfully

How to Achieve Fast Blue Pea Seed Germination at Home Successfully

Blue pea, also known as Clitoria ternatea, is a stunning flowering plant recognized for its vibrant blue petals, delicate structure, and numerous health benefits. Beyond its ornamental value, blue pea flowers are used to make teas, natural food coloring, and herbal remedies. Growing this beautiful plant at home can be highly rewarding, but success depends largely on seed germination. Many gardeners struggle with slow or uneven sprouting, but with the right methods, you can achieve fast and successful blue pea seed germination at home. In this guide, we’ll explore simple steps, essential tips, and practical strategies to help your seeds sprout quickly and grow into healthy plants.


Understanding Blue Pea Seeds

Before diving into germination techniques, it’s essential to understand the nature of blue pea seeds. They have hard, thick seed coats that naturally protect the embryo inside. While this is beneficial in the wild, it can slow down germination when grown at home. Knowing the characteristics of the seeds helps in choosing the right method to encourage faster sprouting.

Key facts about blue pea seeds:

  • Dormancy: Many blue pea seeds have natural dormancy due to their tough coat.
  • Viability: Fresh seeds are more likely to germinate than old seeds. Ideally, use seeds harvested within the last year.
  • Environment: Warmth, moisture, and proper aeration are critical for breaking dormancy.

Selecting High-Quality Seeds

Successful germination begins with high-quality seeds. Here’s how to pick the best ones:

  1. Check appearance: Healthy seeds are firm, plump, and dark-colored. Avoid shriveled or discolored seeds.
  2. Freshness matters: Fresh seeds generally sprout faster and more evenly.
  3. Source: Purchase seeds from reputable suppliers or harvest them from mature, healthy plants.
  4. Quantity: Plant extra seeds, as not all may germinate even under optimal conditions.

Preparing Seeds for Fast Germination

Because blue pea seeds have hard coats, pre-treatment is crucial. Pre-treatment helps water penetrate the seed, activating germination. There are several effective methods:

1. Soaking Method

  • Place seeds in warm water for 12–24 hours before planting.
  • Use a glass or bowl and avoid hot water, which can damage the embryo.
  • After soaking, the seed coat softens, allowing faster root emergence.

2. Scarification Method

  • Use sandpaper or a small knife to gently scratch or nick the seed coat.
  • Avoid cutting too deep to prevent damaging the seed embryo.
  • Scarification increases water absorption, dramatically improving germination speed.

3. Combination Approach

  • For very old or tough seeds, combine soaking and light scarification.
  • First, lightly sand the seed surface, then soak for 12 hours.
  • This combination often yields the fastest and most uniform germination.

Choosing the Right Germination Medium

Blue pea seeds thrive in well-draining, nutrient-rich soil. Using the correct medium accelerates growth and minimizes the risk of rot or fungal issues. Recommended mediums include:

  • Seed-starting mix: Light, airy, and nutrient-rich.
  • Coco peat and vermiculite: Retains moisture while ensuring good aeration.
  • Sandy loam with compost: Provides structure and nutrition for young roots.

Important tips:

  • Avoid heavy clay soil, which retains too much water.
  • Ensure the container or tray has drainage holes.
  • Slightly moisten the medium before planting; it should be damp but not soggy.

Planting the Seeds

Proper planting depth and spacing are essential for healthy germination:

  1. Depth: Plant seeds about 0.5–1 inch deep. Too deep can delay sprouting; too shallow can dry out the seed.
  2. Spacing: If planting in trays, keep seeds 1–2 inches apart to prevent overcrowding.
  3. Cover lightly: Sprinkle a thin layer of soil over the seeds to maintain moisture.
  4. Label trays: Especially if planting different varieties or batches.

Creating the Optimal Environment

Blue pea seeds require warmth, moisture, and light for fast germination. Here’s how to create ideal conditions:

  • Temperature: Maintain 75–85°F (24–29°C). Seeds germinate faster in warm conditions.
  • Humidity: Cover trays with a clear plastic lid or plastic wrap to retain humidity. Ventilate daily to prevent fungal growth.
  • Sunlight: Place trays in bright indirect light. Avoid direct sunlight, which can dry out the seeds.
  • Consistency: Keep the soil consistently moist using a spray bottle or gentle watering.

Watering and Care During Germination

Proper watering is crucial for success:

  • Avoid overwatering: Saturated soil can lead to rot or fungal infection.
  • Mist gently: Use a spray bottle to keep the medium evenly moist.
  • Check daily: Ensure the soil surface never dries out completely.
  • Temperature maintenance: Avoid sudden temperature fluctuations, as cold or excessive heat can slow germination.

Monitoring Germination and Early Growth

Under optimal conditions, blue pea seeds typically sprout in 7–14 days, though some may take slightly longer. Signs of healthy germination include:

  • Visible root tips pushing through the soil.
  • Small green cotyledons emerging.
  • Steady stem growth in seedlings after a few days.

For a time-lapse observation, take photos every day. This not only allows you to monitor progress but also provides a visual record of the remarkable transformation from seed to seedling.


Transplanting Seedlings

Once seedlings develop 2–3 sets of true leaves, they are ready for transplanting:

  1. Choose a larger container or garden bed: Ensure adequate space for root expansion.
  2. Prepare soil: Use fertile, well-draining soil enriched with compost.
  3. Transplant carefully: Avoid damaging delicate roots.
  4. Water gently: Settle the soil around the roots and maintain consistent moisture.
  5. Gradually acclimate to sunlight: If moving seedlings outdoors, gradually introduce them to full sun to prevent shock.

Tips for Rapid and Healthy Growth

After germination, nurturing the seedlings ensures strong and fast growth:

  • Sunlight: Blue pea plants thrive in full sun for at least 6 hours per day.
  • Fertilization: Use a balanced organic fertilizer every 3–4 weeks to support leaf and root growth.
  • Support: For climbing varieties, provide a trellis or support to encourage vertical growth.
  • Pest management: Watch for aphids or caterpillars. Neem oil sprays or insecticidal soap can help protect young plants.
  • Pruning: Trim leggy or weak stems to promote bushier growth.

Troubleshooting Common Problems

Even with careful planning, issues may arise during germination. Here’s how to address them:

  • Seeds not sprouting: Likely causes include old seeds, low temperature, or dry conditions. Re-soak and maintain warmth and moisture.
  • Mold or fungal growth: Overwatering or poor ventilation can lead to mold. Remove affected seeds and improve air circulation.
  • Leggy seedlings: Caused by insufficient light. Move seedlings to brighter areas or use supplemental grow lights.

Benefits of Growing Blue Pea at Home

Successfully growing blue pea plants at home offers several advantages:

  1. Aesthetic appeal: Bright blue flowers enhance your garden or balcony.
  2. Health benefits: Flowers can be used to make teas rich in antioxidants.
  3. Educational value: Watching the transformation from seed to plant is fascinating and rewarding.
  4. Sustainable supply: Homegrown plants provide a steady source of seeds and flowers without depending on external suppliers.

Final Thoughts

Fast and successful germination of blue pea seeds at home is achievable with proper seed selection, pre-treatment, optimal planting conditions, and consistent care. By understanding the unique needs of these seeds—such as their hard coat and requirement for warmth and moisture—you can significantly reduce germination time and enjoy healthy, thriving seedlings.

Documenting growth through time-lapse photography or daily observation adds another layer of satisfaction, allowing you to see the magical transformation from tiny seed to vibrant plant. Whether for ornamental beauty, herbal use, or culinary experiments, blue pea is a rewarding plant to grow at home.

With patience, attention to detail, and the tips provided in this guide, you can achieve fast germination and strong growth, ensuring a flourishing blue pea plant that will bloom beautifully and provide enjoyment for years to come.

How to Grow a Date Palm from Seed at Home | Complete Tree Plant Guide

How to Grow a Date Palm from Seed at Home | Complete Tree Plant Guide

Date palms (Phoenix dactylifera) are iconic trees that not only enhance landscapes with their elegant fronds but also produce the sweet, nutrient-rich fruits cherished worldwide. While date palms are often purchased as saplings or mature trees, growing them from seed at home is an incredibly rewarding experience. Although it requires patience and consistent care, cultivating a date palm from seed allows you to witness the entire life cycle of this remarkable tree—from germination to full maturity. This comprehensive guide walks you through every step, providing practical tips to ensure successful growth and healthy development of your home-grown date palm.

Why Grow Date Palms from Seed?

Starting a date palm from seed has several advantages:

  1. Cost-Effective: Seeds are far less expensive than purchasing saplings, especially mature trees.
  2. Satisfaction: Watching a tree grow from a tiny seed to a towering palm is immensely gratifying.
  3. Adaptability: Seed-grown trees often develop stronger root systems and adapt well to local conditions.
  4. Genetic Diversity: Growing from seed allows you to explore different varieties and select for traits such as fruit size, flavor, and drought tolerance.

Although the process is slower than buying an established plant, the long-term reward of a thriving date palm makes it worthwhile.

Selecting and Preparing Seeds

The first and most crucial step is obtaining viable seeds:

  • Choose Fresh, Mature Dates: Select seeds from fully ripened fruits. Fresh seeds have a higher germination rate than old, dried seeds.
  • Clean the Seeds: Remove any fruit pulp, as remaining sugars can promote mold growth. Wash seeds thoroughly in water.
  • Soak the Seeds: Soak cleaned seeds in warm water for 24–48 hours to soften the hard outer shell and encourage germination. Change the water daily to prevent bacterial growth.
  • Optional Scarification: Lightly nick or sand the seed coat to speed up germination. This is helpful for especially hard seeds but must be done carefully to avoid damaging the embryo inside.

Proper seed selection and preparation dramatically increase the likelihood of successful sprouting.

Germinating the Seeds

Germination can be the most exciting stage, as it marks the beginning of life for your date palm. Follow these steps for best results:

  1. Choose a Container: Use small pots or seed trays with drainage holes. A well-draining medium is essential to prevent rot.
  2. Prepare the Medium: Mix equal parts of sand, perlite, and peat moss. This combination ensures moisture retention while allowing proper drainage.
  3. Planting Depth: Sow seeds about 1–2 cm deep, with the pointed end facing downward. Cover lightly with soil.
  4. Maintain Moisture: Keep the soil consistently moist but not waterlogged. Covering the container with a clear plastic bag can create a mini greenhouse, retaining humidity.
  5. Warmth and Light: Date seeds germinate best at temperatures between 25–30°C (77–86°F). Place the container in a warm, sunny location but avoid direct harsh sunlight, which may dry the soil.

Germination typically occurs within 4–8 weeks but can take up to 3 months for some seeds. Patience is key during this stage.

Caring for Seedlings

Once the seeds sprout, careful care is essential to ensure strong, healthy seedlings:

  • Light: Provide bright, indirect sunlight for 6–8 hours daily. Gradually expose seedlings to more direct sunlight as they grow stronger.
  • Watering: Keep the soil moist but avoid overwatering, which can cause root rot. Allow the top inch of soil to dry slightly between waterings.
  • Fertilization: Use a diluted, balanced liquid fertilizer once the seedlings develop their first true leaves. Organic fertilizers, such as compost tea, are also effective.
  • Transplanting: Once seedlings have 2–3 leaves and a strong root system, transplant them into individual pots to encourage further growth. Use a rich, well-draining soil mix for this stage.

Seedlings may look delicate initially, but with consistent care, they develop into robust young palms.

Growing Date Palms in Pots

For home growers, maintaining a date palm in a pot allows better control over soil, watering, and space:

  • Pot Selection: Use deep containers to accommodate the long taproot. A pot at least 12–15 inches deep and wide is ideal for young plants.
  • Soil Requirements: Use a mix of sandy loam, compost, and perlite for good drainage and nutrient content. Avoid heavy clay soils.
  • Watering: Water deeply once the topsoil dries slightly. Reduce frequency during cooler months to prevent waterlogging.
  • Fertilization: Apply a balanced fertilizer every 2–3 months during the growing season to promote healthy foliage and root development.

Potted date palms can remain indoors or on balconies, making them suitable for urban gardening and spaces with limited land.

Transplanting to the Ground

If you plan to grow your date palm into a full-sized tree, transplanting outdoors is the next step:

  1. Choose the Right Location: Full sun exposure is essential. Select a site with well-draining soil and protection from strong winds, which can damage young fronds.
  2. Spacing: Ensure a minimum distance of 20–25 feet between trees to allow ample room for growth and root expansion.
  3. Planting Hole: Dig a hole twice as wide and deep as the pot or root ball. Add organic matter such as compost to improve soil fertility.
  4. Transplanting: Gently remove the seedling from the pot, taking care not to damage roots. Place it in the hole, fill with soil, and water thoroughly.
  5. Mulching: Apply mulch around the base to retain moisture and suppress weeds. Keep mulch away from the trunk to prevent rot.

Transplanted date palms require careful monitoring during the first year to ensure establishment and adaptation to outdoor conditions.

Pruning and Maintenance

Date palms require minimal pruning, but certain practices enhance growth and fruiting in the long term:

  • Remove Dead or Damaged Fronds: This prevents pest infestation and improves air circulation.
  • Prune for Shape: Maintain a balanced canopy, especially in younger trees, to encourage strong structural growth.
  • Pest Management: Watch for common pests such as spider mites, scales, and aphids. Neem oil or insecticidal soap can help control infestations.
  • Disease Prevention: Ensure proper watering and avoid waterlogging to reduce fungal infections.

Regular observation and maintenance help ensure your date palm remains healthy and resilient.

Flowering and Fruiting

Date palms are dioecious, meaning male and female flowers grow on separate trees. For fruit production, you need at least one male tree for pollination:

  • Pollination: In natural conditions, wind and insects aid pollination, but hand pollination increases fruit set. Collect pollen from male flowers and transfer it to female flowers during the flowering season.
  • Time to Fruiting: Seed-grown date palms may take 4–8 years to bear fruit, depending on variety and growing conditions. Patience is essential.
  • Fruit Care: Water regularly during fruiting to ensure large, sweet fruits. Protect fruits from birds and pests with netting if necessary.

Proper flowering and pollination practices ensure a bountiful harvest of delicious dates.

Tips for Successful Home Cultivation

  1. Patience is Key: Growing a date palm from seed is a slow but rewarding process. Celebrate each stage, from germination to seedling growth.
  2. Consistent Care: Regular watering, fertilization, and pruning ensure healthy development.
  3. Protection from Cold: Date palms are sensitive to frost. If growing in cooler climates, provide winter protection or keep young plants indoors.
  4. Gradual Sun Exposure: Acclimatize seedlings to outdoor sunlight gradually to prevent sunburn.
  5. Record Keeping: Track watering, fertilization, and growth stages to identify patterns and optimize care.

By following these practical tips, you can successfully cultivate a date palm from seed at home and enjoy its many benefits for years to come.

Conclusion

Growing a date palm from seed at home is both an art and a science. It requires attention to detail, patience, and consistent care, but the rewards are immense. From observing the tiny seeds germinate to nurturing seedlings into majestic trees and eventually harvesting sweet, nutrient-rich fruits, the journey is deeply satisfying. By selecting viable seeds, providing optimal growing conditions, and maintaining diligent care, you can cultivate a healthy date palm that thrives for decades. Whether you are a backyard gardener, a patio enthusiast, or an urban grower, this complete tree plant guide ensures that your date palm seeds have the best possible start, giving you a chance to enjoy one of nature’s most iconic and beneficial trees right at home.

How to Successfully Grow Cylindrical Beetroot at Home for a Unique Vegetable Garden Experience

How to Successfully Grow Cylindrical Beetroot at Home for a Unique Vegetable Garden Experience

Beetroot is a versatile, nutritious vegetable beloved by home gardeners for its deep red color, earthy flavor, and impressive health benefits. While traditional round varieties are common, cylindrical beetroot offers a unique twist for gardeners looking to diversify their vegetable patch. Its elongated, uniform shape makes it perfect for slicing, roasting, or pickling, and it often produces higher yields in smaller spaces. Growing cylindrical beetroot at home is not only rewarding but also allows you to enjoy fresh, homegrown vegetables that elevate your culinary creations. In this guide, we’ll cover step-by-step tips to successfully cultivate cylindrical beetroot and achieve a thriving, productive garden.

Understanding Cylindrical Beetroot

Cylindrical beetroot, sometimes referred to as “long beet” or “Detroit Dark Red Cylinder,” is an elongated variety prized for its smooth texture and consistent shape. Unlike traditional round beets, the cylindrical type grows longer roots, which are ideal for uniform cooking and attractive presentation. Cylindrical beets are rich in vitamins A, C, and K, minerals like potassium and manganese, and powerful antioxidants such as betalains, which provide the vibrant red color and offer anti-inflammatory benefits.

This variety grows well in home gardens, raised beds, and even deep containers, making it a versatile choice for gardeners with limited space. With proper soil preparation, planting, and care, cylindrical beetroot can flourish in both temperate and subtropical climates.

Selecting the Right Location

Cylindrical beetroot requires a sunny spot that receives at least 6–8 hours of direct sunlight per day. Adequate sunlight ensures strong, healthy growth and vibrant root color. Beetroot also prefers cooler weather; temperatures between 50°F and 75°F (10°C–24°C) are optimal. In hot climates, consider planting in partial shade to prevent bolting, which can lead to woody or bitter roots.

Soil quality is crucial for cylindrical beetroot. It thrives in loose, well-draining soil that is rich in organic matter. Heavy clay or compacted soil can restrict root growth and result in misshapen or stunted beets. Raised beds or container gardening is an excellent solution for maintaining soil depth and structure, especially for elongated root varieties.

Preparing the Soil

Proper soil preparation is the foundation for successful beetroot cultivation. Follow these steps to create ideal conditions for cylindrical beetroot:

  1. Loosen the Soil: Dig or till the soil to a depth of at least 12 inches to accommodate long roots. Remove stones, sticks, and debris that could obstruct growth.
  2. Add Organic Matter: Mix in compost, well-rotted manure, or leaf mold to improve fertility, moisture retention, and soil structure.
  3. Check Soil pH: Cylindrical beetroot prefers slightly acidic to neutral soil, with a pH range of 6.0–7.0. Adjust the pH with lime (if acidic) or sulfur (if alkaline) as needed.
  4. Ensure Drainage: Beets do not tolerate waterlogged conditions. Raised beds or mounded rows can help improve drainage and prevent root rot.

Choosing Seeds and Planting

Cylindrical beetroot is typically grown from seeds, which can be purchased from reputable seed suppliers. Look for fresh, high-quality seeds for maximum germination rates.

Planting Seeds

  1. Sowing Time: Sow seeds in early spring or late summer for a fall harvest. Cylindrical beets grow best in cooler weather.
  2. Spacing: Sow seeds about 1 inch deep and 2–4 inches apart in rows spaced 12–18 inches apart. Thin seedlings once they reach 2–3 inches tall, leaving the strongest plants spaced 3–4 inches apart. Proper spacing allows roots to grow straight and elongated.
  3. Watering: After sowing, water gently but thoroughly to keep the soil consistently moist. Avoid overwatering, which can lead to fungal diseases.

Direct Sowing vs. Transplants

Cylindrical beetroot is typically direct-sown, as it does not transplant well due to its long taproot. However, in colder climates, starting seeds indoors in biodegradable pots 3–4 weeks before the last frost date can give seedlings a head start. Transplant seedlings carefully without disturbing the roots.

Watering and Moisture Management

Consistent moisture is key to growing healthy cylindrical beetroot. Water deeply at least once or twice a week, depending on rainfall and soil type. The soil should remain damp but not soggy. Uneven watering can lead to split roots or tough, woody textures.

Mulching around the base of the plants with straw, leaves, or grass clippings helps retain moisture, regulate soil temperature, and suppress weeds. In hot weather, increased watering may be necessary to prevent bolting or stress.

Fertilization

Cylindrical beetroot benefits from a balanced nutrient regimen. Too much nitrogen promotes leafy growth at the expense of root development, while phosphorus and potassium support strong, healthy roots.

  1. Pre-Planting Fertilizer: Incorporate a slow-release balanced fertilizer into the soil before sowing.
  2. Side Dressing: Once seedlings are established, side-dress with compost or an organic liquid fertilizer every 3–4 weeks to provide additional nutrients.
  3. Avoid Excess Nitrogen: Excessive nitrogen can lead to long, leafy tops and underdeveloped roots, which is particularly important for cylindrical varieties.

Thinning and Care

Thinning seedlings is essential for cylindrical beetroot. Crowded plants compete for nutrients and space, resulting in misshapen or stunted roots. Thin seedlings when they are 2–3 inches tall, leaving 3–4 inches between plants.

Keep the garden bed free of weeds, which can compete for water and nutrients. Hand weeding is recommended to avoid damaging shallow roots. Regularly inspect plants for pests such as leaf miners, aphids, or flea beetles. Organic pest control methods, such as neem oil or insecticidal soap, are effective for home gardens.

Harvesting Cylindrical Beetroot

Cylindrical beetroot is typically ready for harvest 50–70 days after sowing, depending on the variety and growing conditions. Harvest when roots reach 1–2 inches in diameter for optimal tenderness and flavor. Larger roots may become woody or less sweet.

To harvest, gently loosen the soil around the base and pull the roots straight out to avoid breakage. Trim the tops to about 1 inch above the root to prevent bleeding during storage. Freshly harvested cylindrical beetroot can be stored in the refrigerator for up to two weeks, or pickled for long-term use.

Companion Planting and Crop Rotation

Cylindrical beetroot grows well alongside onions, lettuce, kale, and bush beans. Avoid planting near brassicas such as cabbage or broccoli, which can compete for nutrients.

Rotating crops each season prevents soil depletion and reduces the risk of pests and diseases. Avoid planting beets in the same location for consecutive years to maintain healthy soil.

Challenges and Solutions

While cylindrical beetroot is relatively easy to grow, gardeners may encounter some challenges:

  1. Misshapen Roots: Often caused by compacted soil or insufficient spacing. Prepare deep, loose soil and thin seedlings properly.
  2. Bolting: Premature flowering occurs in hot weather or stress conditions. Sow in cooler seasons and maintain consistent moisture.
  3. Pests: Aphids, leaf miners, and root maggots can affect beet growth. Use organic pest control measures and monitor plants regularly.
  4. Diseases: Fungal diseases such as powdery mildew or leaf spot can occur in humid conditions. Provide proper spacing, good air circulation, and avoid overhead watering.

Health Benefits of Cylindrical Beetroot

Cylindrical beetroot is not only visually appealing but also highly nutritious. It supports cardiovascular health, improves digestion, boosts immunity, and provides natural anti-inflammatory benefits. Beets are a natural source of nitrates, which may enhance blood flow and athletic performance. Including fresh, homegrown beets in your diet ensures maximum nutrient retention and flavor.

Conclusion

Growing cylindrical beetroot at home offers a unique gardening experience that combines visual appeal, nutritional benefits, and culinary versatility. By selecting quality seeds, preparing deep, fertile soil, maintaining consistent watering and nutrition, and providing proper care, gardeners can enjoy a successful harvest of elongated, tender roots.

Whether planted in raised beds, garden plots, or containers, cylindrical beetroot adds variety and excitement to your vegetable garden. Its striking shape, vibrant color, and delicious taste make it a standout addition, while the cultivation process provides a rewarding opportunity to connect with nature and enhance your home-grown food supply. With patience, attention to detail, and dedication, growing cylindrical beetroot can transform your garden into a productive and beautiful space, offering fresh, exotic vegetables for your table all season long.

Essential Tips for Successful Plum Fruit Production in Your Home Garden

Essential Tips for Successful Plum Fruit Production in Your Home Garden

Growing plums at home can be a highly rewarding experience. These sweet, juicy fruits not only enhance your backyard or garden aesthetics but also provide fresh, healthy produce for your table. While plum trees are relatively low-maintenance compared to other fruit trees, producing a bountiful harvest requires careful planning, proper care, and attention to seasonal needs. Whether you are a beginner gardener or an experienced grower, this guide provides essential tips for successful plum fruit production in your home garden.


Why Grow Plums at Home?

Homegrown plums offer several benefits:

  1. Freshness and Flavor: Homegrown plums are far more flavorful and aromatic than store-bought varieties, which are often picked before ripening.
  2. Nutritional Value: Plums are rich in vitamins A, C, and K, antioxidants, fiber, and essential minerals like potassium, which support overall health.
  3. Cost Savings: Growing your own fruit reduces grocery bills, particularly if you enjoy seasonal plums regularly.
  4. Gardening Satisfaction: Cultivating a plum tree provides a sense of accomplishment, beautifies your garden, and attracts beneficial pollinators.

With the right knowledge, even a small backyard or container garden can yield a consistent supply of delicious plums.


Choosing the Right Plum Variety

Selecting the appropriate variety is crucial for successful fruit production. There are two main types of plums:

  1. European Plums (Prunus domestica): Typically grown in cooler climates. These plums are oval, firm, and excellent for fresh eating, canning, and drying. Common varieties include ‘Stanley’ and ‘Italian Prune.’
  2. Japanese Plums (Prunus salicina): Thrive in warmer climates, produce larger, juicier fruits, and ripen earlier than European varieties. Popular types include ‘Santa Rosa,’ ‘Methley,’ and ‘Beauty.’

When selecting a plum tree, consider:

  • Climate Suitability: Check local hardiness zones to ensure your tree will thrive.
  • Pollination Requirements: Some plum varieties are self-pollinating, while others require cross-pollination. Planting compatible varieties nearby increases fruit yield.
  • Tree Size: Dwarf and semi-dwarf varieties are suitable for small gardens or container growing.

Planting Plum Trees

Proper planting ensures healthy growth and productive fruiting. Here’s what you need to know:

Location and Soil

Plums need:

  • Sunlight: Full sun for at least 6-8 hours daily.
  • Soil: Well-draining, fertile soil with a slightly acidic to neutral pH (6.0–7.0). Avoid heavy clay or waterlogged areas.
  • Space: Standard plum trees need 15–20 feet of spacing, while dwarf varieties require 8–10 feet. Adequate spacing prevents competition for nutrients and allows proper air circulation.

Planting Process

  1. Dig a hole twice as wide and as deep as the root ball.
  2. Loosen the roots gently and place the tree at the same depth it was growing in the nursery.
  3. Backfill with soil, lightly tamping to remove air pockets.
  4. Water thoroughly after planting to help roots settle.
  5. Apply a 2-3 inch layer of mulch around the base, keeping it away from the trunk, to retain moisture and suppress weeds.

Watering and Fertilization

Plum trees require consistent care during their growth cycle:

Watering

  • Young Trees: Water regularly, 1-2 times per week, to establish roots.
  • Mature Trees: Deep watering every 10–14 days during dry periods is usually sufficient.
  • Tips: Avoid overwatering, which can cause root rot. Mulch helps conserve soil moisture.

Fertilization

  • Apply a balanced fertilizer (10-10-10) in early spring before new growth starts.
  • Supplement with compost or well-rotted manure to improve soil fertility.
  • Avoid high-nitrogen fertilizers during flowering, as excessive growth may reduce fruiting.

Pruning and Training Plum Trees

Pruning is essential for shaping the tree, improving air circulation, and increasing fruit production:

  1. Timing: Late winter or early spring, while the tree is dormant, is the best time to prune.
  2. Techniques:
    • Remove dead, damaged, or crossing branches.
    • Thin out crowded branches to allow sunlight to reach the inner canopy.
    • Maintain a central leader or vase shape for better structure.
  3. Summer Pruning: Light pruning after fruiting can help control size and encourage lateral growth.

Proper pruning not only improves fruit size and quality but also reduces the risk of fungal infections.


Pollination and Flowering

Most plum trees require pollination to produce fruit. Here’s how to ensure successful pollination:

  • Self-Pollinating Varieties: Some plums, like ‘Santa Rosa’ and ‘Methley,’ can set fruit without a second tree.
  • Cross-Pollination: Plant compatible varieties nearby to improve yield. Bees and other pollinators play a crucial role in transferring pollen.
  • Encouraging Pollinators: Plant flowering companion plants like lavender or marigold to attract bees.

Flowering occurs in early spring, and proper pollination during this period determines the quality and quantity of fruit.


Pest and Disease Management

Plum trees are prone to pests and diseases, but regular monitoring and preventive care can minimize problems:

Common Pests

  • Plum Curculio: Small beetles that damage developing fruit. Handpick or use traps.
  • Aphids and Scale Insects: Cause leaf curling and weaken the tree. Spray with insecticidal soap if necessary.
  • Mites: Can reduce leaf health; maintain proper watering and remove infested leaves.

Common Diseases

  • Brown Rot: Fungal disease that causes fruit decay. Prune affected branches, remove fallen fruit, and use fungicides if needed.
  • Black Knot: Fungal growth on branches that should be pruned and destroyed.
  • Leaf Spot: Affects leaves and reduces photosynthesis. Apply preventive fungicides and remove infected leaves.

Maintaining good air circulation, proper pruning, and cleanliness are key preventive measures.


Harvesting Plums

Knowing when to harvest ensures maximum flavor and sweetness:

  • Timing: Plums are ready to harvest when they are fully colored, slightly soft to touch, and easily detach from the tree.
  • Method: Gently twist or lift the fruit from the branch to avoid damaging stems.
  • Frequency: Harvest regularly to encourage continued production and prevent overripe fruits from attracting pests.

Storing and Using Plums

  • Short-Term Storage: Keep fresh plums at room temperature for a few days until fully ripe, then refrigerate to extend shelf life.
  • Long-Term Storage: Freeze, dry, or can plums to enjoy throughout the year.
  • Culinary Uses: Plums are versatile and can be eaten fresh, baked in pies, made into jams, or incorporated into savory dishes like sauces and glazes.

Tips for Maximizing Fruit Production

  1. Thinning Fruit: Remove small or excess fruits early in the season to allow remaining fruits to grow larger and healthier.
  2. Consistent Care: Water, fertilize, and prune regularly to maintain tree vigor.
  3. Protect From Frost: Late spring frosts can damage blossoms. Use frost cloths or cover young trees during cold snaps.
  4. Monitor Soil Health: Conduct soil tests periodically and amend as needed to maintain nutrient balance.
  5. Patience: Young trees may take 2–4 years to reach full fruiting capacity, so consistent care is key.

Final Thoughts

Plum trees are a rewarding addition to any home garden, offering beautiful blossoms in spring and a bountiful harvest of sweet, juicy fruits in summer. With careful variety selection, proper planting, consistent watering, balanced fertilization, pruning, and pest management, you can enjoy delicious, homegrown plums year after year.

Even if space is limited, dwarf and semi-dwarf varieties can be grown in containers on patios or balconies, making fresh plum fruit accessible to urban gardeners. By following these essential tips, you not only increase your chances of a successful harvest but also contribute to a sustainable and enjoyable gardening lifestyle.

Growing plums at home is more than just cultivating fruit—it’s about connecting with nature, practicing patience, and reaping the rewards of your hard work. Start with the right planning and care, and your garden will soon be filled with the sweet aroma and taste of homegrown plums.

Easy Technique to Root Mango Branch at Home for Beginners

Easy Technique to Root Mango Branch at Home for Beginners

Mangoes are beloved worldwide for their sweet, juicy fruit and luscious aroma. While most people buy mango saplings from nurseries, it is entirely possible—and surprisingly simple—to propagate your own mango tree from a branch right at home. Rooting a mango branch is not only cost-effective but also rewarding, giving you a sense of accomplishment as you watch your plant grow from a small cutting into a thriving tree. In this guide, we will cover an easy technique for beginners to root a mango branch at home successfully.

Why Propagate Mango from a Branch?

Mango trees can be propagated through seeds, grafting, and branch cuttings. While seed-grown trees take longer to bear fruit, rooting a branch from a mature tree ensures that the new plant retains the characteristics of the parent, including fruit quality and growth habits. This method is also faster than waiting for a seedling to mature, allowing your tree to produce flowers and fruit sooner.

Additionally, rooting a branch at home is a great way to experiment with plant propagation, learn basic horticultural techniques, and potentially create multiple trees from a single parent plant.

Choosing the Right Mango Branch

Success begins with selecting the correct branch. Here’s what to look for:

  1. Healthy Branch: Choose a branch that is healthy, free of disease or pests. Avoid any branches with discoloration, cracks, or fungal growth.
  2. Semi-Hardwood Branch: Mango branches are best propagated when they are semi-hardwood—firm but still flexible. These are typically 6–12 months old. Too soft or too old branches are less likely to root successfully.
  3. Size: Select a branch approximately 1–2 feet long with a diameter of about 1–2 inches. Make sure it has at least 3–4 nodes (the small bumps or marks where leaves grow), as these nodes are crucial for root formation.
  4. Timing: The best time to take a cutting is during the tree’s active growth period, usually in spring or early summer. Avoid the rainy season, as excessive moisture can lead to rotting.

Preparing the Branch for Rooting

Once you’ve selected the branch, preparation is key. Here’s how to get your cutting ready:

  1. Prune the Branch: Trim the branch to remove any leaves and flowers, leaving only 2–3 leaves at the top. This reduces water loss and directs the plant’s energy toward root development.
  2. Cut Properly: Use a sharp, sterilized knife or pruning shears to make a clean cut at the base of the branch. A clean cut prevents infection and increases the chances of rooting.
  3. Optional Hormone Treatment: While not absolutely necessary, dipping the cut end of the branch in a rooting hormone can increase the success rate. Rooting hormones stimulate root formation and help the cutting develop a stronger root system.

Rooting Techniques for Mango Branches

There are several methods to root a mango branch, but we’ll focus on the easiest techniques suitable for beginners: soil propagation and water propagation.

1. Soil Propagation Method

Soil propagation is the most natural and effective method for mango branches. Follow these steps:

  1. Choose the Right Container: Use a pot or container with good drainage. Mango cuttings are sensitive to waterlogging, which can cause rotting.
  2. Prepare the Soil: Mix garden soil with sand and compost in a 2:1:1 ratio. The soil should be light, well-draining, and nutrient-rich. Adding some organic matter helps the cutting develop roots faster.
  3. Plant the Cutting: Make a hole in the soil with a stick or your finger and insert the cut end of the mango branch about 4–6 inches deep. Firm the soil gently around the cutting to eliminate air pockets.
  4. Watering: Water the cutting lightly but consistently. The soil should be moist, not soggy. Overwatering is a common mistake that can cause the cutting to rot.
  5. Create a Humid Environment: Cover the cutting with a plastic bag or transparent bottle to maintain humidity. Make sure to allow some ventilation to prevent fungal growth.
  6. Sunlight: Place the pot in a warm, bright location, preferably with indirect sunlight. Too much direct sun can dry out the cutting, while too little light can slow root formation.
  7. Patience: Rooting takes time—typically 4–8 weeks. During this period, check for signs of root growth by gently tugging the cutting. Resistance indicates roots are developing.

2. Water Propagation Method

Water propagation is an alternative for beginners and allows you to see roots as they form. Follow these steps:

  1. Prepare a Container: Use a clean glass jar or container filled with water. Make sure the water is at room temperature.
  2. Insert the Cutting: Place the cut end of the mango branch in the water, ensuring that at least one node is submerged. Avoid submerging leaves.
  3. Change Water Regularly: To prevent bacterial growth, change the water every 3–4 days. Keep the container in a bright, warm location, but away from direct sunlight.
  4. Monitor Root Growth: After 3–6 weeks, you should see roots developing from the submerged nodes. Once the roots are about 2–4 inches long, the cutting is ready for planting in soil.

Caring for Your Rooted Mango Cutting

Once your cutting has successfully developed roots, it’s time to plant it permanently. Here’s how to ensure it grows into a healthy mango tree:

  1. Transplanting: Choose a sunny location in your garden with well-draining soil. Dig a hole large enough to accommodate the roots comfortably. Plant the cutting and water thoroughly.
  2. Watering: Keep the soil consistently moist for the first few weeks after transplanting. Gradually reduce watering as the plant establishes itself.
  3. Mulching: Apply a layer of organic mulch around the base of the plant to retain soil moisture, suppress weeds, and regulate temperature.
  4. Fertilization: Start applying a balanced organic fertilizer after the first month. Mango trees are heavy feeders, and proper nutrition encourages healthy growth.
  5. Pruning: Prune the cutting lightly to encourage branching and a strong structure. Avoid heavy pruning until the plant is well-established.
  6. Protection: Protect the young plant from strong winds, pests, and extreme temperatures. Using a protective mesh or temporary shelter can help during its early stages.

Common Challenges and Solutions

  • Cutting Rot: Often caused by overwatering or poor drainage. Solution: Use well-draining soil and water moderately.
  • No Root Growth: Could be due to improper cutting selection or timing. Solution: Use semi-hardwood branches and try again during the active growth period.
  • Pests: Aphids and mites may attack young cuttings. Solution: Inspect regularly and use natural pest control methods like neem oil.

Tips for Beginners

  1. Start with more than one cutting to increase your chances of success.
  2. Keep a propagation journal to note planting dates, observations, and root development.
  3. Avoid disturbing the cutting too often; patience is key.
  4. Use sterilized tools to prevent infections.
  5. Ensure the cutting is in a warm, bright, and humid environment for faster root growth.

Enjoying the Fruits of Your Labor

Rooting a mango branch at home allows you to enjoy the satisfaction of growing your own tree from a simple cutting. With care and patience, your cutting can develop into a strong, fruit-bearing mango tree within 2–4 years, depending on the variety and growing conditions. Not only will you save money, but you’ll also have the joy of harvesting mangoes that you nurtured from the very beginning.

Conclusion

Rooting a mango branch at home is an easy, rewarding process that even beginners can master. By selecting the right branch, preparing it properly, and providing the ideal conditions for root growth, you can grow your own mango tree without stepping into a nursery. Whether you choose soil or water propagation, patience, care, and attention to detail are key. Before you know it, your small cutting will transform into a flourishing tree, offering sweet, juicy mangoes for years to come. This simple technique is a perfect way to expand your home garden and experience the joy of growing fruit from scratch.

Housewives’ Dream: Grow Cabbage at Home in Plastic Bottles – Easy, Space-Saving, and High Yield!

Housewives’ Dream: Grow Cabbage at Home in Plastic Bottles – Easy, Space-Saving, and High Yield!

For many home gardeners, growing fresh vegetables at home is both a passion and a way to ensure a healthy, chemical-free diet. But space constraints often pose a significant challenge, especially for urban dwellers or those living in apartments. What if you could grow crisp, delicious cabbage right on your balcony, kitchen window, or tiny backyard without large garden plots? Enter the ingenious method of growing cabbage in plastic bottles—a simple, space-saving, and high-yield solution that’s perfect for housewives, hobbyists, and anyone interested in self-sufficiency.

This complete guide will walk you through everything you need to know about growing cabbage in plastic bottles, from selecting seeds to harvesting your leafy bounty.


Why Grow Cabbage at Home?

Cabbage is a versatile, nutrient-rich vegetable packed with vitamins C and K, fiber, antioxidants, and minerals. Including cabbage in your diet supports digestion, boosts immunity, and promotes overall wellness. While many may assume growing cabbage requires ample soil and garden space, the bottle method proves otherwise.

Growing cabbage at home offers several advantages:

  • Freshness on demand: Pick leaves as needed, ensuring peak flavor and nutrition.
  • Reduced chemical exposure: Control your soil and water, minimizing pesticides and fertilizers.
  • Space efficiency: Ideal for apartments, balconies, or small patios.
  • Cost-saving: Save money by growing your own instead of buying from markets.
  • Educational and fun: A great project for kids and family, teaching gardening and sustainability.

Materials You’ll Need

You don’t need fancy tools to get started. Most of these items are likely already at home or easily available:

  • Plastic bottles: 2-liter soda bottles work best.
  • Potting mix: Well-draining soil rich in organic matter.
  • Cabbage seeds: Choose varieties suitable for container growth, like “Mini Green” or “Micro Cabbage.”
  • Watering can or spray bottle: To control moisture without overwatering.
  • Scissors or knife: For cutting bottles.
  • Fertilizer (optional): Organic compost or liquid fertilizer to boost growth.

Step 1: Preparing the Plastic Bottles

The beauty of this method lies in the clever use of everyday plastic bottles. Here’s how to prepare them for cabbage cultivation:

  1. Clean the bottle: Remove any labels and rinse thoroughly.
  2. Cut the bottle: Cut off the top one-third of the bottle. This top piece can be inverted as a mini-greenhouse to cover seedlings.
  3. Create drainage holes: Puncture small holes at the bottom of the bottle to prevent waterlogging. Proper drainage is essential to avoid root rot.
  4. Optional window: For larger bottles, cut a small side window to check root growth and soil moisture.

By recycling plastic bottles, you’re also contributing to an eco-friendly gardening approach.


Step 2: Preparing the Soil

Cabbage thrives in nutrient-rich, well-draining soil. Here’s a simple way to prepare your potting mix:

  • Mix equal parts of garden soil and compost for a fertile base.
  • Add perlite or sand to improve drainage.
  • Optional nutrients: A tablespoon of organic fertilizer per bottle encourages strong growth.

Fill the bottle with soil up to 2–3 inches below the top. Lightly compact, but avoid over-compressing the soil, which can impede root development.


Step 3: Sowing Cabbage Seeds

Starting cabbage seeds in bottles is easy and rewarding:

  1. Plant the seeds: Place 2–3 seeds ½ inch deep in the soil.
  2. Water gently: Use a spray bottle to moisten the soil without washing away seeds.
  3. Cover the bottle: Invert the cut top portion to act as a mini-greenhouse. This traps moisture and warmth, promoting germination.
  4. Placement: Keep the bottle in a sunny location, such as a windowsill, balcony, or under grow lights.

Germination typically occurs within 5–10 days, depending on the temperature. Maintain consistent warmth (around 60–70°F or 15–21°C) for optimal growth.


Step 4: Caring for Seedlings

Once seeds sprout, they require careful attention to ensure strong, healthy plants:

  • Sunlight: Cabbage seedlings need 6–8 hours of sunlight daily. Rotate bottles to ensure even growth.
  • Watering: Keep the soil consistently moist, but avoid soggy conditions. Water small amounts daily or as needed.
  • Thinning: When seedlings have 2–3 true leaves, thin to one strong plant per bottle. Remove weaker seedlings to reduce competition for nutrients.
  • Fertilization: Light liquid feeding every 2 weeks encourages robust leaf development.

Step 5: Transplanting (Optional)

Some gardeners prefer starting seeds in smaller bottles and transferring seedlings to larger containers as they grow. If you choose this route:

  • Select larger bottles or pots (3–5 liters) for mature growth.
  • Handle seedlings carefully to avoid root damage.
  • Plant at the same soil level to minimize transplant shock.

With proper care, your cabbage will continue to thrive and grow quickly.


Step 6: Encouraging Optimal Growth

Cabbage in bottles grows best with consistent care:

  • Temperature: Ideal range is 60–75°F (15–24°C). Avoid extreme heat, which can stress the plant.
  • Sunlight: Ensure at least 6 hours of direct sunlight daily.
  • Fertilization: Every 3–4 weeks, apply a balanced organic fertilizer. Leafy greens, like cabbage, thrive with nitrogen-rich nutrients.
  • Pest management: Watch for aphids, caterpillars, or fungal issues. Spray with mild soapy water or neem oil if needed.

By paying attention to these factors, you’ll maximize leaf size and overall yield.


Step 7: Harvesting Your Home-Grown Cabbage

One of the most satisfying moments for any gardener is harvesting. Cabbage grown in bottles is no exception. Depending on variety and care, cabbage can be ready for harvest in 60–90 days:

  • Size: Small or mini-cabbage varieties are perfect for container growth. Harvest when the heads are firm and compact.
  • Method: Use a sharp knife to cut the head at the base, leaving some outer leaves for potential regrowth in certain varieties.
  • Storage: Fresh cabbage can last up to 2 weeks in the refrigerator, ensuring a steady supply of nutritious greens.

Advantages of Bottle Gardening for Cabbage

Growing cabbage in plastic bottles offers several unique benefits:

  1. Space-saving: Ideal for urban homes with limited outdoor space.
  2. Mobility: Bottles can be moved indoors during harsh weather.
  3. High yield: With proper care, each bottle produces a full head of cabbage.
  4. Eco-friendly: Reuses plastic bottles, reducing household waste.
  5. Accessible gardening: Perfect for beginners and housewives with limited gardening experience.

Common Mistakes and How to Avoid Them

Even with the easiest methods, some beginners make common mistakes. Here’s how to prevent them:

  • Overwatering: Avoid soggy soil; proper drainage prevents root rot.
  • Insufficient sunlight: Lack of light results in weak, elongated leaves. Rotate bottles or use grow lights.
  • Neglecting nutrients: Small containers require regular fertilization to replace depleted nutrients.
  • Crowding plants: Thinning seedlings is essential to prevent competition.

By paying attention to these pitfalls, even first-time gardeners can succeed.


Tips for Success

  • Choose dwarf or compact cabbage varieties to ensure they fit comfortably in bottles.
  • Label bottles with planting dates to track growth stages.
  • Regularly monitor moisture by checking soil with your finger or a small stick.
  • Harvest selectively: You can pick outer leaves as needed, leaving the inner head to continue growing.
  • Rotate bottles for even sunlight exposure and stronger stems.

Final Thoughts

Growing cabbage at home in plastic bottles is more than just a gardening trend—it’s a practical, sustainable, and rewarding solution for anyone looking to enjoy fresh, home-grown vegetables. This method empowers housewives, urban gardeners, and beginners to grow a nutritious staple with minimal space and effort.

The combination of low-cost materials, space efficiency, and high yield makes it a perfect choice for those who want to embrace home gardening without the complications of large-scale planting. By following this step-by-step guide, you can transform ordinary plastic bottles into productive mini-gardens, ensuring a fresh, healthy supply of cabbage throughout the year.

So why wait? Gather your bottles, select your seeds, and start your cabbage-growing journey today. With patience, care, and a touch of creativity, you’ll enjoy the satisfaction of harvesting your own leafy greens right from the comfort of your home—proof that even the smallest spaces can yield big rewards.