Grow Sweet Pineapples at Home: The Ultimate Step-by-Step Guide for Beginners (Fast & Easy Method)

Grow Sweet Pineapples at Home: The Ultimate Step-by-Step Guide for Beginners (Fast & Easy Method)

Growing a pineapple at home may sound unusual, but it’s surprisingly simple—and extremely rewarding! With just a pineapple crown and a little patience, you can grow your own plant that not only looks beautiful but also produces a delicious fruit. Pineapples grow well in pots, balconies, terraces, and even indoors near a bright window.

This complete 1200-word guide will walk you through every step—from choosing the right pineapple, preparing the crown, planting, caring, and all the way to harvesting. If you’ve ever dreamed of growing your own pineapple, this is the perfect place to start.


Why Grow Pineapples at Home?

Pineapples are tropical plants that adapt extremely well to containers. They don’t require much space, water, or maintenance. This makes them ideal for home gardeners, even beginners.

Benefits of Growing Pineapples

  • Low maintenance and drought-tolerant
  • Grows well in pots
  • Beautiful ornamental foliage
  • Free plant from a store-bought pineapple
  • Fun gardening project for kids and beginners
  • Produces sweet homegrown fruit

If you have a sunny spot at home, you can easily grow a pineapple plant that will reward you with a beautiful fruit in 18–24 months.


Step 1: Selecting the Perfect Pineapple

Your journey begins with choosing a healthy, ripe pineapple from the market.

Choose a Pineapple With:

  • Fresh green leaves at the crown
  • No signs of rot
  • No wrinkles or soft spots
  • Sweet aroma
  • Firm body

Avoid: pineapples with dry, brown, or brittle crown leaves—they won’t grow.


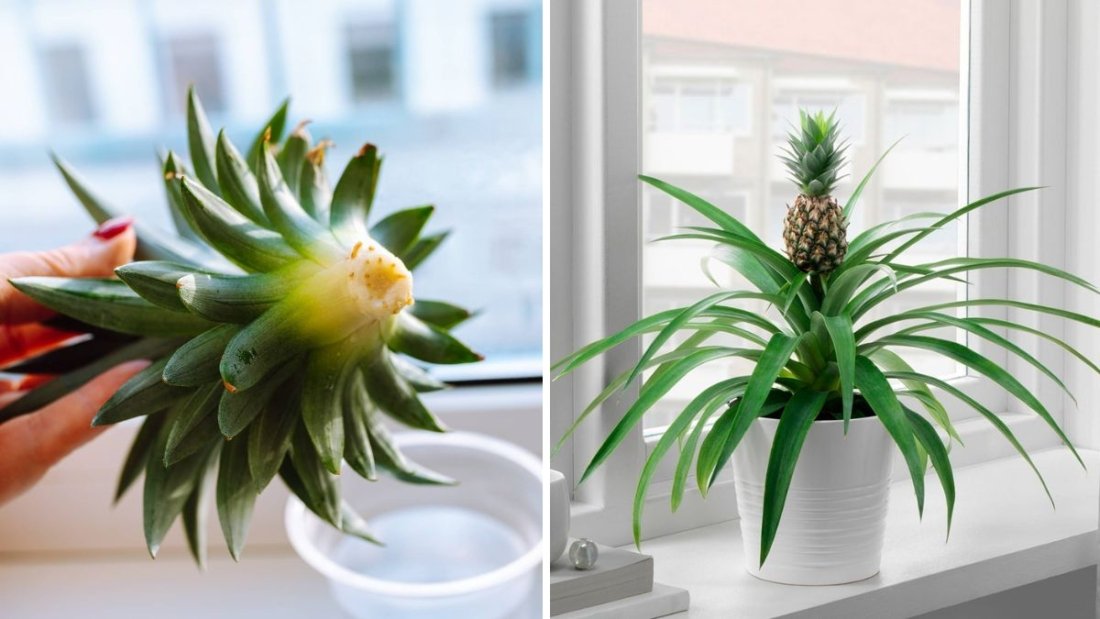
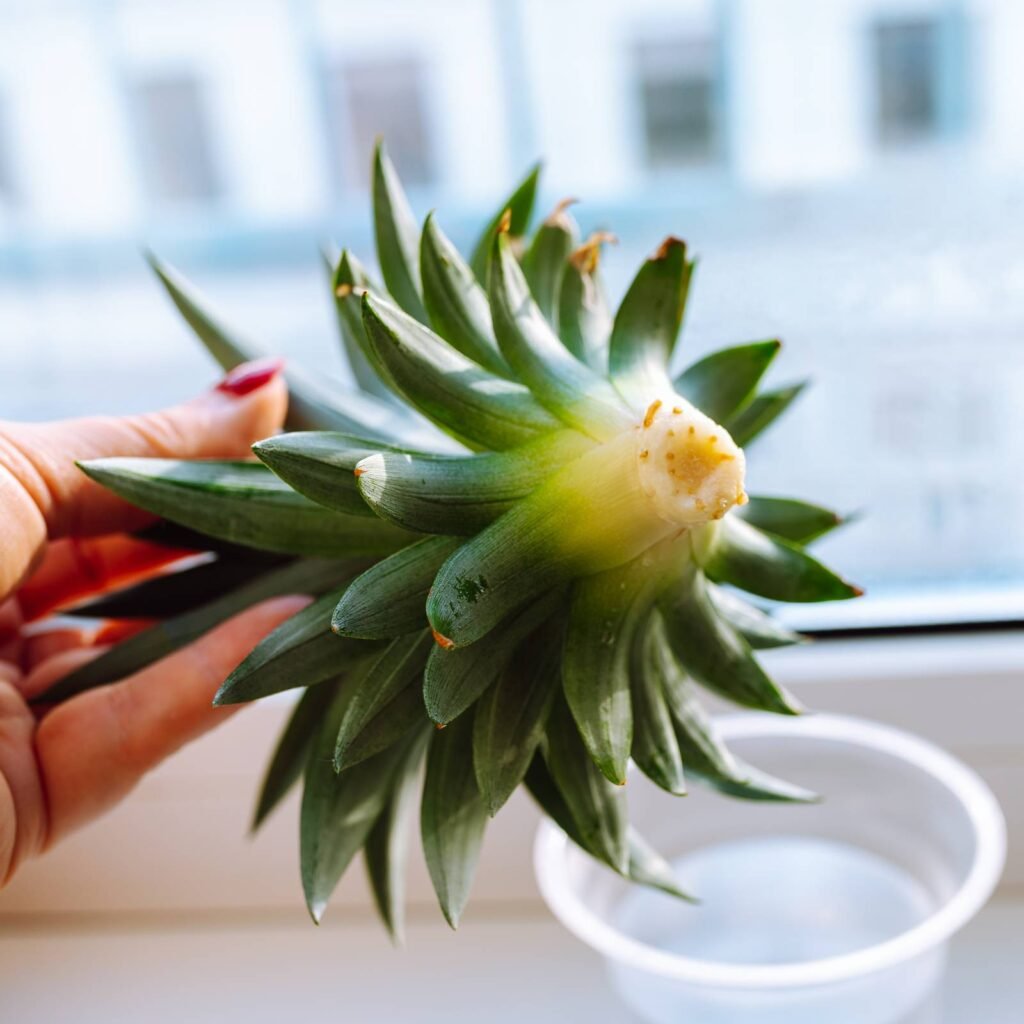
Step 2: Preparing the Pineapple Crown

Once you have your pineapple, it’s time to prepare the top for planting.

How to Prepare the Crown:

  1. Twist the Crown Off:
    Hold the pineapple body in one hand, and twist the leafy crown using your other hand. It will separate cleanly.
  2. Remove Excess Fruit Flesh:
    Using a knife, carefully trim any remaining fruit flesh from the base of the crown.
    Important: Leaving flesh attracts rot.
  3. Pull Off the Bottom Leaves:
    Peel about 1–2 inches of the lower leaves to expose small brown root buds.
  4. Dry the Crown:
    Keep the crown aside for 2–3 days in a shaded place.
    This drying helps prevent fungal infections.

Now your pineapple crown is ready for rooting.


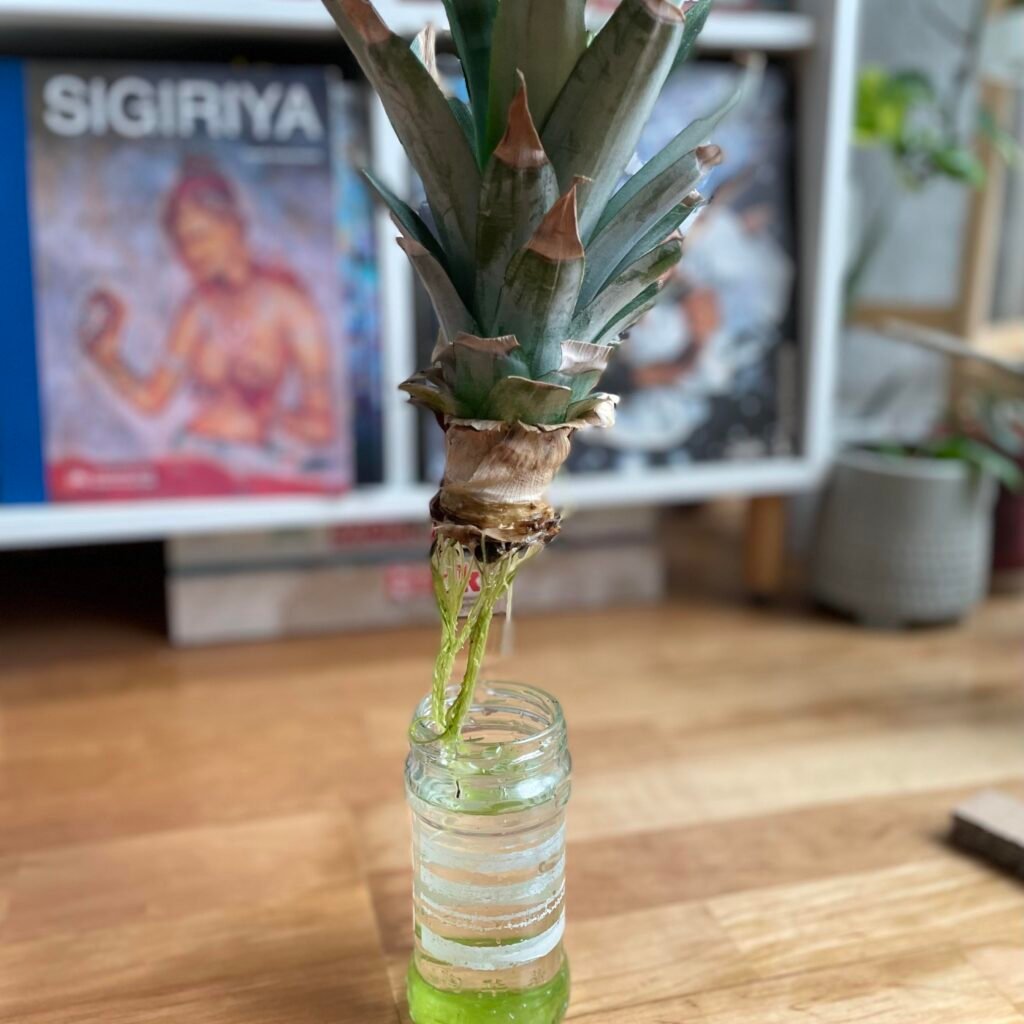
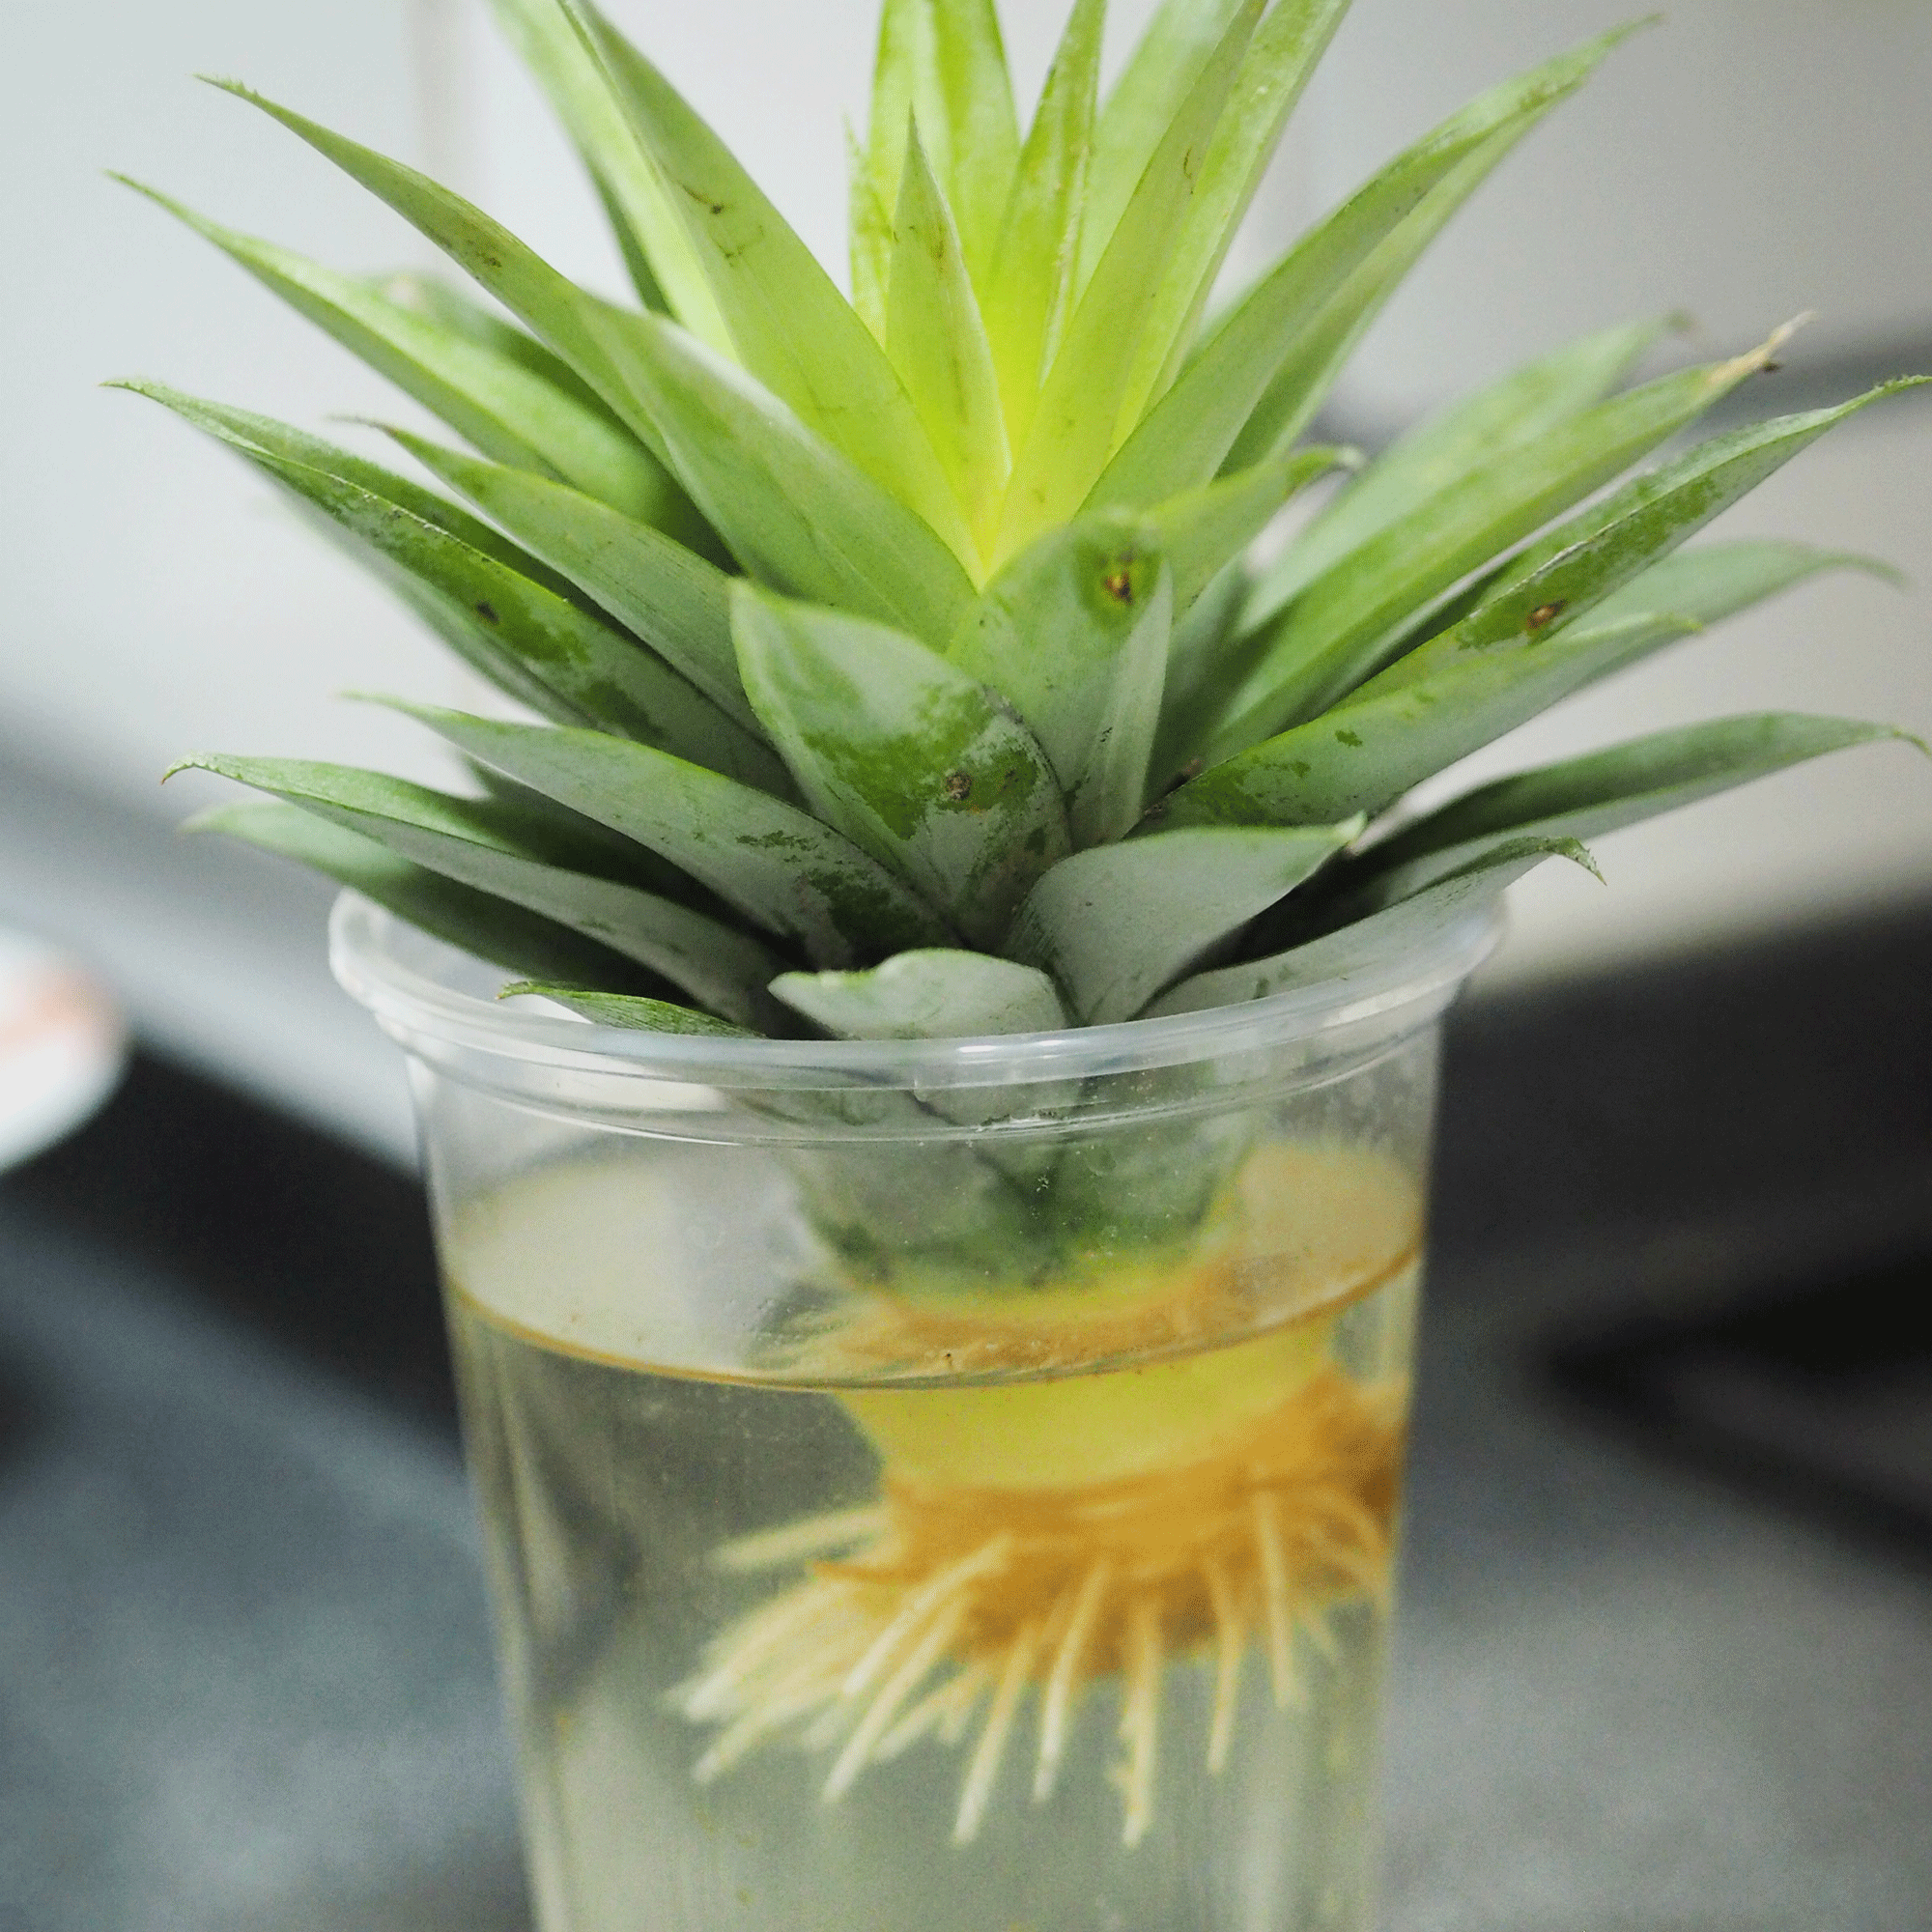
Step 3: Rooting the Pineapple Crown

You can root pineapple crowns in water or soil.
But soil rooting is more natural and gives better results.

Soil Rooting Method (Recommended):

  1. Choose a small pot (6 inches).
  2. Fill it with a well-draining mix:
    • 50% garden soil
    • 30% sand
    • 20% compost
  3. Insert the crown 1–2 inches deep into the soil.
  4. Press soil firmly around it.
  5. Water lightly.
  6. Keep in bright, indirect sunlight.

What Happens Next (Rooting Updates):

  • Week 1: Leaves stay green and upright.
  • Week 2: Small roots begin forming underground.
  • Week 3–4: Roots strengthen; new leaves begin to grow from the center.

If you see new leaves emerging, that means your pineapple crown has rooted successfully!


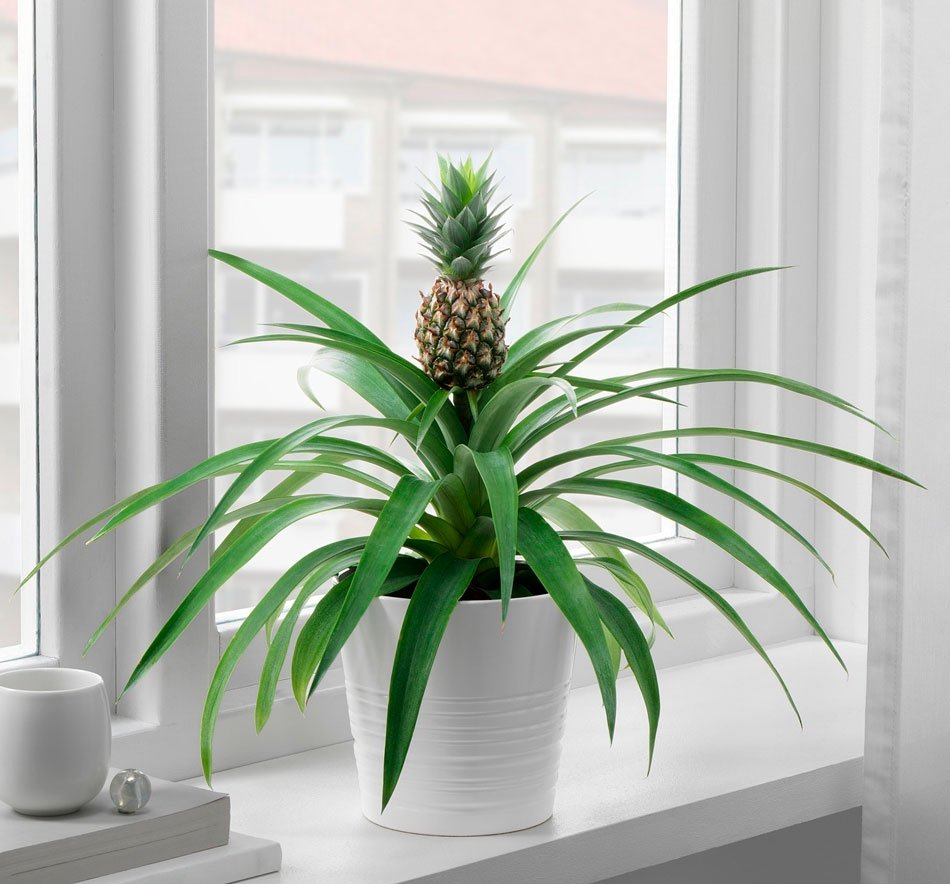
Step 4: Transplanting the Pineapple Plant

After 30–40 days, your rooted crown is ready to be shifted to a bigger pot.

Best Pot Size:

Use a 12–14 inch pot for best results.

Ideal Soil Mix:

  • 40% garden soil
  • 30% compost
  • 20% river sand
  • 10% cocopeat

Mix should be well-draining because pineapples hate soggy soil.

How to Transplant:

  1. Fill the pot with the soil mix.
  2. Make a small hole in the center.
  3. Gently remove the crown from the previous pot.
  4. Place it in the new pot.
  5. Press soil lightly and water well.
  6. Shift to bright sunlight gradually.

Step 5: Pineapple Plant Care Guide

Caring for pineapples is simple if you follow a few important rules.


1. Sunlight

Pineapples love the sun!
They require 6–8 hours of direct sunlight daily.

Perfect locations include:

  • Sunny terrace
  • South-facing balcony
  • Garden area with full sun

More sunlight = faster growth and sweeter fruit.


2. Watering

Pineapples are drought-tolerant and do not like standing water.

Watering Tips:

  • Water once every 3–4 days in summer.
  • Water once a week in winter.
  • Always let the top soil dry before watering again.
  • Avoid waterlogging at all costs.

3. Feeding (Fertilizer)

Pineapples are heavy feeders during growth stages.

Best Fertilizers:

  • Vermicompost
  • Cow dung compost
  • Mustard cake liquid
  • Banana peel liquid fertilizer
  • Seaweed extract

Feed the plant every 30–40 days.

This ensures strong foliage growth and faster fruit development.


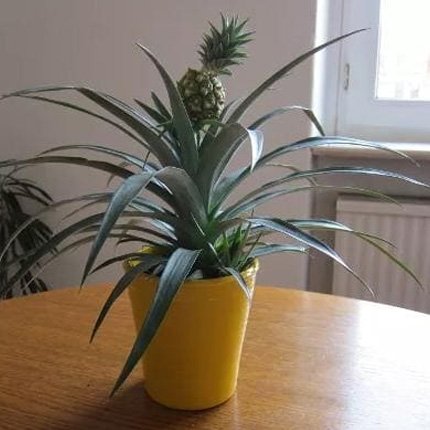
Step 6: Pineapple Growth Timeline (Month-by-Month Updates)

Here’s what you can expect as your plant grows:

Month 1–2:

Crown establishes roots and new leaves appear.

Month 3–6:

Leaves become longer; plant grows wider.

Month 7–10:

Plant strengthens and reaches maturity size (2–3 feet wide).

Month 12–16:

Center part of the plant becomes tight; prep for flowering begins.

Month 16–20:

A beautiful pinkish-red flower emerges.

Month 20–24:

Flower develops into a fruit.

Month 22–26:

Pineapple ripens fully and is ready for harvest.

Patience pays—homegrown pineapples are sweeter than store-bought ones!


Step 7: Encouraging Your Pineapple to Flower Faster

If your pineapple plant takes longer than expected:

Try This Natural Trick:

  1. Place a ripe apple inside a plastic bag along with the pineapple plant crown area.
  2. Tie the bag loosely for 3–4 days.
  3. Ethylene gas released by the apple encourages flowering.

This method is widely used by farmers to induce blooms naturally.


Step 8: Protecting Your Pineapple Plant

Common Problems & Solutions

1. Yellow Leaves

Cause: Overwatering
Solution: Reduce watering and improve sunlight.

2. Rotting Crown

Cause: Excess moisture
Solution: Use well-draining soil; avoid overhead watering.

3. Slow Growth

Cause: Low sunlight or poor soil
Solution: Shift to full sun; add compost monthly.

4. Insects on Leaves

Cause: Mealy bugs or aphids
Solution: Spray neem oil every 10–15 days.


Step 9: Harvesting Your Homegrown Pineapple

Your pineapple is ready to harvest when:

  • The skin turns golden yellow
  • It smells sweet
  • The fruit feels firm but not hard
  • The crown becomes loose

Cut the fruit with a sharp knife, leaving 2–3 inches of stem attached.


Step 10: How to Regrow Pineapples Forever

The crown of your harvested pineapple can be planted again to grow a new plant.

This means:
One pineapple = Infinite pineapple plants!

Just repeat the same steps and enjoy endless harvests.


Final Thoughts

Growing pineapples at home is a slow but extremely rewarding experience. With the right sunlight, good soil, and a little patience, you can enjoy your own sweet, juicy pineapple straight from your garden or balcony.

Whether you’re a beginner or an experienced gardener, this method is easy, reliable, and fun. Start with one plant, and soon you’ll have a mini pineapple garden of your own!

Grow Hibiscus from Cuttings in Water: The Easiest Step-By-Step Method for Fast Rooting (Full Guide + Updates)

Grow Hibiscus from Cuttings in Water: The Easiest Step-By-Step Method for Fast Rooting (Full Guide + Updates)

Hibiscus—known for its large, colorful flowers—is one of the most loved flowering plants for home gardens. The best part? You don’t need to buy new plants every time. Growing hibiscus from cuttings is incredibly easy, and rooting them in water is one of the fastest, most successful propagation methods.

Whether you’re a beginner or an experienced gardener, this complete guide will show you how to root hibiscus cuttings in water step-by-step with full growth updates, so you get healthy, strong plants ready for transplanting.


Why Propagate Hibiscus in Water?

Water rooting has become very popular because of how simple and reliable it is. Here’s why:

  • Fast root formation
  • Easy to monitor root growth
  • Less chance of soil diseases
  • Beginner-friendly method
  • Higher success rate than direct soil planting

If you want to multiply your hibiscus plants for free, this method is perfect.


Step 1: Choosing the Right Hibiscus Cutting

Not every stem works well for propagation. Selecting the right cutting increases your success rate significantly.

Features of a Good Cutting:

  • 6–8 inches long
  • From a healthy mother plant
  • Semi-hardwood stem (not too green, not too woody)
  • Contains 3–4 leaf nodes
  • Free from pests and disease

How to Prepare the Cutting:

  1. Remove the lower leaves completely.
  2. Keep only 2–3 leaves at the top to reduce water loss.
  3. If leaves are large, cut them in half.
  4. Trim the bottom part of the stem at a 45-degree angle for better water absorption.

Now your cutting is ready for water rooting.


Step 2: Selecting a Jar and Preparing Water

To root hibiscus cuttings in water, use:

  • A clear glass jar or bottle
  • Clean, chlorine-free water

Why use glass?
It allows you to clearly observe root growth and detect rot early.

Water Preparation Tips:

  • Use filtered or stored water (tap water kept overnight).
  • Fill the jar about 3–4 inches.
  • Ensure only the nodes (where leaves were removed) are submerged.

Step 3: Placing the Cutting in Water

Place the prepared cuttings carefully into the jar.

Important Conditions:

  • Keep the jar in bright, indirect sunlight (avoid direct sun).
  • Maintain a warm temperature (25–35°C).
  • Replace or top-up the water every 3 days.

Why Change Water?

Fresh water prevents fungal growth and oxygen depletion, which helps in faster root development.


Step 4: Rooting Timeline (Full Updates)

Here’s what happens at each stage:

Day 1–3:

  • Cutting stays hydrated
  • Leaves remain green
  • Some swelling around nodes starts

Day 4–7:

  • Hair-like small root bumps appear
  • These are the first signs of rooting

Day 10–14:

  • Thin white roots begin to grow longer
  • The cutting becomes more stable in water

Day 14–20:

  • Roots grow 1–2 inches
  • New leaf buds may start forming at the top

Day 21–30:

Your hibiscus cutting becomes fully rooted and ready for soil transplantation.

The ideal root length for planting is 2–3 inches.


Step 5: Preparing the Soil for Transplanting

Once the roots develop well, the next step is transplanting the cutting into soil.

Best Soil Mix for Hibiscus:

  • 40% garden soil
  • 30% compost or cow dung
  • 20% sand
  • 10% cocopeat

This mix ensures good drainage and keeps the hibiscus roots moist but not soggy.

Best Pot Size:

  • Start with an 8–10 inch pot
  • Make sure the pot has drainage holes

Step 6: Planting the Rooted Cutting

Follow these steps carefully to avoid transplant shock:

  1. Fill the pot with the soil mix.
  2. Make a small hole in the center.
  3. Gently remove the cutting from the water without damaging the roots.
  4. Place it inside the hole and cover the roots with soil.
  5. Press the soil gently to remove air pockets.
  6. Water immediately and deeply.

Important Tip:

Keep the plant in shade for 5–7 days after planting. This helps the cutting adjust to soil conditions.


Step 7: Post-Planting Care (First Month)

After the cutting has been transferred to soil, proper care will ensure healthy growth.

Week 1:

  • Leaves remain stable
  • Plant focuses on establishing its roots
  • Keep soil evenly moist (not soggy)

Week 2:

  • New leaves start growing
  • Slight upward growth noticeable

Week 3:

  • Stems strengthen
  • New branches appear

Week 4:

  • Plant becomes more vigorous
  • You can move it to a sunnier spot (morning sun only)

Step 8: Light, Water, and Fertilizer Requirements

Sunlight

Hibiscus needs plenty of sunlight once established.

  • Best: 4–6 hours of morning sunlight
  • Avoid strong afternoon sun for young cuttings

Watering

  • Keep soil moist but never waterlogged
  • Water every 2–3 days or when the top soil dries

Fertilizer

Start feeding after 30 days of transplanting.

Best fertilizers:

  • Vermicompost
  • Cow dung
  • Mustard cake liquid
  • Seaweed extract

Feed once every 20–25 days.


Step 9: Common Problems & Their Solutions

1. Leaves Turning Yellow

Cause: Overwatering or poor drainage
Solution: Improve soil aeration, reduce watering

2. Root Rot in Water

Cause: Dirty water or submerged leaves
Solution: Change water frequently, remove lower leaves

3. No Roots After 3 Weeks

Cause: Cutting too woody or low temperature
Solution: Use semi-hard cuttings and keep in warm place

4. Droopy Plant After Transplanting

Cause: Transplant shock
Solution: Keep in shade, mist leaves, maintain moisture


Step 10: When Will Your Hibiscus Flower?

A cutting-grown hibiscus plant will start producing flowers in:

  • 3–5 months, depending on variety and conditions

Once it matures, it can give year-round blooms if properly cared for.


Step 11: Tips for Bushy and Heavy Flowering Hibiscus

  • Pinch the growing tips to encourage branching
  • Keep the plant in full morning sunlight
  • Feed with potassium-rich fertilizers
  • Remove old yellow leaves regularly
  • Avoid overwatering

These small steps guarantee more blooms and a healthier plant.


Final Thoughts

Growing hibiscus from cuttings in water is one of the easiest and most satisfying gardening experiences. With just a jar of water, a healthy cutting, and simple care, you can create new hibiscus plants in less than a month.

This method is perfect for plant lovers who want to multiply their plants, gift them to friends, or fill their garden with vibrant hibiscus flowers.

Grow Endless Mint at Home: The Ultimate Step-By-Step Guide to Propagating Mint from Cuttings (With Full Updates)

Grow Endless Mint at Home: The Ultimate Step-By-Step Guide to Propagating Mint from Cuttings (With Full Updates)

Mint is one of the easiest and most rewarding herbs you can grow at home. Whether you love adding it to your tea, chutneys, smoothies, or salads, having a fresh supply at your doorstep is always a joy. The best part? You don’t need seeds! You can easily grow a lush, fragrant mint plant from just a simple cutting.

In this full guide—with updates on every stage—you will learn how to root mint cuttings, transplant them successfully, and keep them producing vigorously throughout the year.


Why Growing Mint from Cuttings Is the Best Method

Mint seeds take a long time to germinate and often fail to grow true to type. But mint cuttings grow fast, root quickly, and produce a healthy, cloned plant that retains all the qualities of the parent plant.

This method also guarantees:

  • Faster growth (roots appear in 5–7 days)
  • Higher success rate
  • True-to-variety plants
  • Quick bushy growth

So if you’re looking to grow mint the beginner-friendly way, stem cuttings are the perfect choice.


Step 1: Selecting the Perfect Mint Cutting

Healthy cuttings mean healthy plants. Choose cuttings that are:

  • 5–6 inches long
  • Bright green
  • Disease-free
  • Taken from new, soft stems (not woody)

Trim off the lower leaves, leaving only the top 2–3 pairs. This helps reduce water loss and allows the plant to focus on root formation.

Tip: You can take cuttings from store-bought mint bundles too!


Step 2: Rooting Mint Cuttings in Water

Water propagation is the easiest and most reliable method. Mint loves moisture, so rooting is usually very fast.

How to Do It:

  1. Take a clean glass or jar.
  2. Fill it with clean, chlorine-free water.
  3. Place the cuttings inside, making sure the leaf nodes are submerged.
  4. Keep it in a bright, indirect light location.
  5. Change the water every 2 days to prevent rotting.

What Happens Next (Full Update)

  • Day 2–3: Stems stay fresh, leaves firm up.
  • Day 4–5: Tiny white roots begin appearing.
  • Day 7–10: Strong root growth of 1–2 inches.
  • Day 14: Roots become thick and ready for planting.

Once the roots reach 1–2 inches in length, the cuttings are ready to be moved into soil.


Step 3: Preparing the Perfect Soil Mix for Mint

Mint loves moist, loose, nutrient-rich soil. The ideal potting mix is:

  • 40% garden soil
  • 30% compost/cow dung
  • 30% cocopeat or sand

This combination retains moisture but also ensures good drainage—mint hates waterlogged soil.

Best Container Size

  • Start with a 6–8 inch pot for a few cuttings.
  • If you want a large, bushy mint patch, use a wide container or grow bed.

Mint spreads fast, so a wide space results in fuller growth.


Step 4: Planting the Rooted Cuttings

Follow these steps for a successful transplant:

  1. Fill the pot with the soil mix.
  2. Make a hole with your finger or a stick.
  3. Gently place each rooted cutting into the hole.
  4. Cover roots with soil and press lightly.
  5. Water thoroughly to settle the soil.

Post-Planting Care Update (Next 7 Days)

  • Day 1–3: Plants may look droopy—this is normal.
  • Day 4–5: Plants perk up and new leaves appear.
  • Day 6–7: Growth becomes vigorous, and stems begin expanding sideways.

Your mint plant is now established!


Step 5: Light, Water, and Temperature Requirements

Sunlight

Mint prefers partial sunlight to bright indirect light.
Direct sunlight can burn the leaves, especially during hot summer days.

Best Position:

  • East-facing balcony
  • Shaded terrace
  • Window with filtered light

Watering

Mint loves moisture, but not soggy soil.

  • Water every 1–2 days or whenever the top soil feels dry.
  • Ensure the pot has drainage holes.

Temperature

Mint thrives in temperatures between 18°C–32°C.
It struggles in extreme heat, so provide shade during hot afternoons.


Step 6: How to Make Mint Grow Thick and Bushy

Mint naturally spreads through its runners, but with a few tips, you can make it grow exceptionally bushy:

1. Pinch the Top Leaves

Whenever the plant reaches 6–8 inches in height, pinch the top 2–3 leaves.
This encourages side branching.

2. Harvest Often

Frequent harvesting keeps the plant active and prevents legginess.

3. Feed Monthly

Use organic fertilizers such as:

  • Vermicompost
  • Cow dung compost
  • Mustard cake liquid
  • Seaweed extract

Feeding once every 20–25 days boosts lush growth.


Step 7: Mint Plant Full Growth Updates (Month-Wise)

Week 1:

Cuttings establish roots and new leaves appear.

Week 2:

Plants begin spreading sideways; stems become fuller.

Week 3:

You can start light harvesting by picking 2–3 leaves per plant.

Week 4:

The plant becomes dense and strong—harvest freely now.

Month 2:

Mint grows vigorously. Runners (side stems) spread rapidly and fill the pot.

Month 3:

Plant becomes fully mature. Trim it regularly to prevent overcrowding and keep it fresh.


Step 8: Common Mint Problems and Solutions

1. Yellowing Leaves

Caused by overwatering or poor drainage.
→ Fix: Reduce watering and improve soil aeration.

2. Leggy Growth

Due to lack of sunlight or infrequent pruning.
→ Fix: Move to brighter location and pinch tips regularly.

3. Root Rot

Excess water can rot delicate mint roots.
→ Fix: Use well-drained soil and avoid waterlogging.

4. Pest Attacks

Mint is generally pest-resistant but may attract aphids or whiteflies.
→ Fix: Spray neem oil every 10–12 days.


Step 9: How to Harvest Mint Properly

Harvesting mint correctly ensures continuous growth.

Do This:

  • Cut stems from the top
  • Leave at least 2–3 inches from the base
  • Harvest only one-third of the plant at a time

Regular harvesting actually makes your mint bushier!


Step 10: How to Multiply Your Mint (Forever!)

Once you have one bushy plant, you can create unlimited plants using:

  • Runner cuttings
  • Stem cuttings
  • Dividing the root ball

Mint spreads like wildfire, so you’ll have a never-ending supply.


Final Thoughts

Growing mint from cuttings is one of the easiest gardening projects, even for beginners. With minimal effort, you can have a fresh, fragrant, and unlimited supply of mint right in your home.

Follow the simple steps—rooting, planting, watering, pruning—and watch your mint turn into a lush green patch within weeks. Whether you’re growing it for cooking, tea, aroma, or herbal remedies, mint is a must-have plant in every home garden.

Secret Formula for Heavy Flowering on Vinca (Sadabahar): Grow Bushy, Blooming Plants All Year!

Secret Formula for Heavy Flowering on Vinca (Sadabahar): Grow Bushy, Blooming Plants All Year!

Vinca, also called Sadabahar, Madagascar Periwinkle, or Nayantara, is one of the most beautiful, hardy, and long-blooming flowering plants that thrive almost anywhere. It produces stunning flowers in shades of white, pink, red, purple, peach, and even bi-colors. What makes Vinca truly special is its ability to bloom 365 days a year, especially when given the right care.

If your Vinca plants are looking leggy, producing fewer flowers, or growing slowly, this detailed guide will teach you exactly how to get heavy flowering and keep them bushy, vibrant, and full of blooms.

Let’s unlock the secrets to growing lush, healthy, and continuously blooming Vinca plants at home!


1. Understanding Vinca (Sadabahar): Why It Blooms Continuously

Vinca is a tropical, heat-loving plant that grows extremely well in hot climates. Its nature is simple:

  • Loves full sunlight
  • Thrives in warm temperatures
  • Requires less water
  • Prefers well-draining soil
  • Blooms continuously with proper pinching and feeding

Knowing these basics helps you provide ideal conditions for heavy flowering.


2. Choosing the Right Variety for Maximum Blooms

There are two major Vinca varieties:

(1) Upright or Tall Vinca

  • Grows 1–2 feet tall
  • Ideal for garden beds and large pots
  • Produces large flowers

(2) Dwarf or Bush Vinca

  • Compact and bushy
  • Perfect for small pots, borders, and balcony gardening
  • Produces more blooms

Both varieties flower heavily with the right care, but dwarf vinca plants bloom more densely.


3. Best Containers for Heavy Flowering

Vinca has a shallow root system. The right pot size boosts growth and flowering.

Ideal container size:

  • 8–12 inch pot for one plant
  • Ensure good drainage holes
  • Clay or terracotta pots work best (dry faster and prevent root rot)

If planting multiple vincas together, use a wider container or trough.


4. Perfect Soil Mix to Boost Flowering

Vinca hates wet and sticky soil. It performs best in loose, airy, fast-draining soil.

Best soil mix for Vinca:

  • 40% Garden soil
  • 30% Cocopeat
  • 20% Compost (vermicompost or cow dung)
  • 10% Sand or perlite

You can also add:

  • 1 spoon neem cake powder
  • A pinch of Epsom salt (optional)

The key is drainage—never plant vinca in heavy or clayey soil.


5. Sunlight Requirements for Heavy Flowering

If you want maximum blooms, sunlight is the MOST important factor.

Vinca needs:

  • 4–6 hours of direct sunlight
  • Bright light for the rest of the day

More sunlight = more branching = more flowers.

Plants kept in low light become:

  • Leggy
  • Weak
  • Low flowering

If garden sunlight is limited, place vinca where it receives morning sun.


6. Watering the Right Way (Very Important!)

Vinca is drought-tolerant and does not like too much water.

Watering rule:

  • Water only when the top layer of soil is dry
  • Avoid daily watering
  • Overwatering can cause root rot and yellow leaves

In summer: water every 1–2 days
In winter: water every 3–4 days

Always water at the base—avoid wetting flowers and leaves.


7. Pinching & Pruning: The Secret to Bushy Growth + Tons of Flowers

One of the biggest mistakes people make is not pinching vinca.

Pinching is essential for:

  • More branches
  • Dense growth
  • Maximum flowers

How to pinch:

  • When the plant reaches 4–5 inches, pinch the top 1–2 inches
  • New branches grow from the sides
  • Repeat the process after 20 days for the next flush

Pruning dry or leggy branches improves airflow and encourages more blooms.


8. Fertilizers for Heavy Flowering (Natural & Effective)

Feeding your vinca regularly is the key to a continuous bloom cycle.

Best fertilizers for Vinca (organic options):

Vermicompost

  • Apply once every 20–25 days
  • Encourages healthy foliage and roots

Mustard Cake Liquid Fertilizer

  • High in potassium
  • Best for heavy flowering
  • Use once every 10–15 days

Banana Peel Fertilizer

  • Boosts flower production naturally

Seaweed Liquid Fertilizer

  • Strengthens plant and improves color

Best fertilizer routine:

  • Every 2 weeks: liquid fertilizer (mustard cake/seaweed)
  • Every month: a handful of compost

Do not use too much nitrogen—it causes more leaves and fewer flowers.


9. Protecting Vinca from Pests & Diseases

Vinca is generally low maintenance, but sometimes may face:

Common pests:

  • Aphids
  • Mealybugs
  • Whiteflies

Prevention:

  • Spray neem oil (5 ml per liter) weekly
  • Avoid overwatering
  • Keep area around plant clean

Yellow Leaves Causes:

  • Overwatering
  • Poor drainage
  • Fungal infection
  • Too much fertilizer

Fix the watering schedule and ensure proper airflow.


10. Deadheading: The Trick for Continuous Flowering

Dead or faded flowers should be removed regularly.

Why remove old flowers?

  • Encourages new blooms
  • Saves plant energy
  • Keeps plant neat and clean

Just pinch off the dying flowers with your fingers.


11. Growing Vinca from Seeds or Cuttings

Vinca grows easily in two ways:

From Seeds

  • Sow seeds in warm weather
  • Lightly cover with soil
  • Mist water
  • Germinate in 5–7 days

From Cuttings

  • Take a 4–5 inch healthy stem
  • Remove lower leaves
  • Dip in rooting hormone (optional)
  • Plant in moist soil
  • Roots in 10–15 days

Cuttings bloom much faster than seeds.


12. Tips to Get Maximum Flowers All Year

Follow these special tips for nonstop blooming:

Give 5–6 hours of sunlight daily

Water only when soil feels dry

Use a well-draining soil mix

Pinch tops for bushy growth

Feed liquid fertilizer every 2 weeks

Remove dried flowers (deadheading)

Do not overwater or let water stagnate

Protect from heavy rain during monsoon

Repot yearly for best performance

By following these, your vinca will bloom more than ever!


Conclusion

Vinca (Sadabahar) is an incredibly rewarding flowering plant that can brighten your garden with endless blooms. With just a little care—proper sunlight, correct watering, pinching, and regular feeding—your plant will become bushier, healthier, and full of vibrant flowers throughout the year.

Whether you grow it on your balcony, terrace, or in your backyard, Vinca will never disappoint. Once you master the right techniques, you’ll enjoy heavy flowering season after season.

Grow Endless Spinach at Home: The Ultimate Beginner-Friendly Guide to Fresh, Organic Greens

Grow Endless Spinach at Home: The Ultimate Beginner-Friendly Guide to Fresh, Organic Greens

Spinach is one of the easiest, fastest, and most rewarding leafy vegetables you can grow at home. Whether you live in a small apartment, have a balcony garden, or enjoy a full backyard space, spinach fits perfectly into any setup. It grows quickly, needs very little maintenance, and provides an abundant harvest of nutritious green leaves packed with iron, vitamins, and antioxidants.

If you’ve always wanted a continuous supply of chemical-free leafy greens, this complete guide will walk you through how to grow spinach at home successfully—from soil preparation to harvesting and regrowing again.


Why Grow Spinach at Home?

Growing your own spinach gives you many benefits:

  • Fresh and organic leaves every week
  • Saves money spent on regular market greens
  • Grows quickly (ready in 30–40 days)
  • Thrives in containers, pots, grow bags, boxes, or ground
  • Perfect for beginners
  • Can be harvested multiple times (cut-and-come-again method)

Spinach also tolerates partial shade, making it ideal even for low-sunlight balconies.


1. Choosing the Right Variety

There are two main types of spinach:

Indian Spinach (Desi Palak)

  • Heat tolerant
  • Grows larger leaves
  • Best for warm climates like India

English Spinach (Palak)

  • Prefers cool weather
  • Leaves are softer and juicier
  • Perfect for winter growing

Both do well in containers, but Indian spinach handles heat better.


2. Best Season for Growing Spinach

Spinach prefers cool weather, but can grow year-round with care.

Ideal growing months:

  • October to February (winter) – fastest growth
  • March to June (summer) – requires shade and regular watering
  • Monsoon – grows well but avoid waterlogging

3. Containers and Pots for Growing Spinach

Spinach doesn’t need deep containers because it has shallow roots.

Best container size:

  • Height: Minimum 6–8 inches
  • Width: 12–24 inches (the wider, the better)

You can use:

  • Plastic pots
  • Grow bags
  • Styrofoam boxes
  • Cement pots
  • Raised beds
  • Balcony rail planters

Ensure the container has good drainage holes to avoid root rot.


4. Best Soil Mix for Spinach

Spinach loves loose, airy, and nutrient-rich soil.

Perfect soil mix:

  • 40% Garden soil
  • 30% Compost (Vermicompost / Cow dung / Homemade compost)
  • 20% Cocopeat
  • 10% Sand

Optional boosters:

  • 1 handful neem cake (keeps pests away)
  • 1 spoon bone meal (encourages leafy growth)

Before sowing, loosen the soil so seeds can sprout easily.


5. How to Sow Spinach Seeds Properly

Spinach seeds are small but strong growers. Follow these steps:

Step-by-step seed sowing:

  1. Moisten the soil lightly before sowing.
  2. Sprinkle the seeds evenly across the soil surface.
  3. Maintain 2–3 cm spacing between seeds.
  4. Cover them with a thin layer of soil (0.5–1 cm).
  5. Water gently using a spray bottle to avoid seed displacement.
  6. Keep the pot in partial shade until they sprout.
  7. Seeds germinate in 4–7 days.

Tip:

For faster germination, soak the seeds in water for 4–6 hours before sowing.


6. Caring for Spinach Plants (Daily to Weekly Care)

Spinach is low maintenance but needs consistent care.

Watering

  • Keep the soil moist but not soggy.
  • In summer: water daily
  • In winter: water every 2–3 days
  • Avoid overhead splashing—use a spray or a gentle shower.

Sunlight

Spinach thrives in:

  • 3–4 hours of sun
  • Or bright indirect light for the rest of the day

Too much sun → leaves may become bitter
Too little sun → slow growth

Fertilizing

Feed spinach every 12–15 days to keep leaves tender and green.

Best fertilizers:

  • Vermicompost
  • Cow dung compost
  • Mustard cake water
  • Seaweed extract

How to apply:

Spread compost around the base OR use liquid fertilizer by mixing in water.


7. Preventing Pests and Diseases

Spinach is mostly pest-free, but sometimes you may face:

Common pests:

  • Aphids
  • Leaf miners
  • Caterpillars

Solutions:

  • Spray neem oil (5 ml per liter) weekly
  • Remove affected leaves
  • Keep plants airy, not overcrowded

Avoid chemical pesticides because spinach is eaten fresh.


8. Thinning and Spacing

When seedlings grow 2–3 inches tall, they become overcrowded.
Thin them out by removing some plants, keeping 3–4 inches distance.

Use removed seedlings as microgreens in salads—nothing goes waste!


9. When and How to Harvest Spinach

Spinach grows very fast and is ready to harvest in 30–40 days.

Two harvesting methods:

(A) Cut-and-Come-Again Method

  • Cut the outer leaves
  • Leave the center intact
  • New leaves keep growing continuously

This gives 3–5 harvests.

(B) Full Harvest

  • Pull out the entire plant
  • Use it for curries, soups, smoothies, dal, paratha, etc.

Harvesting tips:

  • Harvest early morning for best freshness
  • Never cut more than 30–40% at once
  • Regular harvesting promotes more leaf growth

10. Regrowing Spinach for Continuous Supply

After first harvest, apply liquid fertilizer and water well.
Spinach starts producing again within 5–7 days.

With proper care, you can enjoy spinach for 2–3 months from one sowing.


11. Growing Spinach in Small Spaces

Spinach is fantastic for compact gardening!

Perfect for:

  • Balcony gardens
  • Kitchen windows
  • Small patios
  • Indoor sunny areas
  • Terraces

You can grow spinach in:

  • Trays
  • Plastic boxes
  • Hanging planters
  • Vertical planters

Even a 1-foot pot can supply a small family with weekly greens.


12. Bonus Tips for Growing Lush Spinach

  • Avoid overwatering—leads to fungal issues
  • Protect from hot summer afternoon sun
  • Add compost monthly for rich leafy growth
  • Mulch the soil to keep moisture intact
  • Sow seeds every 25–30 days for continuous harvest
  • Don’t let the plant bolt (produce flowers)
    • Move to shade
    • Water regularly
    • Keep soil cool

Final Thoughts

Growing spinach at home is incredibly rewarding, simple, and perfect for beginners. With minimal effort, you can enjoy fresh, pesticide-free, and nutrient-rich spinach straight from your balcony or garden.

Whether you want to make palak paneer, smoothies, salads, parathas, or soups—your homegrown supply will always be fresh, safe, and full of flavor.

Grow Croton From Cuttings Fast & Easy: Complete Step-by-Step Guide for Beginners

Grow Croton From Cuttings Fast & Easy: Complete Step-by-Step Guide for Beginners

Crotons are famous for their vibrant, multicolored leaves that can instantly brighten any garden or indoor space. Their dramatic foliage, painted in red, yellow, orange, green, and sometimes even purple, makes them one of the most eye-catching ornamental plants. The best part? You can easily grow crotons at home from cuttings—and it’s surprisingly quick and simple.

Whether you are a gardening beginner or someone who loves multiplying plants, this full-step guide will help you propagate crotons effectively, boosting your plant collection without spending extra money. With the right method, a little patience, and care, your cuttings will root within a few weeks and grow into healthy, vibrant plants.

Let’s dive into the complete 1200-word guide on how to grow croton plants from cuttings—FAST & EASY!


Why Grow Crotons From Cuttings?

Crotons can be grown from seeds, but the process is slow and unpredictable. Growing from cuttings is much better because:

  • It’s fast (roots in 2–4 weeks).
  • The new plant becomes identical to the parent plant (same leaf pattern and colors).
  • You save money by multiplying your existing plant.
  • It’s easy and requires minimal tools.

Propagating crotons from cuttings is a fun and rewarding gardening activity that guarantees results if done the right way.


1. Selecting the Perfect Croton Cutting

Success begins with choosing the right stem for propagation.

Best Type of Cutting:

  • Semi-hardwood stem (not too soft, not too old)
  • 4–6 inches long
  • Has at least 3–4 leaves
  • Healthy, disease-free, vibrant colors

Avoid completely green, soft stems—they rot easily.
Also avoid very old, woody stems—they root slowly.

How to Prepare the Cutting:

  1. Cut the stem using a clean, sharp scissor or pruning shear.
  2. Cut just below a node (where a leaf joins the stem).
  3. Remove the lower leaves, keeping 2–3 leaves at the top.
  4. If the leaves are too large, cut them in half to reduce water loss.

This simple preparation increases the rooting success rate significantly.


2. Use Rooting Hormone for Faster Root Growth (Optional but Helpful)

Rooting hormone is not mandatory, but it speeds up the propagation process.

Dip the bottom of the cutting in:

  • Rooting powder
    or
  • Aloe vera gel (natural rooting agent)

This prevents fungal infections and triggers faster root formation.


3. Best Growing Medium for Croton Cuttings

Croton cuttings root best in a light, airy, and sterile medium. Avoid heavy garden soil because it retains too much moisture and can lead to rotting.

Recommended Soil Mix:

  • 40% Cocopeat
  • 30% Perlite or Sand
  • 20% Compost
  • 10% Garden Soil

This mix ensures:

  • Proper drainage
  • Good air circulation
  • Fast root development

If you prefer the water propagation method, you can also root crotons in a jar of clean water (details below).


4. Two Proven Methods to Propagate Croton Cuttings

You can root crotons in soil or water. Both methods work, but each has its advantages.


Method 1: Soil Propagation (Most Effective)

Steps:

  1. Fill a pot with the prepared soil mix.
  2. Make a small hole using a pencil.
  3. Insert the cutting 1–2 inches deep.
  4. Firm the soil gently around it.
  5. Water lightly.
  6. Cover the pot with a transparent plastic bag to create humidity.

This mini greenhouse environment increases success by keeping moisture locked in.

Ideal Conditions:

  • Warm temperature (20–30°C)
  • Indirect bright light
  • High humidity

Roots develop in about 3–4 weeks.


Method 2: Water Propagation (Easy & Fun)

Steps:

  1. Fill a glass jar with clean, room-temperature water.
  2. Insert the cutting so only the stem touches the water.
  3. Keep it in bright, indirect sunlight.
  4. Change the water every 3–4 days.

Roots appear within 2–3 weeks.

After roots grow 2–3 inches long, transfer the cutting to soil carefully.


5. Watering Croton Cuttings Properly

Cuttings do not have roots, so they lose moisture quickly. Watering correctly is important.

Watering Tips:

  • Keep the soil slightly moist—not soggy.
  • Water only when the top layer feels dry.
  • Never let water accumulate in the pot tray.
  • High humidity helps in faster rooting.

Overwatering is the number one cause of cutting failure, so avoid heavy watering.


6. Light Requirements for Croton Cuttings

Crotons love bright light, but direct sun can burn new cuttings.

Best Light Conditions:

  • Bright indirect sunlight
  • Avoid harsh afternoon sun
  • Morning sunlight is good
  • Never keep freshly planted cuttings in full sun

Once fully rooted, the plant can handle brighter light and its leaf colors will become richer.


7. Temperature & Humidity Needs

Crotons thrive best in warm conditions.

Ideal Temperature:

  • 20–32°C

They cannot tolerate cold climates or chilly winds. Keep them away from AC vents, cold windows, and winter drafts.

Humidity:

  • Grow well in 60–80% humidity
  • Mist lightly once a day
  • You can also place a bowl of water nearby to increase moisture

Higher humidity = faster rooting.


8. Caring for Rooted Cuttings

Once your cutting develops strong roots (after 3–4 weeks), it needs proper care to grow into a full plant.

Repotting Guide:

  1. Take a 6–8 inch pot.
  2. Fill it with a rich croton soil mix.
  3. Plant the rooted cutting carefully.
  4. Water thoroughly once.
  5. Keep in partial shade for 10–12 days.

After establishment, slowly introduce it to brighter light.


9. Fertilizing Newly Rooted Crotons

Do NOT fertilize freshly planted cuttings.

Wait for 4–6 weeks, then begin:

Best Fertilizers:

  • Liquid seaweed
  • Cow dung compost
  • Vermicompost tea
  • Mustard cake liquid (diluted)

Apply once a month for best results.
Avoid chemical fertilizers initially.


10. Common Problems & Solutions

1. Cutting Turning Black

Cause: Too much water, fungus
Fix: Improve drainage, reduce watering, use fungicide

2. Leaves Wilting

Cause: Low humidity
Fix: Mist daily, keep under plastic cover

3. Cutting Rotting in Water

Cause: Stale water
Fix: Change water frequently

4. No Roots After 4 Weeks

Cause: Cutting too old or too soft
Fix: Try fresh semi-hardwood stems


11. Tips to Grow Healthy, Colorful Crotons

  • Keep the plant in bright sunlight (after rooting).
  • Water only when needed.
  • Maintain warm temperature.
  • Provide good humidity.
  • Fertilize monthly.
  • Remove dead or damaged leaves.

Crotons reward you with vibrant, glossy leaves when cared for well.


12. Conclusion: Grow Unlimited Crotons Easily at Home

Growing croton plants from cuttings is one of the easiest and most satisfying ways to expand your garden. With just a few simple steps—selecting the right cutting, using proper soil, maintaining humidity, and giving enough light—you can grow healthy crotons in just a few weeks.

Whether you choose soil propagation or water propagation, success is almost guaranteed if you follow the right method. Soon, your cuttings will turn into beautiful, colorful plants that enhance the beauty of your home, balcony, or garden.

Grow Camellias Like a Pro: Complete Guide to Planting, Caring & Blooming This Stunning Flower

Grow Camellias Like a Pro: Complete Guide to Planting, Caring & Blooming This Stunning Flower

Camellias are among the most elegant flowering shrubs, admired for their glossy evergreen leaves and breathtaking blooms that come in shades of pink, red, white, and even bi-color. Often called the ‘Roses of Winter’, these plants brighten gardens when most other flowers are resting. Whether you’re a beginner gardener or an experienced plant lover, growing camellias is a deeply rewarding experience—if you understand their needs.

In this detailed, 1200-word care guide, you will learn how to grow camellia plants, best soil mix, watering habits, sunlight needs, common problems, and expert tips to boost flowering.


Introduction: Why Camellias Are Garden Favorites

Camellias are native to East and South Asia and belong to the Theaceae family. They are known for:

  • Long-lasting blooms
  • Stunning evergreen leaves
  • Being excellent hedge or ornamental plants
  • Thriving in cooler climates
  • Blooming during late winter and early spring (depending on variety)

With proper care, a camellia plant can live for decades and become the centerpiece of your garden.


1. Choosing the Right Camellia Variety

There are more than 250 species and thousands of hybrids, but the two most popular types are:

Camellia japonica

  • Larger blooms
  • Blooms in late winter to early spring
  • Prefers semi-shade
  • Best for cooler regions

Camellia sasanqua

  • Slightly smaller flowers
  • Blooms from autumn to early winter
  • Tolerates more sun
  • More drought-tolerant

If you live in a warmer climate, choose sasanqua.
If you live in a cooler region, go with japonica.


2. Best Soil for Camellia Growth

Camellias Love acidic soil.
Their ideal soil pH: 5.5 – 6.5

Perfect Soil Mix (Pot or Garden)

You can create an ideal soil mix with:

  • 40% Garden Soil
  • 30% Cocopeat
  • 20% Compost/Vermicompost
  • 10% Sand or Perlite

Mix well so the soil becomes loose, airy, and well-draining.

Camellias hate waterlogged or clay-heavy soil, which causes root rot.


3. Sunlight Requirements

Camellias need bright indirect light or partial shade.

Best Light Conditions:

  • Morning sunlight
  • Afternoon shade
  • Filtered sunlight under trees
  • Avoid harsh midday heat

Direct strong sunlight can burn leaves and buds.
Too much shade reduces flowering.


4. Watering Schedule for Camellias

Camellias prefer consistent moisture, but never soggy soil.

Watering Rules:

  • Water when the top 1–2 inches of soil feels dry.
  • Deep watering once or twice a week is ideal.
  • During summers, increase frequency.
  • During winters, reduce watering.
  • Avoid watering on the flowers (prevents spots and fungal issues).

Mulching with pine bark or dry leaves helps retain moisture and maintain soil acidity.


5. Fertilizing Camellias for Heavy Flowering

Camellias grow slowly, but they appreciate good nutrients.

Best Fertilizers:

Use any fertilizer labeled for acid-loving plants, such as:

  • Azalea fertilizer
  • Rhododendron fertilizer

Or use organic options:

  • Cow dung compost
  • Seaweed extract
  • Mustard cake liquid
  • Bone meal (during flowering season)

When to Fertilize:

  • Early Spring – for healthy growth
  • Mid-Summer – helps in forming flower buds
  • Avoid fertilizing during winter blooming season

Over-fertilizing may burn the roots, so apply lightly.


6. How to Plant Camellia (Pot or Ground)

Planting in Pots

Choose:

  • Minimum 14–16 inch pot for young plant
  • For mature plants, use 18–20 inch deep pot

Steps:

  1. Fill pot with acidic soil mix.
  2. Place the plant at the same depth as it was in the nursery pot.
  3. Do NOT bury the stem too deep.
  4. Water thoroughly.
  5. Keep in semi-shade for 2–3 weeks.

Planting in the Ground

  • Dig a hole twice as wide as the root ball.
  • Place plant slightly above soil level.
  • Backfill with acidic soil mix.
  • Mulch well to protect roots.

7. Pruning Camellias the Right Way

Camellias do not need much pruning, but light trimming improves shape and flowering.

Best Time to Prune:

Immediately after flowering season ends.

What to Prune:

  • Dead branches
  • Weak, thin shoots
  • Crossing branches
  • Excess branches to improve air circulation

Never prune in late summer or fall — it removes flower buds for next season.


8. Common Problems & Solutions

Camellias are generally hardy, but they may face a few issues:

Yellow Leaves

Cause:

  • High soil pH
  • Overwatering

Fix:

  • Add sulfur or acidic fertilizer
  • Improve drainage

Bud Drop

Cause:

  • Underwatering
  • Sudden temperature change
  • Too much sun

Fix:

  • Maintain consistent moisture
  • Give partial shade

Pests

Aphids, mites, scales can appear.

Fix:

  • Neem oil spray once a week
  • Soap water spray for severe infestation

9. How to Encourage Heavy Blooming

Here are expert tips to help your camellia bloom abundantly:

Use acidic soil mix
Provide morning sun + afternoon shade
Water regularly but avoid overwatering
Fertilize lightly during summer
Protect buds from strong heat
Prune immediately after flowering

Camellias take time to establish, but once settled, they bloom heavily every year.


10. Winter Care for Camellias

Camellias bloom in cold weather but still need protection.

Tips:

  • Mulch heavily around plant base
  • Avoid freezing winds
  • Move potted plants under shade or greenhouse
  • Water sparingly in winter

Do NOT keep camellias near heaters or warm walls.


11. Can Camellias Be Grown Indoors?

Yes — but only if you can provide:

  • Cool temperature
  • Bright indirect light
  • Good humidity
  • Slightly acidic soil

Indoor camellias need more care than outdoor ones.


12. Conclusion: A Timeless Beauty for Every Garden

Camellias are not just plants—they’re living artwork. Their glossy leaves, vibrant winter blooms, and long lifespan make them a treasure in any home garden. With the right care—acidic soil, partial shade, consistent watering, and seasonal trimming—your camellia will reward you with spectacular flowers year after year.

Whether you grow it in a pot, garden bed, or as a hedge, a camellia plant adds unbeatable charm and elegance to your home.

Grow Hibiscus Like a Pro: Complete Guide to Lush Blooms & Healthy Plants (Full Tips Inside)

Grow Hibiscus Like a Pro: Complete Guide to Lush Blooms & Healthy Plants (Full Tips Inside)

The hibiscus plant—known for its large, vibrant, eye-catching blooms—has become a favorite among home gardeners. Whether you grow it in pots, containers, or directly in the ground, hibiscus rewards you with stunning flowers almost year-round in warm climates. With the right care and techniques, anyone can grow hibiscus successfully—even beginners.

This complete guide will walk you through everything you need to know: soil, watering, sunlight, feeding, pruning, propagation, pest control, and pro tips for maximum blooms.


Introduction: Why Hibiscus is a Must-Have Plant

Hibiscus (Hibiscus rosa-sinensis) is admired for its tropical charm and comes in countless colors—red, pink, yellow, orange, white, and even multi-shaded varieties. Its large flowers can bloom daily, making it one of the most rewarding flowering plants for home gardens.

It grows beautifully in:

  • Terraces
  • Balcony pots
  • Garden beds
  • Large containers
  • Indoor spaces with bright light

But to keep hibiscus blooming regularly, you must understand its specific care needs. Let’s break it down step-by-step.


Step 1: Choosing the Right Hibiscus Plant

When selecting a hibiscus, look for:

  • Healthy green leaves
  • A strong central stem
  • No signs of pests (whiteflies, aphids)
  • Multiple branches
  • Compact, bushy growth

Choose varieties according to your climate:

  • Tropical hibiscus for warm climates
  • Hardy hibiscus for colder climates

Step 2: Best Pot & Soil Mix for Hibiscus

Pot Size

Hibiscus loves space. For best results:

  • Use a 12–16 inch pot for young plants
  • Upgrade to 18–20 inches as the plant grows
  • Ensure drainage holes at the bottom

A bigger pot = more roots = more blooms.


Best Soil Mix

Hibiscus needs light, airy, and nutrient-rich soil.

Perfect Soil Mix:

  • 40% garden soil
  • 30% compost/vermicompost
  • 20% cocopeat
  • 10% sand/perlite

Add 1 handful neem cake powder to prevent root fungus.

Why this works:
Hibiscus hates waterlogging. This mix ensures drainage + nutrients for continuous growth.


Step 3: Sunlight Requirement

Hibiscus is a sun-loving plant.

  • Needs 4–6 hours of direct sunlight daily
  • Morning sunlight is best

If grown in low light, you’ll notice:

  • No blooms
  • Yellowing leaves
  • Weak stems

Tip: Keep the pot where it receives bright sun but avoid harsh afternoon summer heat in extremely hot regions.


Step 4: Watering the Hibiscus Plant

Hibiscus is moisture-loving but sensitive to overwatering.

Watering Rules:

  • Water when the top soil feels slightly dry
  • In summer: water daily or every alternate day
  • In winter: water every 3–4 days
  • Never let the pot stand in water

Signs of underwatering:

  • Droopy leaves
  • Dry soil

Signs of overwatering:

  • Yellow leaves
  • Mushy soil
  • Root rot

Use a deep watering method—water until it drains out from the bottom.


Step 5: Fertilizing Hibiscus for Heavy Blooming

Hibiscus is a heavy feeder. To bloom continuously, it needs regular nutrition.

Best Fertilizers:

  • Compost or vermicompost – once every 15 days
  • Liquid seaweed fertilizer – weekly
  • Banana peel fertilizer – boosts bud formation
  • NPK 19:19:19 or DAP – once a month (in small quantity)
  • Epsom salt (magnesium) – once monthly for greener leaves

Important Tip:

After applying solid fertilizers, water the plant gently to activate nutrients.


Step 6: Pruning for Bushy Growth & More Flowers

Pruning is essential for hibiscus.

Why prune?

  • Encourages new branches
  • Increases flowering
  • Controls the height
  • Removes weak or dead parts

When to prune?

  • Major pruning: End of winter / early spring
  • Light pruning: Anytime during the growing season

How to prune?

  • Cut 1–2 inches above the nodes
  • Remove leggy and weak stems
  • Don’t prune during extreme winter or heavy flowering

New growth appears within weeks, followed by lots of flower buds.


Step 7: Propagating Hibiscus from Cuttings

Hibiscus propagation is easy and fun.

Steps:

  1. Choose a healthy semi-hardwood branch
  2. Cut 6–8 inch long cuttings
  3. Remove lower leaves
  4. Dip in rooting hormone (optional)
  5. Plant in cocopeat/soil mix
  6. Keep in partial shade
  7. Keep soil slightly moist

Roots appear in 15–25 days.
Shift to a bigger pot after 45–60 days.


Step 8: Pest & Disease Control

Hibiscus may face pests like:

  • Aphids
  • Whiteflies
  • Spider mites
  • Mealybugs

Organic Treatment:

  • Neem oil spray (5 ml in 1 litre water) + 2 drops liquid soap
  • Spray every 7 days
  • Don’t spray in direct sunlight

Fungal Issues:

  • Yellow leaves
  • White powder-like layer
  • Black spots

Treat with:

  • Copper fungicide (monthly)
  • Good drainage

Step 9: Seasonal Care Tips

Summer Care:

  • Water more frequently
  • Give morning sunlight
  • Mulch soil to retain moisture

Rainy Season Care:

  • Avoid overwatering
  • Check for fungus
  • Improve drainage

Winter Care:

  • Reduce watering
  • Protect from frost
  • Move pots indoors if temperature drops below 10°C

Expert Tips to Boost Hibiscus Flowering

Add banana peel fertilizer twice a month
Use seaweed extract for faster growth
Keep the plant in full sun
Prune regularly to make the plant bushy
Remove spent flowers to prevent disease
Avoid shifting the pot too frequently
Maintain slightly acidic soil (pH 6–6.5)


Conclusion: Grow the Most Beautiful Hibiscus at Home

Growing hibiscus is easy once you understand its needs—sunlight, regular watering, nutrient-rich soil, and proper pruning. With these full tips, your hibiscus will reward you with big, colorful blooms throughout the year.

Whether you want to grow hibiscus on your terrace, balcony, or garden, just follow the steps above and watch your plant transform into a full, flower-loaded beauty.

If you want more articles like this, just send the next title!

Create a Stunning Succulent Planter in Just 5 Minutes: A Quick & Beautiful DIY Guide for All Garden Lovers

Create a Stunning Succulent Planter in Just 5 Minutes: A Quick & Beautiful DIY Guide for All Garden Lovers

Succulents are one of the most popular indoor and outdoor plants today—not just because they look gorgeous, but because they thrive with very little care. Their unique shapes, vibrant colors, and easy-growing nature make them perfect for creating eye-catching decorative planters at home. The best part? You don’t need an hour… you don’t even need 20 minutes.

You can create a beautiful, aesthetic succulent planter in just 5 minutes!

In this step-by-step guide, you’ll learn how to design a stunning arrangement using only a few basic items. Whether you’re decorating your living room, gifting a plant, or simply upgrading your garden décor, this 5-minute project will instantly elevate any space.

Let’s begin!


Why Succulents Are Perfect for Quick Planters

Succulents are considered the kings of easy gardening. Here’s why they’re ideal for quick and beautiful planters:

  • They grow well in small containers
  • They require very little water
  • They come in endless shapes and colors
  • They thrive indoors and outdoors
  • They don’t need complicated care
  • They stay compact and neat for months

Their low-maintenance nature makes them perfect for instant planters or last-minute home décor ideas.


Materials You’ll Need (Simple & Easily Available)

You don’t need fancy gardening tools. A few items are enough to create a stunning arrangement:

A wide, shallow pot or bowl

Prefer ceramic, terracotta, or glass containers. Even small wooden or metal trays work beautifully.

Succulents of different shapes and colors

Choose 3–7 varieties for a fuller look.
Examples:

  • Echeveria
  • Haworthia
  • Sedum
  • Jade plant (mini)
  • String of pearls
  • Crassula
  • Graptopetalum

Well-draining succulent soil

Essential for healthy growth.

Decorative stones or pebbles

White stones, colored pebbles, gravel, or aquarium chips.

Activated charcoal (optional)

Useful if you’re using a non-draining container like glass bowls.

A small spoon or your hands

For quick planting.

That’s it—super simple!


Step-by-Step Guide: Make a Succulent Planter in Just 5 Minutes

Ready to create your masterpiece? Follow this quick and easy process.


Step 1: Select the Perfect Container (30 seconds)

The container sets the theme of your planter. Shallow pots work best because succulents have short roots.

Choose a container that:

  • Matches your room décor
  • Has drainage holes (if not, read tips below)
  • Is wide enough for at least 3 succulents

A round bowl gives a soft, elegant look.
A rectangle tray gives a modern, minimalistic style.

If your container has no drainage holes, add a thin layer of:

  • Pebbles
  • Charcoal
  • Gravel

This prevents water from accumulating at the bottom.


Step 2: Fill with the Right Soil Mix (45 seconds)

Succulents hate wet soil. A well-draining mix is most important.

Use:

  • 50% succulent or cactus soil
  • 25% sand
  • 25% perlite

This ensures:

  • Fast drainage
  • No root rot
  • Healthy root growth

Fill the container ¾ full and gently level the surface.


Step 3: Position Your Succulents (1 minute)

This is where creativity comes in.

Arrange your plants before planting:

  • Place the biggest succulent in the center or backside
  • Add medium-sized plants around it
  • Add small trailing varieties like Sedum on the edges

This gives a balanced and visually appealing design.

Before planting, loosen the roots gently with your fingers. Succulents are hardy, so don’t worry—they won’t get damaged easily.


Step 4: Plant the Succulents (1 minute)

Use your fingers or a spoon to make small holes in the soil.

Place each succulent in its hole and press the soil gently around the base.

Tips:
Do NOT bury the stem too deep
Keep all plants at the same soil level
Leave small gaps between plants for growth

Within seconds, your planter starts taking shape!


Step 5: Add Decorative Layer on Top (45 seconds)

For the finishing touch:

Sprinkle:

  • White stones
  • Colored gravel
  • Black pebbles
  • Tiny shells
  • Wood pieces
  • Sand art

This not only makes your planter look professional, but also:

  • Prevents soil splashing
  • Reduces fungus gnats
  • Keeps the surface dry

Choose colors that match your interior.


Step 6: Final Touch & Placement (30 seconds)

You’re done!

Gently tap the container to settle the soil.
Do NOT water immediately—wait at least 24 hours.

Now place your succulent planter in:

  • A bright windowsill
  • A desktop
  • A coffee table
  • Balcony railing
  • Study table
  • Bedroom corner

Avoid harsh direct sunlight for the first few days.


How to Care for Your Succulent Planter (Easy Maintenance)

After creating your planter, caring for it is just as simple.


Watering (Only When Needed!)

Succulents store water in their leaves. Overwatering kills them faster than underwatering.

Follow this rule:
Water only when the top 2 inches of soil are completely dry.

For indoor planters: Every 10–14 days
For outdoor planters: Every 7–10 days

Always water deeply but infrequently.


Sunlight Requirements

Place your planter in:

  • Bright light
  • Indirect sunlight
  • Near a window

If kept outdoors:

  • Give morning sunlight
  • Avoid afternoon harsh heat

Signs of too much sun:

  • Brown patches
  • Wrinkled leaves

Signs of too little sun:

  • Stretched, leggy growth
  • Pale color

Fertilizing

Succulents don’t need much feeding.
Use fertilizer only once every 45–60 days.

Best fertilizers:

  • Succulent fertilizer
  • Liquid seaweed
  • Diluted NPK 10-10-10
  • Vermicompost (very small amount)

Cleaning Your Succulents

Dust collects easily.
Blow gently or use a soft brush to keep the leaves clean and shiny.


Propagation (Get More Plants for Free!)

Succulents multiply very easily. You can propagate them from:

  • Leaves
  • Stem cuttings
  • Offsets

Just place cut leaves on dry soil—they’ll root naturally in a few weeks.


Top Succulents to Use for Beautiful, Compact Planters

Here are some great options:

Echeveria

Rosette-shaped and perfect for the center.

Sedum

Great for edges; grows quickly.

Crassula

Thick leaves and beautiful color.

Haworthia

Ideal for low-light indoor areas.

Graptopetalum

Soft pastel shades make planters dreamy.

Mixing different textures makes your planter look more professional.


Creative Theme Ideas for Your 5-Minute Succulent Planter

Want to make your arrangement even more stylish? Try these creative themes:

Desert Theme

Use sand, cactus, and brown stones.

Beach Theme

Add shells, blue stones, and white sand.

Minimalist Black & White Style

Black pot + white stones = elegant décor.

Fairy Garden Theme

Add tiny houses, bridges, or figurines.

Zen Garden

Use raked sand and smooth round stones.

These themes look perfect on tables, balconies, or office desks.


Why Succulent Planters Make the Best Gifts

Whether it’s a birthday, housewarming, anniversary, or office celebration, succulent planters are ideal gifts because:

  • They look premium
  • They last long
  • They require almost no care
  • They symbolize growth and harmony
  • They suit any décor

A handmade planter adds a personal touch that store-bought gifts can’t match.


Final Thoughts: A Beautiful Planter in Just Minutes

Making a succulent planter doesn’t require gardening experience, expensive materials, or a lot of time. In just 5 minutes, you can create something visually stunning, long-lasting, and incredibly easy to maintain.

Try this today and bring instant natural beauty into your home!

Bloom Explosion: The Simple Trick to Multiply Your Portulaca/Moss Rose Flowers Instantly!

Bloom Explosion: The Simple Trick to Multiply Your Portulaca/Moss Rose Flowers Instantly!

Portulaca, also known as Moss Rose, is one of the most colorful, low-maintenance, and sun-loving flowering plants you can grow at home. Whether you keep them on your balcony, terrace, or garden bed, Portulacas reward you with hundreds of bright, cheerful blooms throughout the summer. But what if your plant is producing only a few flowers, or blooming irregularly?

Good news! With one simple trick, you can dramatically increase the number of flowers on your Portulaca plants. This technique works for all varieties—single, double, grandiflora, hybrid, and even 9-o’clock varieties. In this article, you’ll learn exactly how this trick works, why it works, and how you can apply it to boost your plant’s flowering power like never before.

Let’s dive into the complete guide to unleash tons of blooms on your Portulaca with minimal effort!


Why Portulaca Is the Perfect Flower for Beginners

Before we talk about the trick, it’s important to understand why Portulaca is such a popular choice:

  • Thrives in extreme heat
  • Needs very little water
  • Grows well in poor soil
  • Flowers almost daily in summer
  • Spreads beautifully and fills pots quickly
  • Ideal for hanging baskets and borders

Because Portulaca is a succulent-type plant, it stores water in its leaves and stems. This makes it extremely resistant to drought and sunlight.

But even the strongest plants need the right technique to push out more flowers.


The Simple Trick: Pinching and Pruning!

The number one method to increase Portulaca flowers is:

Pinching off the growing tips to force branching.

This single action multiplies the number of branches—and each branch produces multiple blooms. More branches = more flowers every single day.

Let’s break down how this trick works.


How Pinching Works (And Why It Boosts Blooming)

A Portulaca plant naturally grows slightly upright with a central main stem. As long as this main stem is intact, the plant focuses its energy on growing length—not flowers.

When you pinch the top:

  • The apical dominance is removed
  • The plant starts producing side shoots
  • These side shoots carry new buds
  • Flower density increases 3–5 times

Within 10–15 days, you’ll see new growth emerging from the nodes—and within 20–30 days, the plant becomes fuller and more flower-loaded.


How to Pinch or Prune Portulaca Properly

The method is quick, safe, and extremely simple.

Step-by-Step Instructions

Step 1: Identify the growing tip

Look at the end of each branch—you’ll see a tender, soft tip.

Step 2: Use fingers or small scissors

Pinching is best done by hand, but clean scissors also work.

Step 3: Remove ½ to 1 inch of the tip

Do not cut too deeply. Only the top soft part should be removed.

Step 4: Repeat for all long branches

Pinch every branch that is stretching too long and has fewer blooms.

Step 5: Allow it to rest

Wait 7–10 days, and you will see multiple branches sprouting.

Within a month, your Portulaca will transform from a thin, leggy plant into a dense, bushy, flower-loaded beauty.


When Should You Apply This Trick?

The best time to pinch Portulaca:

  • When the plant is 5–6 inches tall
  • When it looks leggy and stretched
  • After the first major wave of flowering
  • During spring and early summer

Avoid pinching just before monsoon because excess moisture may cause stem rot.


Additional Tips to Boost Flower Production Even More

Pinching alone works wonders, but if you combine it with these simple care tips, you’ll see maximum flowering in minimum time.


Give Your Portulaca Full Sunlight

Portulaca is a sun worshipper. The more sunlight it gets, the more it blooms.

Perfect Sunlight Condition:

  • 6–8 hours of direct sunlight: Ideal
  • 4 hours: Minimum for flowering
  • Less than 4 hours: Very few or no flowers

Place them on a terrace, sunny balcony, or anywhere they receive maximum heat.


Use the Right Soil Mix (Very Important)

The biggest mistake beginners make is using heavy soil. Portulaca hates wet, soggy soil.

Best Soil Mix for Massive Flowering:

  • 40% garden soil
  • 40% sand or perlite
  • 20% compost

This sandy, fast-draining mix helps roots stay healthy and encourages more blooms.


Water Only When Needed

Portulaca is a succulent. Overwatering stops blooming and causes rot.

Watering Rule:

Water only when the soil is completely dry.

In summers, watering every 2–3 days is enough. In monsoon, almost no watering is required.


Feed Them With a Bloom Booster

A small dose of fertilizer boosts flowering dramatically.

Best Fertilizers for Portulaca:

  • Banana peel fertilizer
  • Bone meal
  • Mustard cake (well-fermented)
  • NPK 0-52-34 (once a month for heavy bloom)

Avoid too much nitrogen—this grows leaves, not flowers.


Remove Dead Flowers (Deadheading)

Portulaca flowers bloom for one day only. Removing the dried blooms encourages the plant to produce more.

Deadheading Benefits:

  • Cleaner appearance
  • No energy wasted on seed formation
  • Faster blooming cycle

Just gently pluck off the dried flower heads every few days.


Avoid Crowded Pots

Portulaca spreads horizontally. If your pot is overloaded, the blooming reduces.

Ideal Pot Size:

  • 8–12 inch pot for 3–4 plants
  • Hanging baskets give excellent results
  • Wide containers work best

Spacing ensures each branch gets enough light and airflow.


What Results Can You Expect?

If you follow:

  • Pinching
  • Sunlight
  • Correct soil
  • Controlled watering
  • Occasional fertilizers

Your Portulaca will:

Produce double or triple the flowers
Grow thicker, healthier stems
Show daily blooming throughout summer
Spread beautifully and fill the pot
Look brighter and more vibrant

Expect a dramatic bloom increase within 20–30 days.


Common Mistakes to Avoid

Even though Portulaca is a hardy plant, these mistakes reduce flowering:

Overwatering
Heavy garden soil
No pruning
Keeping plants in shade
Too much nitrogen
Growing too many plants in one pot
Pinching during rainy season

Just avoid these, and your plant will reward you endlessly.


Why This Trick Works Every Time

Pinching redirects the plant’s energy from growing tall to growing wide—and a wider plant always produces more blooms.

This method is used by:

  • Professional gardeners
  • Nurseries
  • Commercial flower growers

And now you can use it too—without any tools or extra cost.


Final Thoughts: Boost Your Portulaca Flowers the Easy Way

If you want a bloom explosion in your garden, Portulaca is your best friend. With this simple pinching trick, you can transform even a weak plant into a flowering superstar. This method is so effective that you’ll see visible results in just a few weeks.

Try this today, and soon your terrace or balcony will look like a colorful carpet of blooms—bright, bold, and absolutely stunning!