Chickpeas, also known as garbanzo beans, are one of the most versatile and nutritious legumes. Packed with protein, fiber, vitamins, and minerals, they are a staple in many cuisines worldwide. While commonly grown in fields, chickpeas can also be successfully cultivated in a garden pot, making them ideal for urban gardeners or anyone with limited space. Growing chickpeas from seed to harvest in a simple garden pot is a rewarding experience that combines sustainable gardening, healthy eating, and the joy of nurturing a plant from its very beginning. This comprehensive guide will walk you through every step to achieve healthy chickpea plants in your own backyard or balcony.
Why Grow Chickpeas in a Pot?
Growing chickpeas in a pot has several advantages. Firstly, it requires minimal space, making it perfect for balconies, terraces, or small patios. Secondly, container gardening allows precise control over soil quality, watering, and sunlight, which is essential for chickpeas, as they are sensitive to overwatering and poor drainage. Thirdly, growing your own chickpeas ensures chemical-free, organic legumes that are fresher and more nutritious than store-bought options.
Potted chickpeas also offer educational value for beginners, teaching them about plant growth, legume biology, and sustainable gardening practices. The process—from soaking seeds to harvesting mature pods—connects gardeners with nature in a simple yet rewarding way.
Choosing the Right Chickpea Seeds
The first step in successful chickpea cultivation is selecting the right seeds. Chickpeas generally come in two types:
- Desi Chickpeas: Small, dark, and wrinkled seeds. They are hardy and produce a higher yield but may take slightly longer to mature.
- Kabuli Chickpeas: Larger, cream-colored seeds with a smooth surface. They have a milder flavor and shorter cooking time but require more consistent care.
Choose seeds suited to your local climate. Chickpeas thrive in areas with warm days and cool nights. Ensure that the seeds are fresh, high-quality, and untreated to guarantee maximum germination.
Selecting the Right Garden Pot
Chickpeas develop a deep taproot, so pot selection is crucial. A container with a depth of at least 30–35 centimeters and a diameter of 25–30 centimeters is ideal. Ensure that the pot has multiple drainage holes to prevent waterlogging, as chickpeas are highly susceptible to root rot in soggy conditions.
Terracotta, ceramic, or plastic pots all work, but terracotta pots are preferable because they allow better airflow and moisture regulation. If you plan to grow multiple plants, individual pots per seedling may produce better results than a single crowded container.

Preparing the Soil
Chickpeas grow best in well-drained, fertile soil. A potting mix enriched with organic compost or vermicompost provides nutrients and promotes root development. The soil should be slightly alkaline to neutral, with a pH between 6.0 and 7.5.
A recommended soil mixture for a garden pot is:
- 2 parts garden soil or potting soil
- 1 part compost or well-rotted manure
- 1 part coarse sand or perlite for drainage
Fill the pot with the soil mix, leaving about 2–3 centimeters at the top to prevent overflow when watering. Lightly water the soil before sowing seeds to ensure even moisture.
Pre-Soaking and Sowing Seeds
Chickpea seeds benefit from pre-soaking, which softens the hard seed coat and accelerates germination. Soak the seeds in water for 8–12 hours or overnight. This process also reduces the risk of seedling failure.
Plant seeds about 2–3 centimeters deep in the pot. Place one to two seeds per planting hole to ensure at least one healthy seedling emerges. Cover lightly with soil and press gently to secure contact.
Space seedlings evenly if planting multiple seeds in a single pot. Avoid overcrowding, as chickpeas need air circulation and room for root expansion.
Watering and Moisture Management
Proper watering is essential for chickpea growth. Overwatering is a common mistake that can lead to root rot, while underwatering can stunt growth and reduce yield.

Water the pot immediately after sowing to settle the soil. Keep the soil consistently moist during germination, which usually occurs within 7–10 days. Once seedlings emerge, reduce watering frequency but ensure the soil remains lightly moist.
During flowering and pod formation, maintain consistent moisture, as stress at this stage can cause flower drop and reduce pod development. Avoid wetting leaves excessively to prevent fungal infections.
Mulching around seedlings with straw or dried leaves helps retain moisture and suppresses weeds.
Sunlight and Temperature Requirements
Chickpeas require full sunlight to thrive. Place your pot in a location that receives at least 6–8 hours of direct sunlight daily. Inadequate sunlight can result in leggy, weak plants with reduced flowering.
Ideal daytime temperatures for chickpeas range between 21°C and 29°C. They can tolerate slightly cooler nights but are sensitive to frost. If growing in cooler climates, consider starting seeds indoors and transplanting them once temperatures stabilize.
Fertilization and Nutrition
Chickpeas are legumes, which means they can fix atmospheric nitrogen through symbiotic bacteria in their root nodules. However, young seedlings benefit from a gentle nutrient boost.
Apply a balanced, slow-release organic fertilizer when seedlings reach 4–5 weeks of age. Avoid excessive nitrogen fertilizers, as they encourage leafy growth at the expense of flowers and pods. Phosphorus and potassium are particularly important for root development, flowering, and pod formation.

Side-dressing with compost or liquid organic fertilizer every 3–4 weeks helps maintain soil fertility throughout the growing season.
Supporting Plants and Managing Growth
Chickpea plants can grow 30–60 centimeters tall, with sprawling branches. While they do not require heavy staking, supporting taller plants with small stakes or bamboo sticks prevents bending or breakage, especially in windy areas.
Regularly inspect the plant for weak, damaged, or diseased stems and remove them to maintain airflow and reduce pest infestations. Pruning is minimal but occasionally trimming excess side shoots can focus energy on pod production.
Pest and Disease Management
Even in pots, chickpeas are vulnerable to pests and diseases. Common issues include:
- Aphids: Small, sap-sucking insects that can stunt growth. Control with neem oil or insecticidal soap.
- Spider Mites: Tiny pests that cause yellowing and speckling of leaves. Spray with water or mild organic insecticides.
- Fungal Diseases: Root rot, powdery mildew, and leaf spots can occur if humidity is high. Ensure proper drainage, sunlight, and avoid overhead watering.
Regular monitoring and early intervention are crucial. Organic solutions are preferred for container-grown chickpeas to ensure edible pods remain chemical-free.
Flowering and Pollination
Chickpeas produce small, delicate flowers that develop into pods. Most chickpea varieties are self-pollinating, but insects like bees improve pollination efficiency and increase pod set.
Encourage pollinators by placing small flowering plants near your chickpea pot or keeping a balcony-friendly bee hotel. Gently shaking the plant during flowering can also help distribute pollen and improve fruiting.

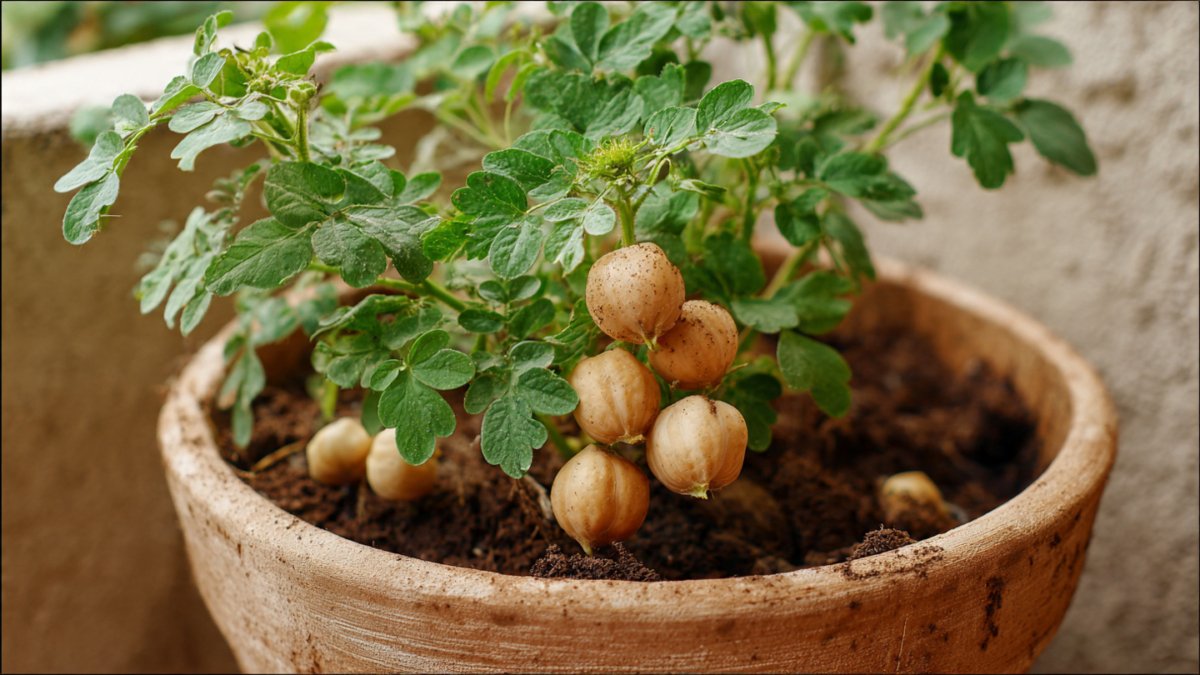
Pod Formation and Harvesting
After flowering, pods begin forming, typically taking 60–90 days to mature depending on variety and growing conditions. Pods are ready to harvest when they turn brown and dry on the plant.
For fresh green chickpeas (also known as chana), pick pods while they are still green and tender. For dried chickpeas, leave pods on the plant until fully matured and dry. Harvest in the morning for best results, and gently handle pods to avoid damaging seeds.
Store dried chickpeas in an airtight container in a cool, dry place. Fresh green chickpeas can be boiled, steamed, or added directly to salads and recipes.
Benefits of Growing Chickpeas in a Pot
Container-grown chickpeas offer several advantages:
- Space Efficiency: Ideal for urban homes, balconies, and small patios.
- Nutritional Value: Homegrown chickpeas are fresher and chemical-free.
- Educational Value: Teaches plant biology, sustainable gardening, and crop management.
- Sustainability: Reduces reliance on store-bought legumes and promotes eco-friendly practices.
- Aesthetic Appeal: Chickpea plants have delicate foliage and small flowers that enhance garden beauty.
Growing chickpeas from seed to harvest is not only productive but also fulfilling for gardeners of all skill levels.
Tips for Successful Container Gardening
- Rotate the pot occasionally to ensure all sides of the plant receive sunlight.
- Use a well-draining potting mix and avoid compacted soil.
- Keep the pot elevated slightly to ensure water drains freely from the bottom.
- Monitor for pests weekly and remove any infested leaves promptly.
- Record planting and harvest dates to track growth and improve future cycles.
Following these practices ensures healthy plants and a consistent yield of chickpeas.
Conclusion
Growing chickpeas in a simple garden pot is a practical, rewarding, and sustainable gardening endeavor. From choosing the right seeds and preparing the soil to caring for seedlings, managing water, and harvesting mature pods, every step contributes to healthy, productive plants. Container-grown chickpeas are perfect for urban gardeners, beginners, or anyone seeking a nutritious addition to their home garden.

By carefully managing sunlight, moisture, fertilization, and pest control, you can enjoy a full cycle of chickpeas from seed to harvest. This not only provides fresh legumes for your kitchen but also enhances your gardening skills and contributes to a greener, more sustainable lifestyle. With patience, attention, and simple gardening strategies, a small pot can yield a bounty of healthy chickpeas, bringing the satisfaction of homegrown food straight to your table.
Leave A Comment