As urban spaces become smaller and environmental concerns grow, many people are looking for creative ways to live more sustainably. One simple and effective solution is creating a vertical garden using recycled plastic bottles. This eco-friendly project helps reduce waste, saves space, and allows you to grow herbs, flowers, or vegetables even in limited areas. Whether you live in an apartment, have a small balcony, or want to add greenery to a wall or fence, a bottle-based vertical garden is an affordable and rewarding option.
This easy DIY guide will walk you through everything you need to know to create your own vertical garden from plastic bottles and enjoy the benefits of sustainable living.
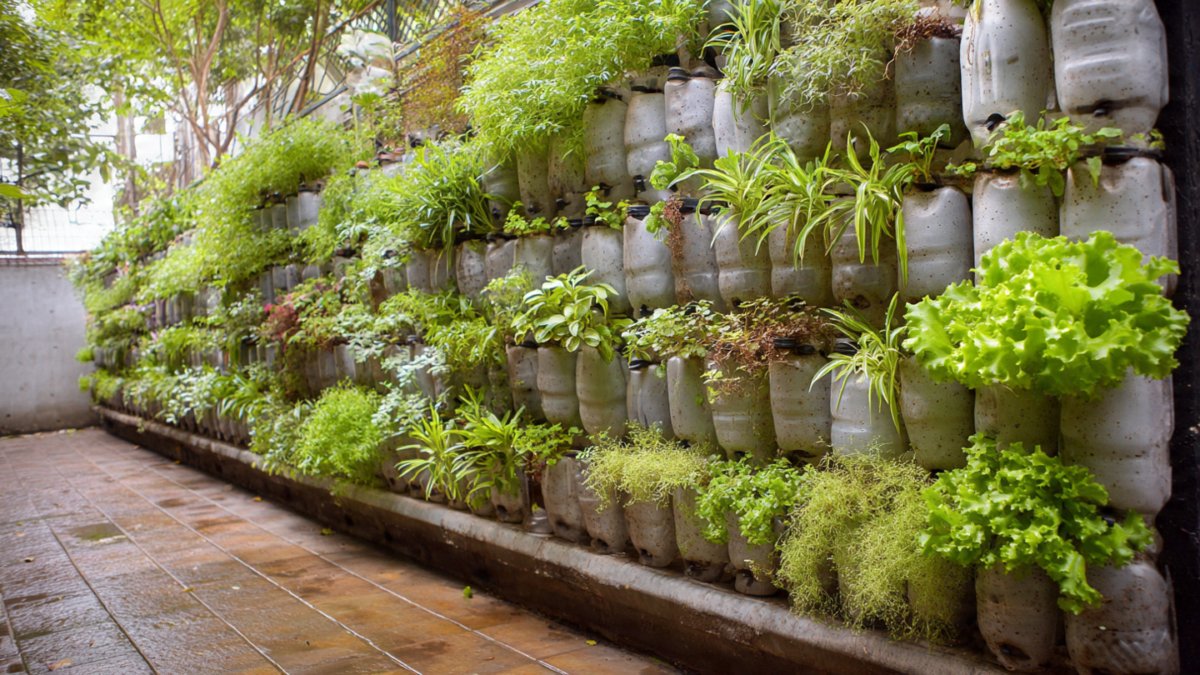
Why Choose a Plastic Bottle Vertical Garden?
Plastic bottles are one of the most common household waste items. Instead of throwing them away, reusing them for gardening gives them a second life and reduces environmental pollution.
Vertical gardens made from bottles are ideal for small spaces because they use vertical surfaces rather than horizontal ground. They are lightweight, customizable, and suitable for indoor or outdoor use. In addition, growing your own plants helps improve air quality, reduces grocery expenses, and promotes healthier eating habits.
This project is perfect for beginners, students, families, and anyone interested in green living without spending much money.
Materials You Will Need
Before starting, gather all the necessary materials. Most of these items are easy to find at home or in local stores.
You will need several clean plastic bottles, preferably 1.5-liter or 2-liter bottles. Transparent bottles work best, as they allow you to monitor soil moisture. You will also need a sharp cutter or scissors, a nail or screwdriver for making holes, strong string, rope, or wire, and hooks or wall nails for hanging.
Other essential materials include potting soil, compost, small stones or gravel for drainage, seeds or seedlings, and a marker for marking cut lines. Optional items include paint, brushes, and decorative materials if you want to personalize your garden.
Choosing the Right Location
Location plays a key role in the success of your vertical garden. Most plants need at least five to six hours of sunlight each day, so choose a spot that receives adequate light.

Good locations include balconies, window grills, terrace walls, fences, patios, or sunny indoor windows. If you plan to hang the bottles on a wall, make sure it is strong enough to support their weight when filled with soil and water.
Also consider accessibility. You should be able to water, trim, and harvest your plants easily. Avoid placing the garden where strong winds or heavy rain may damage it.
Preparing the Plastic Bottles
Start by washing the bottles thoroughly to remove any residue. Remove labels and let them dry completely.
Next, decide on the orientation. The most common method is horizontal placement, where the bottle lies on its side. Mark a rectangular opening on one side of each bottle using a marker. This opening will serve as the planting area.
Carefully cut along the marked lines using scissors or a cutter. Make sure the edges are smooth to avoid injury. Then, use a heated nail or screwdriver to make small drainage holes at the bottom of each bottle. These holes are essential to prevent water from collecting and causing root rot.
If you plan to hang the bottles vertically, make two small holes near both ends of the bottle for threading rope or wire.
Creating the Hanging System
A strong and secure hanging system is crucial for your vertical garden. Measure the distance between bottles and decide how many rows you want.
Cut equal lengths of rope or wire. Thread them through the holes you made in the bottles, ensuring each bottle is balanced. Tie strong knots below each bottle to keep them in place.
If you are attaching the bottles to a wall, install hooks, nails, or screws at equal distances. Hang the ropes on these supports, making sure everything is level and stable.

For fence or grill installations, you can tie the bottles directly using wire or zip ties.
Always test the setup by gently pulling on it before adding soil and plants.
Preparing the Soil Mix
Healthy soil is the foundation of successful gardening. Since bottles have limited space, the soil must be light, fertile, and well-draining.
A good basic mix includes two parts potting soil, one part compost, and one part coco peat or sand. Compost provides nutrients, while coco peat improves moisture retention and aeration.
If you are growing herbs or vegetables, you may add a small amount of organic fertilizer. Avoid using heavy garden soil, as it can become compacted and restrict root growth.
Mix all components thoroughly before filling the bottles.
Filling and Planting
Place a thin layer of small stones or gravel at the bottom of each bottle to improve drainage. Then fill the bottle with prepared soil, leaving about one inch of space at the top.
For seeds, follow the recommended planting depth mentioned on the seed packet. Usually, seeds should be planted shallowly and covered lightly with soil. Water gently after planting.
For seedlings, create a small hole in the soil, place the plant carefully, and press the soil around its base. Avoid damaging the roots.

Do not overcrowd each bottle. One medium-sized plant or two small herbs per bottle is usually enough.
Choosing the Right Plants
Not all plants are suitable for vertical bottle gardens. Choose varieties with shallow root systems and compact growth.
Herbs such as mint, basil, coriander, parsley, thyme, and oregano grow very well in bottles. Leafy greens like spinach, lettuce, fenugreek, and arugula are also excellent choices.
For flowers, consider petunias, marigolds, begonias, and pansies. These add color and attract pollinators.
Small vegetables like cherry tomatoes, chilies, strawberries, and spring onions can also thrive if given proper care.
Avoid plants with large root systems, such as pumpkins or potatoes, as they need more space.
Watering and Maintenance
Vertical gardens tend to dry out faster than ground gardens, so regular watering is essential. Check the soil daily by touching it. If it feels dry, water gently.
Water from the top so that excess moisture flows down to lower bottles. This ensures even distribution. However, avoid overwatering, as soggy soil can lead to fungal problems.
Fertilize every two to three weeks using diluted organic liquid fertilizer or compost tea. This replenishes nutrients in the limited soil space.

Prune dead leaves, trim overgrown plants, and remove weeds regularly to keep the garden healthy and attractive.
Managing Pests and Diseases
Vertical gardens are less prone to pests, but insects like aphids, mites, and caterpillars may still appear. Inspect plants weekly for signs of damage.
If pests are present, spray a mixture of neem oil and water or use mild soapy water. These natural remedies are safe and effective.
Ensure good airflow between bottles to prevent fungal diseases. Do not place bottles too close together, and avoid watering leaves directly.
Remove infected plants immediately to stop the spread of disease.
Decorating and Personalizing Your Garden
One of the joys of a DIY vertical garden is customization. You can paint bottles in bright colors, add labels, or create patterns on the wall.
You may organize plants according to color, type, or height for visual appeal. Mixing flowers and herbs creates both beauty and function.
Adding fairy lights, small name tags, or decorative stones can enhance the overall look, especially on balconies or patios.
A well-designed vertical garden can become a focal point of your home.

Environmental and Lifestyle Benefits
Creating a vertical garden from plastic bottles contributes directly to environmental protection. It reduces plastic waste, lowers carbon footprint, and promotes recycling.
Growing your own plants reduces dependence on packaged produce and helps you consume fresher, healthier food. Gardening also improves mental well-being, reduces stress, and encourages mindfulness.
For families, this project is an excellent way to teach children about sustainability and responsibility.
Final Thoughts
A vertical garden made from plastic bottles is a simple yet powerful step toward sustainable living. It transforms waste into beauty, saves space, and brings nature closer to your daily life.
With minimal cost and effort, you can create a thriving green wall that provides fresh herbs, colorful flowers, and personal satisfaction. By following this easy DIY guide, you can start your journey toward eco-friendly living and inspire others to do the same.
In a world where small actions make a big difference, your bottle garden is proof that sustainability can begin right at home.
Leave A Comment